|
|
< Day Day Up > |
|
NFS enables you to mount a file system on a remote computer as if it were local to your own system. You can then directly access any of the files on that remote file system. This has the advantage of allowing different systems on a network to access the same files directly, without each having to keep its own copy. Only one copy would be on a remote file system, which each computer could then access. You can find out more about NFS at its Web site at nfs.sourceforge.net.
| Note |
Mac OS X for Macintosh computers, which is based on BSD Unix, now supports NFS for file sharing. To access Apple file systems and printers using older Apple operating systems, you can use Netatalk. Netatalk implements the classic AppleTalk and AppleShare IP network protocol on Unix and Linux systems. The current Netatalk Web site is netatalk.sourceforge.net, with links to the FAQ and the HOW-TO sections. |
NFS operates over a TCP/IP network. The remote computer that holds the file system makes it available to other computers on the network. It does so by exporting the file system, which entails making entries in an NFS configuration file called /etc/exports, as well as by running several daemons to support access by other systems. These include rpc.mountd, rpc.nfsd, and rpc.portmapper. Access to your NFS server can be controlled by the /etc/hosts.allow and /etc/hosts.deny files. The NFS daemons are listed here:
rpc.nfsd Receives NFS requests from remote systems and translates them into requests for the local system.
rpc.mountd Performs requested mount and unmount operations.
rpc.portmapper Maps remote requests to the appropriate NFS daemon.
rpc.rquotad Provides user disk quote management.
rpc.statd Provides locking services when a remote host reboots.
rpc.lockd Handles lock recovery for systems that have gone down.
| Note |
It is advisable to use NFS on a local secure network only. If used over the Internet, NFS would open your system up to nonsecure access. |
On Red Hat, you can start up and shut down the NFS daemons using the /etc/rc.d/init.d/nfs service, which you can invoke with the service command, service nfs start. To have NFS started automatically, you can use chkconfig or the redhat-config-services tool to specify the runlevels at which it will operate. The following example will have NFS start up automatically at runlevels 3 and 5 on Red Hat:
chkconfig -level 35 nfs on
The nfs script will start up the portmapper, nfsd, mountd, and rquotad daemons. To enable NFS locking, you use the nfslock script. This will start up the statd and lockd daemons. NFS locking provides for better recovery from interrupted operations that can occur from system crashes on remote hosts.
To see if NFS is actually running, you can use the rpcinfo command with the -p option as shown here. You should see entries for mountd and nfs. If not, NFS is not running.
The NFS package also includes analytical tools with which you can measure the performance of a NFS server. nhfsstone will generate performance data on specified test directories by generating an artificial load (demand on the server) based on a range of different NFS operations. nhfsrun will run nhfsstone with a variety of loads. You can use nhfsnum to generate a graph of the data, and nhfsgraph for a PostScript version. nfsstat will display current statistical information about NFS clients and servers. You can narrow your request to information on just the network activity, the NFS protocol, server usage, or RPC data.
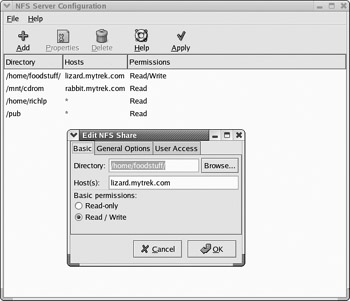
Instead of manually mounting and configuring NFS directories, you can use the Red Hat NFS Configuration Tool (redhat-config-nfs). Select NFS Server from the Server Settings window. This opens the NFS Server Configuration Tool window as shown in Figure 36-1. Be sure your NFS server software is installed (redhat-config-packages) and that the NFS server is running (redhat-config-services).
To add a directory to share, click the Add button to open an Add NFS Share dialog window, similar to the Edit NFS Share window shown in Figure 36-1. You can browse for or enter the directory to be shared in the Directory box. You then list the host where it is located, and specify the access permissions. On the General Options tab, you can set basic security and update features such as insecure file locking or immediate syncing of write operations. By default, the Sync Write Operations On Request option is set. On the User Access tab, you can treat users as local root users or as anonymous users with specific user or group IDs.
When you click OK, the entry will be listed in the NFS Server Configuration window. Changes do not take effect until you click Apply. This will create an entry in the /etc/exports file for the shared directory. You can later change any of these settings by selecting the entry and clicking Properties to open an Edit dialog box. To save your settings, click Apply.
Figure 36-1 shows the same entries that are used in the /etc/exports file described in the next section. The /etc/exports file generated by the NFS Server Configuration tool using this example is shown here.
/home/foodstuff/         lizard.mytrek.com(rw,sync)
/mnt/cdrom               rabbit.mytrek.com(ro,sync)
/home/richlp             *(ro,sync)
/pub                     *(ro,insecure,sync,all_squash)
Options set in the Basic, General Options, and User Access panels show up as options listed for each entry. For example, Read access is ro and Read/Write access is rw. Check the NFS Server Configuration help documents for a complete listing. Options are listed in Table 36-1.
An entry in the /etc/exports file specifies the file system to be exported and the hosts on the network that can access it. For the file system, enter its mountpoint, the directory to which it was mounted on the host system. This is followed by a list of hosts that can access this file system along with options to control that access. A comma-separated list of export options placed within a set of parentheses may follow each host. For example, you might want to give one host read-only access and another read and write access. If the options are preceded by an * symbol, they are applied to any host. A list of options is provided in Table 36-1. The format of an entry in the /etc/exports file is shown here:
directory-pathname host-designation(options)
You can have several host entries for the same directory, each with access to that directory:
directory-pathname host(options) host(options) host(options)
You have a great deal of flexibility when specifying hosts. For hosts within your domain, you can just use the hostname, whereas for those outside, you need to use a fully qualified domain name. You could also just use the host's IP address. Instead of just a single host, you can reference all the hosts within a specific domain, allowing access by an entire network. A simple way to do this is to use the * for the host segment, followed by the domain name for the network, such as *.mytrek.com for all the hosts in the mytrek.com network. Instead of domain names, you could use IP network addresses using a CNDR format where you specify the netmask to indicate a range of IP addresses. You can also use an NIS netgroup name to reference a collection of hosts. The NIS netgroup name is preceded by a @ sign.
directory      host(options)
directory      *(options)
directory      *.domain(options)
directory      192.168.1.0/255.255.255.0(options)
directory      @netgroup(options)
Options in /etc/exports operate as permissions to control access to exported directories. Read-only access is set with the ro option, and read/write with the rw option. The sync and async options specify whether a write operation is performed immediately (sync) or when the server is ready to handle it (async). By default, write requests are checked to see if they are related, and if so, they are written together (wdelay). This can degrade performance. You can override this default with no_wdelay and have writes executed as they are requested. If two directories are exported, where one is the subdirectory of another, the subdirectory is not accessible unless it is explicitly mounted (hide). In other words, mounting the parent directory does not make the subdirectory accessible. The subdirectory remains hidden until also mounted. You can overcome this restriction with the no_hide option (though this can cause problems with some file systems). If an exported directory is actually a subdirectory in a larger file system, its parent directories are checked to make sure that the subdirectory is the valid directory (subtree_check). This option works well with read-only file systems but can cause problems for write-enabled file systems, where filenames and directories can be changed. You can cancel this check with the no_subtree_check option.
|
General Options |
Description |
|---|---|
|
secure |
Requires request originate on secure ports, those less than 1024. This is on by default. |
|
insecure |
Turns off the secure option. |
|
ro |
Allows only read-only access. This is the default. |
|
rw |
Allows read/write access. |
|
sync |
Performs all writes when requested. This is the default. |
|
async |
Performs all writes when the server is ready. |
|
no_wdelay |
Performs writes immediately, not checking to see if they are related. |
|
wdelay |
Checks to see if writes are related, and, if so, waits to perform them together. Can degrade performance. This is the default. |
|
hide |
Automatically hides an exported directory that is the subdirectory |
|
no_hide |
Does not hide an exported directory that is the subdirectory of another exported directory (opposite of hide). Only works for |
|
subtree_check |
Checks parent directories in a file system to validate an exported subdirectory. This is the default. |
|
no_subtree_check |
Does not check parent directories in a file system to validate an exported subdirectory. |
|
insecure_locks |
Does not require authentication of locking requests. Used for older NFS versions. |
|
User ID Mapping |
Description |
|
all_squash |
Maps all UIDs and GIDs to the anonymous user. Useful for NFS-exported public FTP directories, news spool directories, and so forth. |
|
no_all_squash |
The opposite option to all_squash. This is the default setting. |
|
root_squash |
Maps requests from remote root user to the anonymous UID/GID. This is the default. |
|
no_root_squash |
Turns off root squashing. Allows the root user to access as the remote root. |
|
anonuid
|
Sets explicitly the UID and GID of the anonymous account used for all_squash and root_squash options. The defaults are nobody and nogroup. |
Along with general options, there are also options that apply to user-level access. As a security measure, the client's root user is treated as an anonymous user by the NFS server. This is known as squashing the user. In the case of the client root user, squashing prevents the client from attempting to appear as the NFS server's root user. Should you want a particular client's root user to have root-level control over the NFS server, you can specify the no_root_squash option. To prevent any client user from attempting to appear as a user on the NFS server, you can classify them as anonymous users (the all_squash option). Such anonymous users would only have access to directories and files that are part of the anonymous group.
Normally, if a user on a client system has a user account on the NFS server, that user can mount and access his or her files on the NFS server. However, NFS requires the User ID for the user be the same on both systems. If this is not the case, he or she is considered two different users. To overcome this problem, you could use an NIS service, maintaining User ID information in just one place, the NIS password file (see the following section for information on NIS).
Examples of entries in an /etc/exports file are shown here. Read-only access is given to all hosts to the file system mounted on the /pub directory, a common name used for public access. Users, however, are treated as anonymous users (all_squash). Read and write access is given to the lizard.mytrek.com computer for the file system mounted on the /home/foodstuff directory. The next entry would allow access by rabbit.mytrek.com to the NFS server's CD-ROM, using only read access. The last entry allows anyone secure access to /home/richlp.
Each time your system starts up the NFS server (usually when the system starts up), the /etc/exports file will be read and those directories specified will be exported. When a directory is exported, an entry for it is made in the /var/lib/nfs/xtab file. It is this file that NFS reads and used to perform the actual exports. Entries are read from /etc/exports and corresponding entries made in /var/lib/nfs/xtab. The xtab file maintains the list of actual exports.
If you want to export added entries in the /etc/exports file immediately, without rebooting, you can use the exportfs command with the -a option. It is helpful to add the -v option to display the actions that NFS is taking. Use the same options to effect any changes you make to the /etc/exports file.
exportfs -a -v
If you later make changes to the /etc/exports file, you can use the -r option to re-export its entries. The -r option will resync the /var/lib/nfs/xtab file with the /etc/exports entries, removing any other exports or any with different options.
exportfs -r -v
To both export added entries and re-export changed ones, you can combine the -r and -a options.
exportfs -r -a -v
You can also use the exportfs command to manually export file systems instead of using entries for them in the /etc/exports file. Export entries will be added to the /var/lib/nfs/xtab file directly. With the -o option, you can list various permissions, and then follow them with the host and file system to export. The host and file system are separated by a colon. For example, to manually export the /home/myprojects directory to golf.mytrek.com with the permissions ro and insecure, you would use the following:
exportfs -o rw,insecure golf.mytrek.com:/home/myprojects
You can also use exportfs to unexport a directory that has already been exported, either manually or by the /etc/exports file. Just use the -u option with the host and the directory exported. The entry for the export will be removed from the /var/lib/nfs/xtab file. The following example will unexport the /home/foodstuff directory that was exported to lizard.mytrek.com:
exportfs -u lizard.mytrek.com:/home/foodstuff
The /etc/hosts.allow and /etc/hosts.deny files are used to restrict access to services provided by your server to hosts on your network or on the Internet (if accessible). For example, you can use the hosts.allow file to permit access by certain hosts to your FTP server. Entries in the hosts.deny file would explicitly deny access to certain hosts. For NFS, you can provide the same kind of security by controlling access to specific NFS daemons.
| Note |
You can further secure your NFS transmissions by having them operate over TCP instead of UDP. Use the tcp option to mount your NFS file systems (UDP is the default). However, performance does degrade for NFS when it uses TCP. |
The first line of defense is to control access to the portmapper service. The portmapper tells hosts where the NFS services can be found on the system. Restricting access does not allow a remote host to even locate NFS. For a strong level of security, you should deny access to all hosts except those that are explicitly allowed. In the hosts.deny file, you would place the following entry, denying access to all hosts by default. ALL is a special keyword denoting all hosts.
portmap:ALL
In the hosts.allow file, you would then enter the hosts on your network, or any others that you would want to permit access to your NFS server. Again, you would specify the portmapper service, then list the IP addresses of the hosts you are permitting access. You can list specific IP addresses or a network range using a netmask. The following example allows access only by hosts in the local network, 192.168.0.0, and to the host 10.0.0.43. You can separate addresses with commas.
portmap: 192.168.0.0/255.255.255.0, 10.0.0.43
The portmapper is also used by other services such as NIS. If you close all access to the portmapper in hosts.deny, you will also need to allow access to NIS services in hosts.allow, if you are running them. These include ypbind and ypserver. In addition, you may have to add entries for remote commands like ruptime and rusers, if you are supporting them.
In addition, it is also advisable to add the same level of control for specific NFS services. In the hosts.deny file, you would add entries for each service, as shown here:
mountd:ALL
rquotad:ALL
statd:ALL
lockd:ALL
Then, in the hosts.allow file, you can add entries for each service:
mountd:  192.168.0.0/255.255.255.0, 10.0.0.43
rquotad: 192.168.0.0/255.255.255.0, 10.0.0.43
statd:   192.168.0.0/255.255.255.0, 10.0.0.43
lockd:   192.168.0.0/255.255.255.0, 10.0.0.43
You can further control access using Netfilter to check transmissions from certain hosts on the ports used by NFS services. See Chapter 19 for an explanation of Netfilter. The portmapper uses port 111 and nfsd uses 2049. Netfilter is helpful if you have a private network that has an Internet connection, and you want to protect it from the Internet. Usually a specific network device, such as an Ethernet card, is dedicated to the Internet connection. The following examples assume that device eth1 is connected to the Internet. Any packets attempting access on ports 111 and 2049 are refused.
iptables -A INPUT -i eth1 -p 111 -j DENY
iptables -A INPUT -i eth1 -p 2049 -j DENY
To enable NFS for your local network, you will have to allow packet fragments. Assuming that eth0 is the device used for the local network, you could use the following example:
iptables -A INPUT -i eth0 -f -j ACCEPT
| Note |
A root user on a remote host can try to access a remote NFS server as a root user with root level permissions. The root_squash option (a default) will automatically change the remote root user to the nobody (anonymous) user. |
Once NFS makes directories available to different hosts, those hosts can then mount those directories on their own systems and access them. The host needs to be able to operate as an NFS client. Current Linux kernels all have NFS client capability built in. This means that any NFS client can mount a remote NFS directory that it has access to by performing a simple mount operation.
You can mount an NFS directory either by an entry in the /etc/fstab file or by an explicit mount command. You have your NFS file systems mounted automatically by placing entries for them in the /etc/fstab file. An NFS entry in the /etc/fstab file has a mount type of NFS. An NFS file system name consists of the hostname of the computer it is located on, followed by the pathname of the directory where it is mounted. The two are separated by a colon. For example, rabbit.trek.com:/home/project specifies a file system mounted at /home/project on the rabbit.trek.com computer. The format for an NFS entry in the /etc/fstab file follows. Notice that the file type is nfs.
host:remote-directory local-directory nfs options 0 0
You can also include several NFS-specific mount options with your NFS entry. You can specify the size of datagrams sent back and forth, and the amount of time your computer waits for a response from the host system. You can also specify whether a file system is to be hard-mounted or soft-mounted. For a hard-mounted file system, your computer continually tries to make contact if for some reason the remote system fails to respond. A soft-mounted file system, after a specified interval, gives up trying to make contact and issues an error message. A hard mount is the default. A system making a hard-mount attempt that continues to fail will stop responding to user input as it tries continually to achieve the mount. For this reason, soft mounts may be preferable, as they will simply stop attempting a mount that continually fails. Table 36-2 and the Man pages for mount contain a listing of these NFS client options. They differ from the NFS server options indicated previously.
An example of an NFS entry follows. The remote system is rabbit.mytrek.com, and the file system is mounted on /home/projects. This file system is to be mounted on the local system as the /home/dylan/projects directory. The /home/dylan/projects directory must already be created on the local system. The type of system is NFS, and the timeo option specifies the local system waits up to 20 tenths of a second (two seconds) for a response. The mount is a soft mount and can be interrupted by NFS.
rabbit.mytrek.com:/home/projects /home/dylan/projects nfs soft,intr,timeo=20
You can also use the mount command with the -t nfs option to mount an NFS file system explicitly. To mount the previous entry explicitly, use the following command:
# mount -t nfs -o soft,intr,timeo=20   \
          rabbit.mytrek.com:/home/projects   /home/dylan/projects
You can, of course, unmount an NFS directory with the umount command. You can specify either the local mountpoint or the remote host and directory, as shown here:
umount /home/dylan/projects
umount  rabbit.mytrek.com:/home/projects
| Note |
On Red Hat systems, you can also mount and unmount all your NFS file systems at once with the /etc/rc.d/init.d/netfs script, which you can invoke with the service command. This script reads the NFS entries in the /etc/fstab file, using them to mount and unmount NFS remote directories. Using the stop argument unmounts the file systems, and with the start argument, you mount them again. The restart argument first unmounts and then remounts the file systems. |
You can also mount NFS file systems using the automount service, autofs. This requires added configuration on the client's part. The autofs service will mount a file system only when you try to access it. A directory change operation (cd) to a specified directory will trigger the mount operation, mounting the remote file system at that time.
The autofs service is configured using a master file to list map files, which in turn lists the file systems to be mounted. The /etc/auto.master file is the autofs master file. The master file will list the root pathnames where file systems can be mounted along with a map file for each of those pathnames. The map file will then list a key (subdirectory), mount options, and the file systems that can be mounted in that root pathname directory. On some distributions, the /auto directory is already implemented as the root pathname for files systems automatically mounted. You could add your own in the /etc/auto.master file along with your own map files, if you wish. You will find that the /etc/auto.master file contains the following entry for the /auto directory, listing auto.misc as its map file:
/auto auto.misc --timeout 60
Following the map file, you can add options, as shown in the preceding example. The timeout option specifies the number of seconds of inactivity to wait before trying to automatically unmount.
In the map file, you list the key, the mount options, and the file system to be mounted. The key will be the subdirectory on the local system where the file system is mounted. For example, to mount the /home/projects directory on the rabbit.mytrek.com host to the /auto/projects directory, you would use the following entry:
projects soft,intr,timeo=20 rabbit.mytrek.com:/home/projects
You could also create a new entry in the master file for an NFS file system, as shown here:
/myprojects auto.myprojects --timeout 60
You would then create an /etc/auto.myprojects file and place entries in it for NFS files system mounts, like the following:
dylan    soft,intr,rw   rabbit.mytrek.com:/home/projects
newgame  soft,intr,ro   lizard.mytrek.com:/home/supergame
| Note |
The autofs service can be used for any file systems, including floppy disks and CD-ROMs. See Chapter 30. |
|
Options |
Description |
|---|---|
|
rsize=n |
The number of bytes NFS uses when reading files from an NFS server. The default is 1,024 bytes. A size of 8,192 can greatly improve performance. |
|
wsize=n |
The number of bytes NFS uses when writing files to an NFS server. The default is 1,024 bytes. A size of 8,192 can greatly improve performance. |
|
timeo=n |
The value in tenths of a second before sending the first retransmission after a timeout. The default value is seven-tenths of a second. |
|
retry=n |
The number of minutes to retry an NFS mount operation before giving up. The default is 10,000 minutes (one week). |
|
retrans=n |
The number of retransmissions or minor timeouts for an NFS mount operation before a major timeout (default is 3). At that time, the connection is cancelled or a "server not responding" message is displayed. |
|
soft |
Mount system using soft mount. |
|
hard |
Mount system using hard mount. This is the default. |
|
intr |
Allow NFS to interrupt the file operation and return to the calling program. The default is not to allow file operations to be interrupted. |
|
bg |
If the first mount attempt times out, continue trying the mount in the background. The default is to fail without backgrounding. |
|
tcp |
Mount the NFS file system using the TCP protocol, instead of the default UDP protocol. |
|
|
< Day Day Up > |
|
| This HTML Help has been published using the chm2web software. |