|
|
< Day Day Up > |
|
11.2 SambaOnce you've configured your hostnames, you're ready to provide services to hosts on the network. To provide printer and file sharing, Windows uses a facility known as the Server Message Block (SMB). This same facility is sometimes known as the Common Internet File System (CIFS), NetBIOS, or LanManager. Thanks to Andrew Tridgell and others, Linux systems provide support for SMB via a package known as Samba. Like SMB, Samba lets you:
Samba has proven its reliability and high performance in many organizations. According to the survey at http://www.samba.org/pub/samba/survey/ssstats.html, Bank of America is using Samba in a configuration that includes about 15,000 clients, and Hewlett-Packard is using Samba in a configuration that includes about 7,000 clients. 11.2.1 Installing the Samba ServerIf you've never installed and configured a network server, Samba is a good place to begin; its installation and configuration are generally straightforward. The Samba server includes the nmbd and smbd programs (which run as daemons), several utility programs, manpages and other documentation, and three configuration files: /etc/samba/smbusers, /etc/samba/smb.conf, and /etc/samba/lmhosts. The smbusers file associates several user accounts that are special to Samba with Linux user accounts; for example, it associates the Samba user IDs, administrator and admin, with root. Generally, you don't need to change smbusers. Likewise, you don't generally need to revise lmhosts. You'll learn how to configure the smb.conf file shortly. The simplest way to install Samba is to select the Windows File Server package group during system installation. However, if you failed to do so, you can install Samba by using the Package Management Tool. 11.2.2 Configuring SambaThe /etc/samba/smb.conf file lets you specify a variety of options that control Samba's operation. You can edit the file by using your favorite text editor; however, the Samba Server Configuration Tool enables you to view and change options using your web browser, which is generally much easier than using a text editor. The Samba Server Configuration tool verifies the values of parameters you enter and provides online help. To install the Samba Server Configuration Tool, select System
Settings Figure 11-3. The Samba Server Configuration screen Configuring your Samba server involves configuring:
The following three sections explain how to configure your server.
11.2.2.1 Configuring Samba security options
To configure your Samba server, select
Preferences Figure 11-4. The Basic tab of the Server Settings dialog box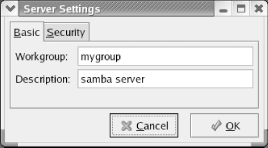 The Security tab (Figure 11-5) enables you to specify options that control access to your server and the file and printer shares it provides. Figure 11-5. The Security tab of the Server Settings dialog box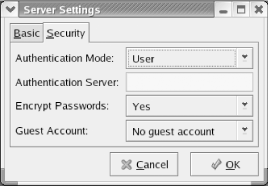 The most important security option is the authentication mode, which determines how the server decides who can use which shared files and printers. The dialog box provides five authentication modes from which you can choose:
The default authentication mode, User, is appropriate for most common situations. The Encrypt Password option is initially enabled. You should not disable this option if your network includes clients using Windows 98 or any more recent version of Windows. PCs running recent versions of Windows send passwords in encrypted form and, unless the appropriate option is enabled, your Samba server will be unable to communicate properly with them. The Guest Account option enables you to specify a default account, known as the guest account. Users logging into your Samba server will automatically receive the privileges assigned to the guest account in addition to any privileges assigned to their personal account. To maximize LAN security, you should not specify a guest account. After specifying the security options, click OK. The Server Settings dialog box saves your changes, which take effect immediately. 11.2.2.2 Configuring Samba users To
configure Samba users, select Preferences Figure 11-6. The Samba Users dialog box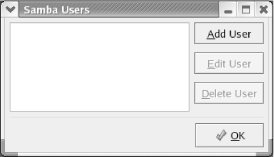 To create a new Samba user, click the Add User button. The Create New Samba User dialog box (Figure 11-7) appears. Choose an existing Linux username by using the listbox titled Unix Username. The user will receive the privileges associated with the specified username. The user may log in to the Samba server by using a different username. Specify the login username by using the textbox labeled Windows Username. Finally, specify the password by entering in the the textboxes labeled Samba Password and Confirm Samba Password. Click OK to create the Samba user.. Figure 11-7. The Create New Samba User dialog box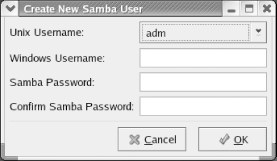
You can use the Samba Users dialog box to edit or delete a Samba user. To do so, highlight the user and click Edit User or Delete User, as appropriate.
11.2.2.3 Configuring Samba sharesOnce you've configured one or more Samba users, you're ready to configure Samba shares. To do so, click Add on the Samba Server Configuration Tool toolbar. The Create Samba Share dialog box, shown in Figure 11-8, appears.
Figure 11-8. The Create Samba Share dialog box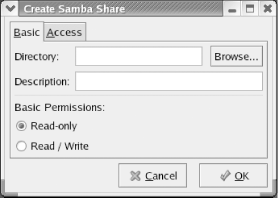 To specify the Linux directory to be shared, enter the directory name in the textbox labeled Directory or use the Browse button to choose a directory. You can specify a description of the share in the textbox labeled Description. By default, users are permitted only read access to shares. If you want users to be able to write to the share, enable the Read/Write radiobutton. Click OK to save your changes and immediately activate the share. If you want to limit access to the share to certain users, you can use the Access tab of the Create Samba Share dialog box (Figure 11-9). Enable the radiobutton labeled "Only allow access to specific users," and enable the checkbox associated with users permitted to access the share. Figure 11-9. The Access tab of the Create Samba Share dialog box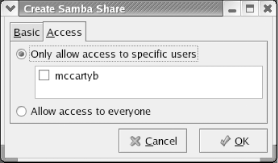 11.2.3 Starting and Stopping SambaIf you want Samba to start automatically when you boot your system, use the Service Configuration Tool, described in Chapter 9, to associate the smb service with the current runlevel. To stop Samba, highlight the Service Configuration Tool's entry for the smb service and click Stop. 11.2.4 Troubleshooting Samba
To verify that Samba is
working, use the Create Samba Share dialog box to temporarily create
a read-only share accessible to an arbitrary Samba user. On the
Windows host, launch the Explorer and choose Tools If you can't access the share, consider the following likely reasons:
If your host
firewall is enabled, Samba will not function. You can easily disable
the host firewall. However, you should not do so if your system
resides on a LAN that is connected to the Internet or another
un-trusted network unless the LAN is protected by a network firewall,
such as a gateway router. To disable the firewall, select System
Settings If you're unable to find the problem, consult the documentation that accompanies Samba. In particular, use a web browser to peruse the file diagnosis.html, which resides in the /usr/share/doc/samba-*/docs/htmldocs directory. This file includes a step-by-step procedure for verifying the operation of your Samba server. When a step fails, you can consult the file to determine the likely causes and how to go about fixing the problem. Chances are, you'll be able to administer Samba without outside help, but if not, you'll find the participants in the comp.protocols.smb newsgroup to be helpful. Another resource is O'Reilly's Using Samba, by Robert Eckstein, David Collier-Brown, and Peter Kelly. Since the book was published under the Open Publication License (OPL), Using Samba is also available online in electronic form at http://www.oreilly.com/catalog/samba. Like any network server, Samba provides a wealth of options and facilities. If you thoroughly explore these facilities, you're likely to break your server. To avoid problems, you should keep a backup copy of your /etc/samba/smb.conf file. Doing so can be as easy as issuing the following command after Samba is up and running: # cp /etc/samba/smb.conf /etc/samba/smb.conf.bak Then, if your server ceases to work, you can restore your old configuration by issuing the command: # cp /etc/samba/smb.conf.bak /etc/samba/smb.conf You'll also need to restart the smb service. 11.2.5 Samba Client Configuration and UseOnce you've got your Samba server up and running, you can access it via Windows and Linux. This section shows you how to access the Samba server and also how to use your Samba server to create backups of important datafiles on client systems. SMB clients are also available for most popular operating systems, including OS/2 and Mac OS (including Mac OS X). You shouldn't expect to have trouble getting them to work with Samba. If your client seems not to work, simply follow the procedure given earlier in Section 11.2.4. 11.2.5.1 Windows clientWindows 3.11, 9x, Me, and NT—including Windows 2000 and XP, which are updated releases of Windows NT—have built-in support for the SMB protocol, so systems running these operating systems can easily access your Samba server's resources. Under Windows 9x/NT, you can access Samba resources by using the Windows Explorer. Log on with a user account that's authorized to access Samba resources, then click Network Neighborhood, and you should see a subtree that corresponds to your workgroup. Click that subtree, and you should see a subtree that corresponds to your Samba server. By expanding the subtree, you can see the browseable file and printer shares that are available. You can easily drag-and-drop files to and from a shared directory, assuming your user account is permitted the necessary access. To use a shared printer, click Start You can map a file share to a drive letter by using the Tools If you have difficulty connecting to your Samba server, follow the procedure given earlier in Section 11.2.4. The Samba package includes a simple SMB client that can access your Samba server and other SMB servers accessible to your system. To demonstrate that your client and server are working, log on using a user account that has Samba authorization and issue the following command: $ smbclient -L localhost If you're prompted for a password, be sure to enter the Samba password for the user account rather than the Linux password. You should see a list of the browseable shares available on your server. To query a different SMB server, issue the following command: $ smbclient -L server where server is the name of the SMB server you want to contact. Rather than logging on using an authorized user account, you can explicitly specify a user account by using this command form: $ smbclient -L server -U userid To actually access resources via SMB, use the following command form: $ smbclient ' service ' -U userid where service specifies the name of the SMB host and share and userid specifies the user account to be used. The name of the SMB host should be preceded by two slashes and followed by one slash; for example: $ smbclient //server/myshare -U billmccarty
If the SMB server accepts your request, the client displays a special prompt: smb: dir> where dir indicates the current working directory on the SMB server. To download a file from the server, issue the command: get file where file specifies the name of the file to be downloaded. To upload a file to the server, issue the command: put file where file specifies the name of the file. To list the contents of the current directory, issue the command: dir To enter a subdirectory, issue the following command, where dir specifies the name of the subdirectory: cd dir You can return to the parent directory by issuing the command: cd .. You can obtain a list of commands by issuing the command help or, to obtain help on a particular command, by issuing the command: help command where command specifies the command that you need help with. To exit the SMB client, issue the command exit. You can use the smbprint script included in the Samba package to print Linux files by using a printer share. However, you'll probably have to do some tweaking of configuration files and adjusting of shell scripts to get smbprint to work. 11.2.5.2 Using the Linux Samba client for file backup and recoveryOne of the most practical uses of the Linux SMB client is creating backup copies of files stored on a Windows system. To do so, simply share the drive or directory containing the files you want to back up. Using the Windows Explorer, right-click the drive or directory, click Properties, click the Sharing tab, and select the desired share options. Then, access the share from Linux using smbclient. Once you have the SMB prompt, move to the directory you want to back up and issue the SMB tar command: tar c backup.tar The syntax of the SMB tar command resembles that of the tar command, though it supports only a handful of options. When you issue the SMB tar command with the c option, the files of the current directory and all its subdirectories will be backed up and stored in the file backup.tar on your Linux system. Of course, you can specify a filename other than backup.tar if you wish (although the .tar extension is required). Once you've created the backup file, you can write it to a tape, a writable CD-ROM, or other media. If your backup requirements are meager, it may be sufficient merely to have a copy of the file on both your Windows and Linux systems. To restore a backup, move to the directory where you want the files restored and issue the SMB tar command: tar x backup.tar The SMB client restores each file from the backup.tar file. Of course, you must have write access to the shared directory in order to be able to restore files. |
|
|
< Day Day Up > |
|
| This HTML Help has been published using the chm2web software. |