|
|
< Day Day Up > |
|
9.2 Administering Your System by Using the System Tools MenuThe System Tools menu of the GNOME and KDE desktops provides access to a set of tools that help you administer your system. The distinction between these tools and the tools provided by the System Settings menu is rather arbitrary. That is, any given tool could as likely have been placed on one menu rather than the other. Generally, items on the System Tools menu perform an action, whereas items on the System Settings menu let you configure a facility. But, exceptions to this rule of thumb abound. The tools provided by the System Tools menu are:
The contents of the System Tools menu vary somewhat, depending on the packages you've installed and which desktop (GNOME or KDE) you're using. This section describes several of the tools that appear on the menu. However, it does not explain the Floppy Formatter, since that tool appears only on the GNOME menu and since its functions are also provided by the Disk Manager. Some of the tools are described elsewhere in this book. For instance, Chapter 8 explains the Red Hat Update Agent. The Network Device Control tool concerns network configuration and administration, which are topics considered in Chapter 10 and Chapter 11. The Kickstart tool is primarily used by enterprise system administrators and is not described in this book. And, I dispense with explanation of the Terminal tool, since it merely launches a familiar terminal window. 9.2.1 Managing Disks
The
Disk Management tool (Figure 9-20) lets you mount
and unmount filesystems. It also lets you format filesystems. To
launch the tool, choose System Tools Figure 9-20. The Disk Management tool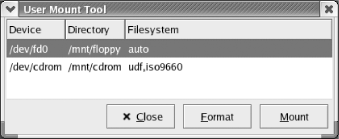 The tool shows a list of configured filesystems, taken from /etc/fstab. To mount a filesystem, select the filesystem and click Mount. If you mount a floppy or CD-ROM under GNOME, an icon representing the mounted filesystem appears on the desktop. Click the icon to browse the filesystem. To unmount a mounted filesystem, select the filesystem and click Unmount. The usual restrictions apply concerning the inability to unmount a file that is in use. To format a filesystem, select the unmounted filesystem and click Format. A dialog box appears, as shown in Figure 9-21. This dialog box lets you choose the type of filesystem to create. For floppies, you may find it convenient to use the vfat file system, which can be read by Linux and Windows 9x, ME, 2000, and XP. For other purposes, you should generally use the standard Linux filesystem type, ext3. The dialog box also lets you choose whether a low-level format should be performed. Generally, you should perform a low-level format only when formatting a floppy. Figure 9-21. Formatting a filesystem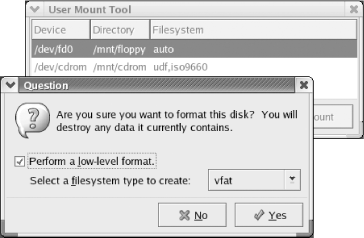 9.2.2 Browsing Hardware Devices
The Hardware Browser tool (Figure 9-22) lets you view information describing the
system's hardware devices. To launch the tool,
select System Tools Figure 9-22. The Hardware Browser tool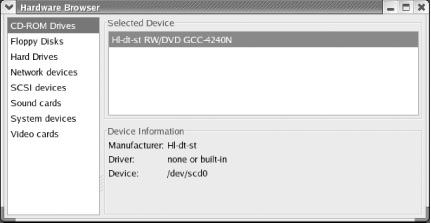 To use the tool, click a device in the list at the left side of the window. A description of the device appears in the right side of the window. The tool does not let you change or configure devices. It merely lets you view information describing them. 9.2.3 Managing Print Jobs
The GNOME
Print Manager (Figure 9-23) lets you view and manage
documents queued for printing. To launch the Print Manager, select
System Tools Figure 9-23. The GNOME Print Manager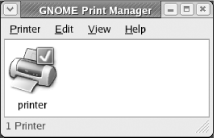 To view the contents of the print queue associated with a printer,
simply double-click the printer's icon. The print
queue tool (Figure 9-24) appears.
To cancel a print job, select the
associated document and click Edit Figure 9-24. The print queue tool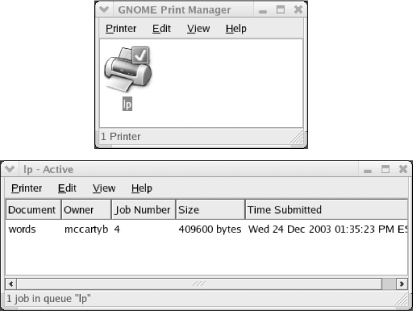 The Print Manager includes options that let you view only selected printers and jobs. These options are helpful in busy environments. You can learn about these options by clicking Help on the Print Manager menu. 9.2.4 Viewing System LogsThe System Logs tool (Figure 9-25) lets you view information contained in system log files, which record information about important events. The tool is especially helpful in troubleshooting system problems, because log files may contain relevant entries that indicate or suggest the cause of the problem. To launch the tool, choose System Tools Figure 9-25. The System Logs tool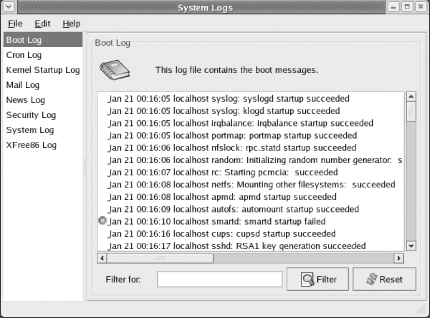 The log files available for viewing depend on which packages are installed. The standard log files are:
9.2.5 Monitoring the System
The
System Monitor tool (Figure 9-26) lets you view
information about system and user processes (running programs). It
also lets you view CPU, memory, and disk space usage data.
Essentially, the tool combines the functions performed under Windows
by the Task Manager and System Information applets. To launch the
tool, choose System Tools Figure 9-26. The System Monitor tool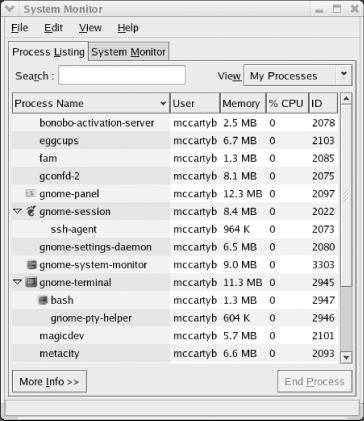 The display uses a tree control that displays members of a process group under their parent processes. Click the triangle next to the name of a parent process to expand or collapse the tree. To view extended information about a process, select the process and click More Info. The bottom pane of the tool is changed to show information about the selected process, as shown in Figure 9-27. Figure 9-27. Extended process information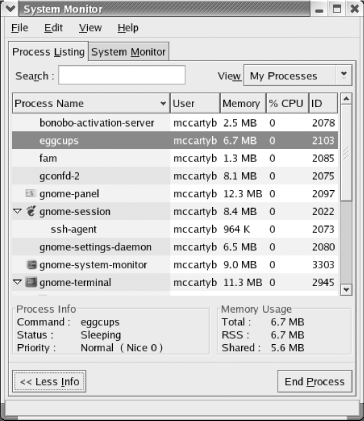 You can terminate a process by selecting it and clicking End Process. However, you should do so judiciously. Terminating a necessary process or terminating a process at an unsuitable time may destabilize your system. Generally, you should terminate only processes that appear to be hung. If the list of processes is long, you may find it convenient to use the Search box. Or, you can use the View list to view all processes, processed owned by your user account, or active processes. Clicking the System Monitor tab displays information such as that shown in Figure 9-28. The tab includes graphs that provide a running display of CPU, memory, and swap space usage. In addition, the tab includes a list box that displays the used and total space associated with mounted disk partitions. Figure 9-28. The System Monitor tab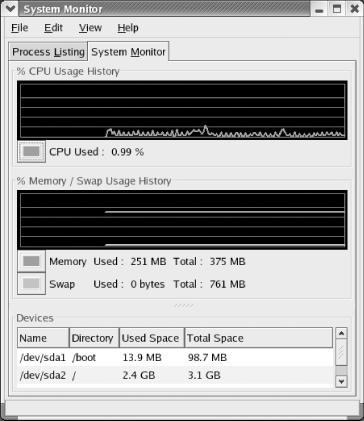 |
|
|
< Day Day Up > |
|
| This HTML Help has been published using the chm2web software. |