 | Linux in a Nutshell, 3rd Edition |  |

KDE, the K Desktop Environment, is an open source software project that aims at providing a consistent, user-friendly, contemporary desktop for Unix and Linux systems. KDE is not simply a window manager like fvwm but a whole desktop system that integrates the window manager functions into its own graphical configuration. The KDE interface makes full use of drag-and-drop functionality, so you can grab an icon for a text file in the file manager and drag it to a text editor window to open it. Full network integration of KDE applications allows you to transparently access files from other computers or FTP sites and manipulate them as if they were local.
KDE also implements a standard help system based on HTML. Applications that display a Help button can open a specific help file in the help viewer.
One goal of KDE is to provide the user with system information and configuration through easy-to-use graphical interfaces of the desktop. The KDE Control Center is a central utility for desktop and application configuration, as well as a source of information for important system components. The Information module of the Control Center can retrieve and display status information for your processor, memory, PCI bus, and network devices.
A wide variety of applications have been developed to take advantage of KDE's features and provide the user with a wealth of productive applications. The base package comes with programs such as a mail client, a calendar and organizer, a CD player, image viewers, chat programs, and many more.
Most Linux distributions ship with KDE and allow you to set it up as the default session environment when you install the operating system. If you are installing KDE separately, download and install the KDE packages (you can find them at ftp://ftp.kde.org,among other places).
To set KDE as your desktop environment, look for the X initialization files in your home directory. Depending on your distribution, look for either .xinitrc, .xsession, or .Xclients in your home directory. If none of these files exist, create a new .xinitrc file. Edit the file to remove any window manager references that may exist and add startkde on a line at the end of the file. Make sure to put the KDE directories in your path. The default package installation is /opt/kde. Note that some distributions will use a different KDE path, but it will be configured by the default setup.
Figure 16-1 shows a typical KDE desktop. The bar across the top edge of the screen is the taskbar. It is used to keep track of application windows running on the desktop. The panel is at the bottom of the screen. The panel contains buttons for the main menu, the window list, and the desktop pager as well as other buttons used to launch applications.
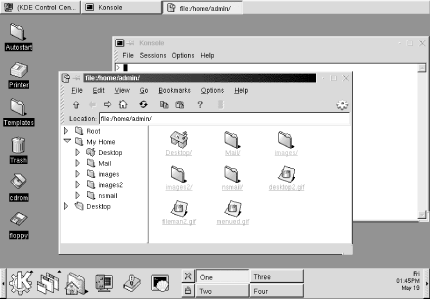
The desktop displays open application windows and contains icons that can be used to launch applications with a single click. A number of icons are placed on the desktop by default. There are two folder icons. One opens the Templates folder, which contains a set of generic files used to create desktop links. The Autostart folder contains links to applications that are started automatically every time you log in. The Trash icon is a link to a special desktop folder to which you can drag files that you want to delete. There are also icons that link to mounted CD-ROM and floppy drives.
Each KDE window has a titlebar with common buttons on the right for minimize, maximize, and close. On the left side of the titlebar, there is a small icon (or a dash, if an icon isn't specified by the application) and a button that looks like a pushpin. The icon opens the window menu that contains a number of different functions you can apply to the window, such as sending it to another desktop. The push pin button is used to stick or unstick the window to the screen. If you click on the pushpin, the window will be sticky and appear on all of the virtual desktops. The button appears pushed in when a window is sticky. Click the button again to unstick a window.
The window menu contains standard window commands: Maximize, Iconify, Move, Resize, Sticky, and Close. There is also a command that lets you send the window to another virtual desktop.
One of the most important KDE applications is kfm. kfm is a graphical file manager and Internet browser and also controls the workings of the KDE desktop and the icons it contains. Anytime you click a folder icon, such as the Home folder button on the panel or the Autostart icon on the desktop, a kfm window opens displaying the contents of the directory. Figure 16-2 shows a kfm window displaying a home directory. Files and directories are shown as icons by default, but you can use the View menu to view contents with more detail.
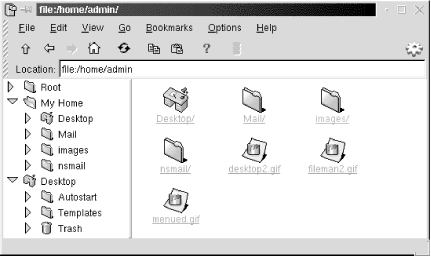
The kfm interface has its roots in web browsers. The toolbar contains back and forward buttons for stepping through your selection history, a home button, reload, and stop. The Location bar uses URL addressing for both network addresses and local filesystems. HTML rendering is well-supported in kfm, although not as robust as commercial browsers. If you don't like the bells and whistles of advanced features such as Java applets and scripting, kfm makes a perfect, simple web browser. You can even save addresses as bookmarks and use HTTP cookies.
In addition to file management, kfm is responsible for the functioning of the desktop. When you log into a KDE session, kfm reads the contents of the Desktop directory. Any files or folders will be represented as icon links on the desktop. Items contained in the Autostart folder will be launched as well. kfm uses text files ending in .kdelnk to configure desktop links. These files are described later.
There are a couple of ways to add a desktop link. The simplest way is to right-click on the background and select the New submenu in the pop-up menu. The New menu offers a number of choices for the type of link to create: Folder, File System Device, FTP URL, Mime Type, Application, Internet Address, and WWW URL. When you make a selection, a default icon for that type will appear on the desktop, and the properties window will appear for the link.
The properties window varies slightly for the type of link, but for all links you need to specify a name for the link file, the label for the icon, and the executable command or file location. You can also set the permissions for the link file and select a new icon.
The following example shows how to create an application desktop link
that opens the Kedit text editor. First right-click on the desktop
and select New Application. A new icon appears on the screen with
the default KDE "gear" graphic and labeled
"Application," and the properties window opens.
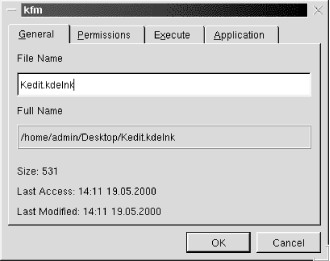
The General tab, shown in Figure 16-3, shows the default name of the kdelnk file and other file information. Change the name of the file to reflect the purpose of the link; in this example, it is Kedit.kdelnk.
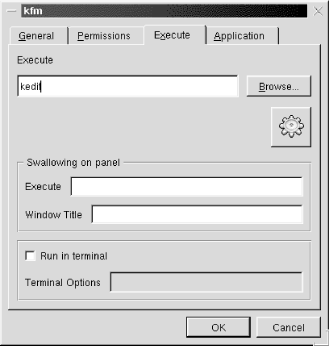
Since you created the link file, the permissions allow you to use it. If you want to adjust the permissions, go to the Permissions tab. The next step is to supply the command used to open the application. On the Execute tab (Figure 16-4), type in the command, or click the Browse button to locate the file. Here you can change the icon for the link by clicking the button showing the current icon. This opens a window that displays a set of default KDE icons found on your system. Pick the one you like and click OK.
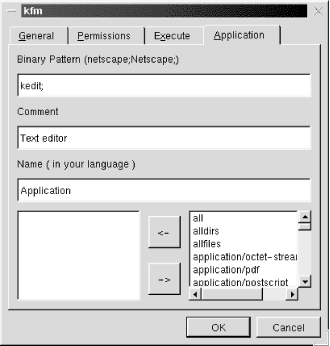
The final step is to supply the name for the link and a tooltip comment. Fill in the Comment box on the Application tab (Figure 16-5) with a description of the application. Supply the name of the link (the label that appears under the icon on the desktop) in the Name box. Click the OK button to finish the configuration.
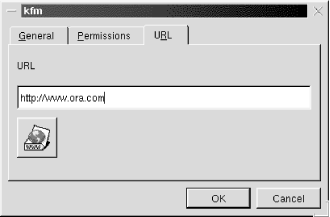
For URL or Internet address settings, the properties windows are all the same except for the default names and icons. These type of links require you to supply the URL address on the URL tab (Figure 16-6).
For a new device link, set the link name and permissions if needed. On the Device tab, supply the location of the device, such as /dev/fd3 and the mount point. Specify the filesystem type in the Filesystems box (e.g., default, msdos, etc.).
You can also add a link to the desktop by dragging an item from a file manager window. You can do this with any file or directory. After you drag the item to the desktop, a small pop-up window asks you whether you want to copy, move, or link the item. Copy simply makes a copy of the item in the Desktop directory. Move will remove the item from its original location and place it in the Desktop directory. If you choose link, the desktop icon will contain a symbolic link that points to the item's current location.
Everything that is shown on the desktop exists in the ~/Desktop folder. If you open this folder in the file manager, you will see directories for Templates and Autostart, as well as .kdelnk files for the CD-ROM and floppy drive and any other links you have set. When KDE starts, it scans the contents of the Desktop directory and creates icons for each item.
Desktop links that launch applications, URLs, or files are configured in the background by .kdelnk files. These are simple text files that contain all the information that you set for a link in the link properties dialog boxes. Although all the configuration of desktop links is handled thoroughly by the configuration pop-up windows, the content of .kdelnk files may be of interest to advanced users. The following example shows the .kdelnk file for a link to the Kedit text editor:
    # KDE Config File
    [KDE Desktop Entry]
    Name[]=Kedit
    Exec=kedit
    Type=Application
    Comment[]=Text editor
    BinaryPattern=kedit;Kedit
    Icon=exec.xpm
    TerminalOptions=
    Path=
    Terminal=0
    MimeType=
    SwallowExec=
    SwallowTitle=
    Name[fi]=Sovellus
    Name[hr]=Program
    Name[sl]=Uporabniki program
    Name[pl]=Aplikacja
    ...
As you can see, the syntax is simple and straightforward. The items filled in on the properties windows are listed on each line of the file. The Type line identifies the kind of link file. In this example, Kedit is an application. Type=URL would indicate an Internet address link file. The Name line lists the name of the application, Exec lists the command, Icon identifies the icon image file, and so on. Unspecified options have empty values. The additional Names lines are set in the template files and provide alternate names for other languages should you switch the default language setting for your environment.

Copyright © 2001 O'Reilly & Associates. All rights reserved.
| This HTML Help has been published using the chm2web software. |