In this chapter, I've used the shipped Microsoft Access file aspnetdb.mdb as the database for storage of membership and role data to make the example as simple as possible. This file is used by the default provider and can be recommended for smaller web sites. Additionally, all the providers are available in an alternative implementation to be used with SQL Server. You can switch between both providers in minutes. This should be done particularly for web sites that are bigger and/or highly frequented.
If you want to use SQL Server for the storage of membership and role data, you'll have to create a corresponding database first, including some tables. Instead of doing this manually, you can work more comfortable by using the shipped aspnet_regsql.exe tool, which you can find in this directory:
<windir>\Microsoft.NET\Framework\<version>
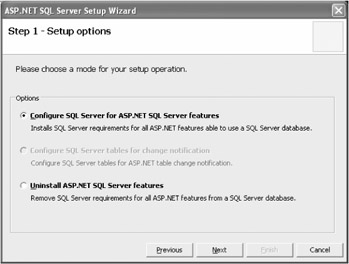
The program is a hybrid that you can use either as a command-line tool with various parameters (for example, "-?" for help) or as a Windows wizard, as shown in Figure 6-19. The assistant will guide you through the various steps of the implementation. At present, you must basically name the desired SQL Server. As long as you won't specifically choose an existing database or specify a new name in the ongoing process, a database called aspnetdb will be created.

After the database has been created, you can specify the new provider in the web.config configuration file. First you have to make sure that the assigned ConnectionString entry with the name localSqlServer is referring to the created database. Naturally, you may use a different name, but this results in more work because you have to reconfigure the providers in the corresponding way. Afterward you map the desired application services to the new default provider. The following example shows a complete configuration file for the use of the local SQL Server:
<?xml version="1.0"?>
<configuration>

    <connectionStrings>
          <add name="LocalSqlServer"
              connectionString="data source=127.0.0.1;Integrated Security=SSPI" />
    </connectionStrings>

    <system.web>
        <membership defaultProvider="AspNetSqlProvider" />
        <roleManager enabled="true" defaultProvider="AspNetSqlProvider" />
    </system.web>
</configuration>
You can switch the providers for other application services in the same way to allow, for example, personalization and side counters (which I'll discuss in Chapters 7, 8, and 10 of this book.