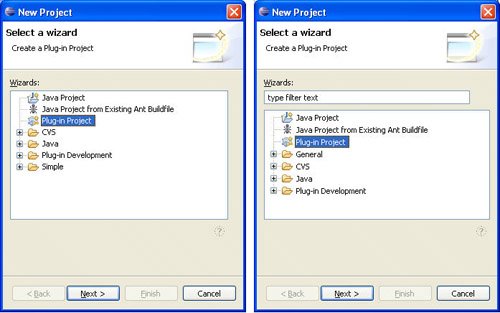
2.2. Creating a Plug-in ProjectThe first step is to create a plug-in project using the Eclipse New Project wizard. In addition to creating a new project, this wizard has a number of different code generation options, such as views, editors, and actions, for creating sample plug-in code. To keep things simple and focus only on the essentials of plug-in creation, select the Plug-in with a view option, which is discussed in the next subsection. 2.2.1. New Plug-in Project wizardFrom the File menu, select New > Project to launch the New Project wizard (see Figure 2-1). On this first page of the wizard, select Plug-in Project from the list and then click the Next button. Figure 2-1. New Project wizard page 1selecting a project type.The Eclipse 3.1 version is shown on the left, and the Eclipse 3.2 version is shown on the right. 
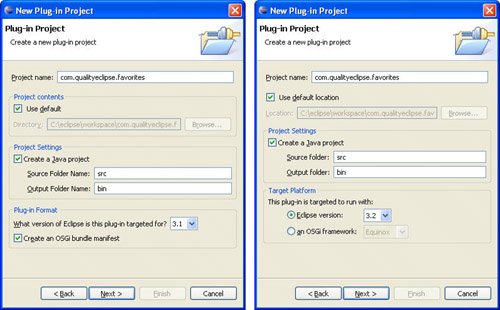
On the next page of the wizard (see Figure 2-2), enter the name of the project; in this case, it's com.qualityeclipse.favorites, which is the same as the Favorites plug-in identifier. Chapter 3, Eclipse Infrastructure, discusses plug-in identifiers and other aspects of plug-in architecture in more detail. Fill in the other fields as shown and then click the Next button. Figure 2-2. New Project wizard page 2naming the project.The Eclipse 3.1 version is shown on the left and the Eclipse 3.2 version is shown on the right. Note the minor differences in options available in the lower section of the page. 
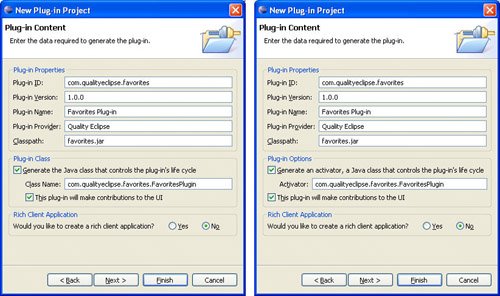
Tip A project can be named anything, but it is easier to name it the same as the plug-in identifier. By convention, this is the plug-in project-naming scheme that the Eclipse organization uses for most of its work. Because of this, the New Project wizard assumes that the project name and the plug-in identifier are the same. 2.2.2. Define the plug-inEvery plug-in has a META-INF/MANIFEST.MF file. In addition, it may contain a plugin.xml file and/or a Java class that represents the plug-in programmatically. The next wizard page displays options for generating both the plug-in manifest and plug-in Java class. Supply the Plug-in ID, Plug-in Version, Plug-in Name and more for the plug-in as shown in Figure 2-3 then click the Next button. Figure 2-3. New Project wizard page 3describing the plug-in.The Eclipse 3.1 version is shown on the left, and the Eclipse 3.2 version is shown on the right. Note the minor differences in terminology in the center section of the page. 
Next, the New Plug-in Project wizard next displays the various plug-in pieces that can be automatically generated by the wizard (see Figure 2-4). There are many different options on this page for generating quite a bit of sample code. It is useful to try out each option and review the code that is generated; however for this example, select Plug-in with a view and then click the Next button. Figure 2-4. New Plug-in Project wizard page 4selecting a plug-in type.
2.2.3. Define the viewSelecting view code generation options is the next step in this process. Enter the values for this page (see Figure 2-5), uncheck the Add the view to the resource perspective checkbox to simplify the generated plug-in manifest file and click the Next button. Figure 2-5. New Plug-in Project wizard page 5defining the view.
Finally, uncheck each of the code generation options on the last wizard page (see Figure 2-6). Each of these checkboxes represents code that could be generated as part of the Favorites view. These are covered in subsequent chapters. When you click the Finish button, the new plug-in project is created and the plug-in manifest editor is automatically opened (see Figure 2-9). Figure 2-6. New Plug-in Project wizard page 6code generation options for the view.
|