17.2. Defining an Extension PointIn the Favorites product, you would like other plug-ins to extend your product to provide additional types of Favorites objects. To accomplish this goal, create a new favorites extension point and schema plus related infrastructure types that others can extend. As part of this process, recast the current Favorites objects as extensions to this new extension point to prove to yourself that the new extension point does indeed work. 17.2.1. Creating an extension pointBegin by opening the Favorites plug-in manifest editor and switching to the Extension Points page. Click the Add... button to open the New Extension Point wizard, and then enter "favorites" for the identifier and "Favorites" for the name (see Figure 17-2). Figure 17-2. The New Extension Point wizard.
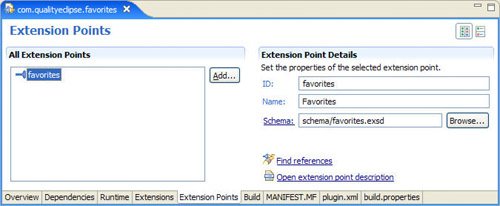
Click Finish to create the new extension point and open the schema file (more on schemas in Section 17.2.2, Creating an extension point schema, on page 599). After switching back to the plug-in manifest editor, the Extension Points page should show the newly defined extension point (see Figure 17-3). Figure 17-3. The Extension Points page in the plug-in manifest editor.
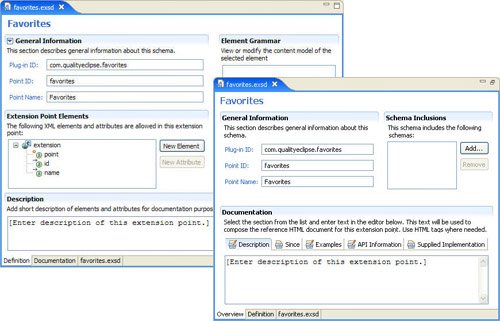
Switching to the plugin.xml page of the plug-in manifest editor reveals a new extension point declaration specifying the identifier, the human-readable name, and the relative location of the schema. <extension-point id="favorites" name="Favorites" schema="schema/favorites.exsd"/> The aforementioned declaration specifies the local identifier of the extension point. The full identifier is the plug-in identifier plus the local identifier and is used when referencing the extension point; in this case, the full identifier is com.qualityeclipse.favorites.favorites. 17.2.2. Creating an extension point schemaThe New Extension Point wizard automatically opens the schema editor to edit the newly created favorites.exsd file in the schema directory of the Favorites project (see Figure 17-4). If you ever need to open the schema editor again, you can either navigate to the schema directory and double-click on the favorites.exsd file, or select the favorites extension point in the Favorites plug-in manifest, right-click, and then select Open Schema. Figure 17-4. The Eclipse 3.1 Extension point schema editor shown on the left, and the Eclipse 3.2 Extension point schema editor shown on the right.
The schema editor has several major parts: General Information, Extension Point Elements, Element Grammar, and Documentation. Note that between Eclipse 3.1 and 3.2, the pages and sections of this editor have been rearranged; however, the basic principles in using it remain the same. The Extension Point Elements list contains elements and their associated attributes, which appear as extensions to the extension points (see Section 17.2.3, Extension point elements and attributes, on the next page). In Eclipse 3.1, the Element Grammar list contains a description of how the XML elements should appear in the extension (see Section 17.2.4, Extension point element grammar, on page 605). In Eclipse 3.2, this section has been combined with the Extension Point Elements list. To start, document the goal so that you have a clear view of what you are trying to accomplish. An extension point schema is used by the PDE to dynamically assemble a help page for the extension point (see Section 17.4, Extension Point Documentation, on page 614). In the Description section of the schema editor (on the Definition page of the editor in Eclipse 3.1 and on the Overview page in Eclipse 3.2), enter the following description, and then click the Apply button. The Favorites view contains and persists a collection of objects existing in the Eclipse workspace. This Favorites extension point allows third-party plug-ins to define new types of objects for the Favorites view. Repeat this process by selecting the Examples tab in the Documentation section and entering the following text (see below). Note the use of the <pre> and </pre> XML tags to denote preformatted text in which whitespace should be preserved; all other whitespace greater than a single space outside those tags is discarded in the automatically generated HTML help text (see Section 17.4, Extension Point Documentation, on page 614). The following is an example
of the Favorites extension point usage:
<p>
<pre>
<extension point="com.qualityeclipse.favorites.favorites">
<itemType
id="com.example.xyz.myNewFavoriteItemId"
name="New Favorites Item Name"
class="com.example.xyz.MyFavoriteItem"
targetClass="com.example.xyz.MyObjectClass"/>
</extension>
</pre>
</p>
Then, for API Information, enter the following: Plug-ins that want to extend this extension point must subclass <samp>com.qualityeclipse.favorites.model.FavoriteItemType</samp> and generate objects that implement the <samp>com.qualityeclipse.- favorites.model.IFavoriteItem</samp> interface.
Note the use the <samp> </samp> XML tags to denote code in a sentence similar to the way that many of the Eclipse plug-ins are documented; the <code> </code> XML tags should work just as well. 17.2.3. Extension point elements and attributesExtension point elements correspond to XML elements that appear in the extension declaration. Extension point attributes correspond to XML attributes that appear in the extension declaration. For example, in the following extension declaration, itemType is an extension point element, while id, name, class, and targetClass are extension point attributes. <extension point=
"com.qualityeclipse.favorites.favorites">
<itemType
id="com.example.xyz.myNewFavoriteItemId"
name="New Favorites Item Name"
class="com.example.xyz.MyFavoriteItem"
targetClass="com.example.xyz.MyObjectClass"/>
</extension>
Extension point attributes have several different properties associated with them. In Eclipse 3.1, double-clicking on an attribute in the schema editor opens the Properties view and displays the properties (see Figure 17-5). In Eclipse 3.2, the Properties view is no longer used to edit the properties as they are now shown directly in the Attribute Details section of the scheme editor. The properties for extension attributes are:
Figure 17-5. The Eclipse 3.1 Properties view showing attribute property values on the left and the Eclipse 3.2 Attribute Details area showing those same properties on the right.
For the Favorites product, you want extensions to this extension point to specify information about the type of Favorites item being added. The following are the extension point attributes to include.
Tip If your extension point is intended for general consumption, then have a plan for lazy extension initialization so that you do not cause more plug-ins than need to be loaded, resulting in memory bloat and slowing down the system. For example, in this case, the targetClass is used to determine which Favorites item type should be used before the plug-in that defines it is actually loaded. If you do not have this information specified in the extension, then when users drag and drop new objects onto the Favorites view, they would need to load and query each Favorites type to determine which type should handle the dropped objects. This could potentially pull in many more plug-ins than necessary, bloating and slowing down the workspace. Instead, you pre-screen the types based on the targetClass to determine which type may be able to handle the dropped object. If your extension point is intended for use only within your own plug-in, then you do not need the extra complexity and overhead associated with a proxy. First, you need to add an itemType element representing the Favorites item type being defined, to which you will add these attributes. To accomplish this, switch to the Definition page, click on the New Element button, select the new_element1 that was created, and change the name to "itemType". To change the name in Eclipse 3.1, you will need to double-click on the element to open the Properties view. In Eclipse 3.2, the name is shown directly in the Attribute Details section of the scheme editor. With itemType selected in the schema editor, click the New Attribute button to add a new attribute to the itemType element. Change its name to "name". With the name attribute selected in the schema editor, enter "A human-readable name for this type of Favorites object." for the description of the name attribute and then click Apply. Repeat this process to add four more attributes. When you are done, you should have defined the following attributes for the itemType element with the properties specified here.
Tip How should an extension provide behavior for your extension point? Do you need extensions to implement an interface or instead extend an abstract base class? If you need extensions to implement an interface, then you grant more flexibility to the extension writer. On the downside, any change to that interface will break existing extensions. Instead, if you need extensions to extend an abstract base class, then you keep some flexibility while still retaining advantages of loose coupling. Adding a concrete method to an abstract base class will not break existing extensions, giving you the opportunity to change the API in future implementations, all without sacrificing much of the extension writer's flexibility. If you are sure that your API will not change, then an interface is a great way to go; otherwise, an abstract base class gives you the flexibility you need to evolve the API. If you need the flexibility of an interface where an abstract base class will not do, then consider requiring the interface but providing an abstract base class that implements that interface for extensions to build on if they choose. Given this approach, you can change the interface API and mitigate disruption by adding concrete methods in your abstract base class that implement any new interface methods. Any extension that uses the abstract base class will be unperturbed by your interface API changes, whereas any extension that implements the interface directly must be modified to fit the new API. 17.2.4. Extension point element grammarAfter the extension point elements have been defined, construct the element grammar describing how the elements are assembled in a way that can be validated by the PDE. When you select an element in the Extension Point Elements list on the left, the grammar associated with the element is displayed in the Element Grammar on the right. The grammar on the right describes the child elements of the selected element on the left. If you select an element on the left and no grammar appears on the right, then the selected element on the left cannot have any child elements. Double-clicking on a grammar element on the right opens the Properties view and displays the properties associated with the grammar element. Note that in Eclipse 3.2, the grammar elements are shown nested in the Extension Point Elements list, and their attributes can be edited directly in the schema editor without using the Properties view. Rather than present all possible grammar elements, several common scenarios and the associated grammar are presented in Table 17-1. The desired XML structure appears on the left. On the right is the grammar used to describe the structure with property values between brackets[ ].
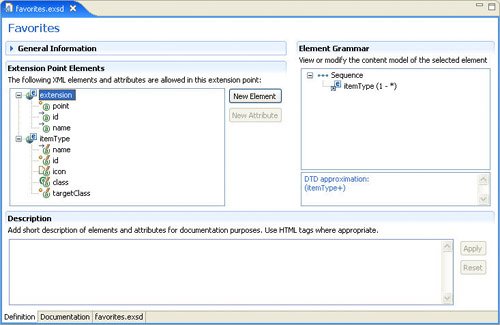
Whenever anyone extends the extension point, you want there to be one or more itemType elements as part of that extension declaration. In the schema editor, select the extension point element extension in the Extension Point Elements list, causing Sequence to appear in the Element Grammar list on the right. Select Sequence, then right-click and select New > Reference > itemType. Expand Sequence so that itemType appears as a child hierarchically under Sequence, and then double-click on itemType to open the Properties view. In the Properties view select maxOccurs and enter "unbounded". After this is complete, you should see itemType (1-*) in the Element Grammar list (see Figure 17-6). Figure 17-6. The Eclipse 3.1 schema editor showing the Favorites extension point. This editor has a different layout in Eclipse 3.2.
In Eclipse 3.2, the Sequence and itemType items are shown nested under the extension element in the Extension Point Elements list, and their attributes can be edited in the details area of the schema editor. |