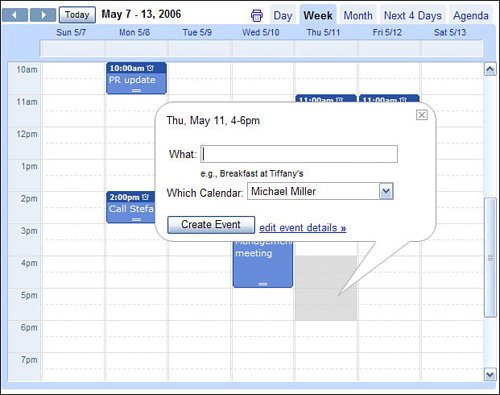
Working with EventsAll the items scheduled on your calendar are called events. An event can include all sorts of informationsome of which is augmented by information provided by the Google website. Adding an Event to Your CalendarGoogle provides several different ways to add events to your calendar. Let's look at each, in turn. First, you can simply click the hour or the day on your calendar that you'd like to create a new event; if you add an event to a daily calendar, click and drag your cursor over the entire timeframe of the event. This opens a new event balloon, like the one shown in Figure 33.11. Enter the name of the event into the balloon, and select which calendar you want to add the event to. Figure 33.11. Adding information to a new event balloon.
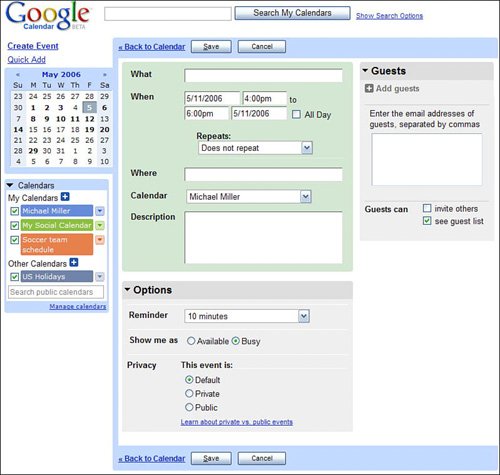
If you use this approach on a monthly calendar, unfortunately, you can't easily determine the length of the event. To fine-tune these and other details of the event, click the Edit Event Details link in the event balloon. This opens the page shown in Figure 33.12, where you can enter the following information:
Figure 33.12. Entering more detailed event information.
You can also add an event by clicking the Create Event link in the upper-left corner of the Google Calendar page. This also opens the page shown in Figure 33.12; enter the appropriate information, and then click the Save button. Tip Another way to access the Create Event page is to click the down-arrow next to a calendar in the Calendars box, and then select Create Event on This Calendar. Adding an Event via Quick AddPerhaps the easiest way to add an event, however, is with Google Calendar's Quick Add feature. When you click the Quick Add link (or type the letter Q), the Quick Add entry box appears, as shown in Figure 33.13. Enter the name and time of the event, and then press Enter. This method is quite intelligent; if you enter Lunch with George at noon Monday at the Macaroni Grill, Quick Add translates the text and enters the appropriate event at the specified date and time. Figure 33.13. Using Quick Add to add an event.
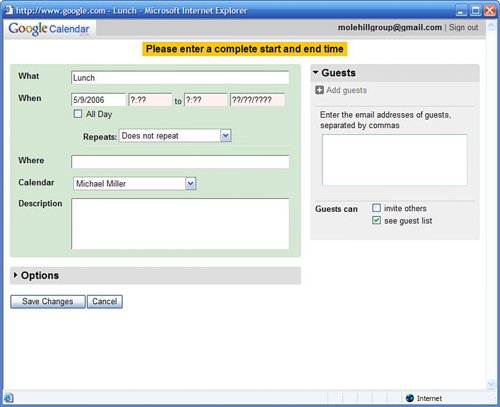
Adding an Event from GmailHere's a neat feature that arises from the integration of Google Calendar and Gmail. When you're reading a Gmail message that contains information pertaining to a possible event, just pull down the More Action menu and select Create Event. This opens a New Event window, as shown in Figure 33.14; enter the appropriate information, click Save Changes, and the event will be added to your Google Calendar. Figure 33.14. Adding an event from a Gmail message.
Importing Events from Other ApplicationsIf you're already using another calendar application, you can import the events from that application to Google Calendar. Importing events in this fashion is a lot easier than re-entering all those events by hand! Tip When you include location information about an event, Google Calendar includes a Map link in that event's information. Click the Map link to view a Google Map of that event's location. For example, if you're using Microsoft Outlook, you can import calendar events by following these steps:
Tip To receive event notifications on your mobile phone, go to the Settings page, select the Notifications tab, and then enter your cell phone number, carrier, and other necessary information. You would follow similar steps to import events from other calendar applications. Just remember to export your other calendar data as a .CSV (comma separated values) file, and then import that file into Google Calendar. Inviting Others to an EventWhen you first created an event, you had the option of adding guests to this event's information. If you did so, you were prompted to send email invitations to those guests. After you've created an event on your calendar, you can invite more guests at any time. Just follow these steps:
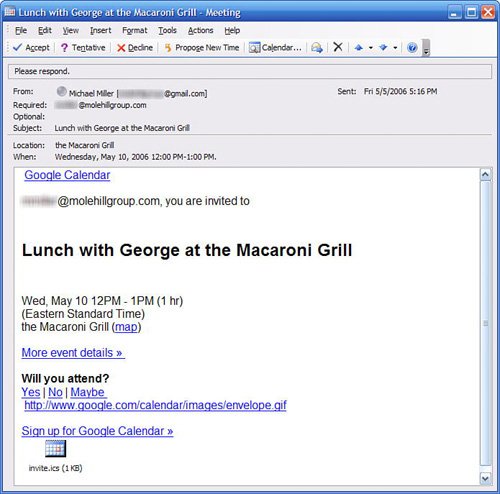
Tip You can also add a Google Calendar event button to your personal website; any visitor clicking on this button adds the event to their own Google Calendar. For instructions on how to add an event button via HTML, read the Google Calendar Event Publisher Guide (www.google.com/googlecalendar/event_publisher_guide.html). Google now sends invitations to all the guests you added. As you can see in Figure 33.15, each invitation includes links for the guest's responseYes, No, or Maybe. When the guest clicks one of these links, he is taken to a Submit Response web page. His response is then automatically entered into the event in your Google Calendar, as shown in the Guests section of the event page (see Figure 33.16). Figure 33.15. An email invitation to a Google Calendar event.
Figure 33.16. Guests attending a specific event.
|