Putting Form Validation into Action
One interesting thing about the script that we built up in the last few examples is that it is largely independent of the HTML page that we used with it. In other words, you can substitute an entirely different page, with a completely different form, and you need to only make minor changes to the script to have it do all the validation tasks you want.
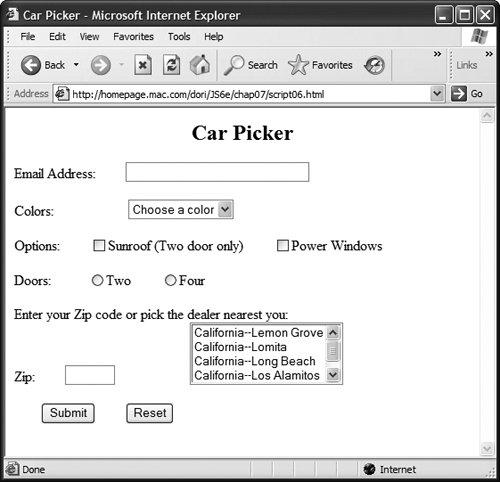
For example, take a look at Figure 7.8, which is a simplistic version of a form that could be used to customize a car that you want to purchase. The form includes a variety of options and interface elements, including radio buttons, menus, check boxes, and text fields that need validation for correct data entry. You'll find the HTML for this form in Script 7.10; we'll be using this HTML for the rest of the examples in this chapter.

Script 7.10. Here's the entire HTML page for the Car Picker example.
<!DOCTYPE html PUBLIC "-//W3C//DTD XHTML 1.0 Transitional//EN">
<html xmlns="http://www.w3.org/1999/xhtml">
<head>
<title>Car Picker</title>
<script language="Javascript" type="text/javascript" src="script06.js">
</script>
<link rel="stylesheet" href="script06.css" />
</head>
<body>
<h2 align="center">Car Picker</h2>
<form action="someAction.cgi">
<p><label for="emailAddr">Email Address:
<input id="emailAddr" type="text" size="30" class="reqd email" />
</label></p>
<p><label for="color">Colors:
<select id="color" class="reqd">
<option value="" selected="selected">Choose a color</option>
<option value="Red">Red</option>
<option value="Green">Green</option>
<option value="Blue">Blue</option>
</select>
</label></p>
<p>Options:
<label for="sunroof"><input type="checkbox" id="sunroof" value="Yes" />Sunroof (
 Two door only) </label>
<label for="pWindows"><input type="checkbox" id="pWindows" value="Yes" />Power Two door only) </label>
<label for="pWindows"><input type="checkbox" id="pWindows" value="Yes" />Power
 Windows</label>
</p>
<p><label for="DoorCt">Doors:
<input type="radio" id="twoDoor" name="DoorCt" value="twoDoor" class="radio" />Two
<input type="radio" id="fourDoor" name="DoorCt" value="fourDoor" class="radio" />Four
</label></p>
<p><label for="zip">Enter your Zip code or pick the dealer nearest you:<br />
Zip: <input id="zip" type="text" size="5" maxlength="5" class="isZip dealerList" />
<select id="dealerList" size="4" class="zip">
<option value="California--Lemon Grove">California--Lemon Grove</option>
<option value="California--Lomita">California--Lomita</option>
<option value="California--Long Beach">California--Long Beach</option>
<option value="California--Los Alamitos">California--Los Alamitos</option>
<option value="California--Los Angeles">California--Los Angeles</option>
</select>
</label></p>
<p><input type="submit" value="Submit" /> <input type="reset" /></p>
</form>
</body>
</html> Windows</label>
</p>
<p><label for="DoorCt">Doors:
<input type="radio" id="twoDoor" name="DoorCt" value="twoDoor" class="radio" />Two
<input type="radio" id="fourDoor" name="DoorCt" value="fourDoor" class="radio" />Four
</label></p>
<p><label for="zip">Enter your Zip code or pick the dealer nearest you:<br />
Zip: <input id="zip" type="text" size="5" maxlength="5" class="isZip dealerList" />
<select id="dealerList" size="4" class="zip">
<option value="California--Lemon Grove">California--Lemon Grove</option>
<option value="California--Lomita">California--Lomita</option>
<option value="California--Long Beach">California--Long Beach</option>
<option value="California--Los Alamitos">California--Los Alamitos</option>
<option value="California--Los Angeles">California--Los Angeles</option>
</select>
</label></p>
<p><input type="submit" value="Submit" /> <input type="reset" /></p>
</form>
</body>
</html>
|
The JavaScript file, Script 7.11, builds on the script that we've used earlier in this chapter. We've added a few lines to the script to handle the new interface elements, but otherwise the form is the same. In this example, you'll see what needed to be added to prepare the script for more validation, and subsequent examples will go deeper into specific types of form elements.
Script 7.11. This script adds several blocks to the switch/case conditional, setting it up for later examples.
window.onload = initForms;

function initForms() {
     for (var i=0; i< document.forms.length; i++) {
        document.forms[i].onsubmit = function() {return validForm();}
     }
}

function validForm() {
     var allGood = true;
     var allTags = document.getElementsByTagName("*");

     for (var i=0; i<allTags.length; i++) {
        if (!validTag(allTags[i])) {
           allGood = false;
        }
     }
     return allGood;

     function validTag(thisTag) {
        var outClass = "";
        var allClasses = thisTag.className.split(" ");

        for (var j=0; j<allClasses.length; j++) {
           outClass += validBasedOnClass(allClasses[j]) + " ";
        }

        thisTag.className = outClass;

        if (outClass.indexOf("invalid") > -1) {
           invalidLabel(thisTag.parentNode);
           thisTag.focus();
           if (thisTag.nodeName == "INPUT") {
              thisTag.select();
           }
           return false;
        }
        return true;

        function validBasedOnClass(thisClass) {
           var classBack = "";

           switch(thisClass) {
              case "":
              case "invalid":
                 break;
              case "reqd":
                 if (allGood && thisTag.value == "") classBack = "invalid ";
                 classBack += thisClass;
                 break;
              case "radio":
              case "isNum":
              case "isZip":
              case "email":
                 classBack += thisClass;
                 break;
              default:
                 if (allGood && !crossCheck (thisTag,thisClass)) classBack = "invalid ";
                 classBack += thisClass;
           }
           return classBack;
        }

        function crossCheck(inTag,otherFieldID) {
           if (!document.getElementById (otherFieldID)) return false;
           return (inTag.value != "" || document.getElementById(otherFieldID). value != "");
        }

        function invalidLabel(parentTag) {
           if (parentTag.nodeName == "LABEL") {
              parentTag.className += " invalid";
           }
        }
    }
}
|
To validate a form with many elements:
1. |
case "radio":
case "isNum":
case "isZip":
case "email":
  classBack += thisClass;
  break;
By adding additional blocks to the switch/case conditional inside the validBasedOnClass() function, we allow the script to check more fields and more situations. We've added radio, isNum, isZip, and email to the list. Although we're not validating them in this task, we want to not cause a problem when we do, so we add each to the list of attributes handled by the switch/case. Because there are no instructions in the first three blocks, all of them fall through to email, which just adds the currently being-checked attribute onto classBack.
| 2. |
return (inTag.value != "" || document.getElementById (otherFieldID).value != "");
This line in crossCheck() has changed a bit. Instead of comparing the two fields to make sure they're the same, we're comparing two fields to make sure that at least one of them is set (this is in preparation for dealing with the Zip code and list elements at the end of the form). If either field contains a value, we return true. If not, we return false.
|
|
