|
|
< Day Day Up > |
|
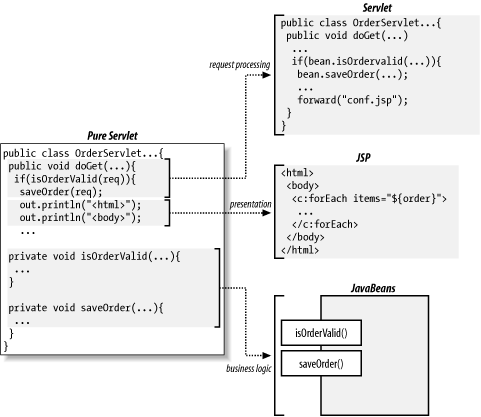
4.4 JavaServer PagesYou can use JSF in a couple of fundamentally different ways: use the JSF API in pure Java code to generate the complete web page, or use JSF together with some sort of template that holds static markup for the overall page layout and place holders for JSF components that generate dynamic content. JavaServer Pages (JSP) fits the bill for the latter scenario and is supported out-of-the-box by all JSF implementations. The JSP specification was created to allow all println( ) calls for adding HTML elements to the response that you see in Example 4-1 Example 4-2 to be moved from the servlet code to a separate file. This file can be managed by someone who knows HTML but is not a programmer, allowing programmers to focus on developing the application business logic instead of changing details in the user interface look every so often. Figure 4-6 illustrates this separation of concerns on different application component types. Figure 4-6. Separation of request processing, presentation, and business logic The servlet is still in charge of request processing, but it uses JSP pages to render the response. The business logic can also be forked off to separate JavaBeans components, typically created and populated with data by the servlet, and read by the JSP pages. The result of this separation is a much more efficient development process. It also makes it possible to change different aspects of the application independently, such as changing the business rules without touching the user interface. 4.4.1 JSP ProcessingA JSP page is simply a regular web page combining static markup with JSP elements that generates the parts that differ between requests, as shown in Figure 4-7. Figure 4-7. Template text and JSP elements Everything in the page that isn't a JSP element is called template text. Template text can be any text: HTML, WML, XML, or even plain text. When a JSP page request is processed, the static template text and the dynamic content generated by the JSP elements are merged, and the result is sent as the response to the browser. A web container that supports JSP intercepts all requests for JSP pages. To process all JSP elements in the page, the container first turns the JSP page into a servlet (known as the JSP page implementation class). The conversion is pretty straightforward; all template text is converted to println( ) statements similar to the ones in the servlets shown in Example 4-1 and Example 4-2, and all JSP elements are converted to Java code that implements the corresponding dynamic behavior. The container then compiles the servlet class. Converting the JSP page to a servlet and compiling the servlet form the translation phase. The JSP container initiates the translation phase for a page automatically when it receives the first request for the page. The translation phase takes a bit of time, so the first user to request a JSP page notices a slight delay. To avoid the delay, the translation phase can also be initiated explicitly before any requests are served; this is referred to as precompilation of a JSP page. Most web containers provide a tool for precompiling all JSP pages in an application (for Tomcat, it's done with the jspc utility, typically invoked by an Ant build file). The web container is also responsible for invoking the JSP page implementation class (the generated servlet) to process each request and generate the response. This is called the request processing phase. The two phases are illustrated in Figure 4-8. Figure 4-8. JSP page translation and processing phases As long as the JSP page remains unchanged, subsequent requests go straight to the request processing phase (i.e., the container simply executes the class file). When the JSP page is modified, it goes through the translation phase again before entering the request processing phase. 4.4.2 JSP ElementsThere are three types of JSP elements: directive, action, and scripting. A new construct added in JSP 2.0 is the Expression Language (EL) expression; let's call it a fourth element type, even though it's a bit different than the other three. Example 4-3 shows a simple JSP page with most of these element types. Example 4-3. JSP page showing a dynamically calculated sum<%@ page contentType="text/html" %>
<%@ taglib prefix="c" uri="http://java.sun.com/jsp/jstl/core" %>
<html>
<head>
<title>JSP is Easy</title>
</head>
<body bgcolor="white">
<h1>JSP is as easy as ...</h1>
<%-- Calculate the sum of 1 + 2 + 3 dynamically --%>
1 + 2 + 3 = <c:out value="${1 + 2 + 3}" />
<jsp:include page="footer.jsp" />
</body>
</html>
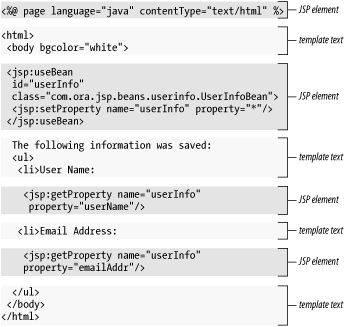
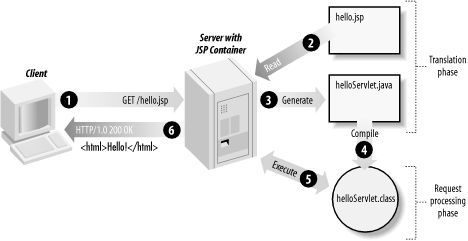
The page in Example 4-3 displays static HTML plus the sum of 1, 2, and 3, calculated at runtime and dynamically added to the response. It also includes the output produced by another page, footer.jsp, in the response. The result of processing the page is shown in Figure 4-9. Figure 4-9. Sample JSP page output 4.4.2.1 Directive elementsThe directive elements you can use in a JSP page, shown in Table 4-1, specify information about the page itself that remains the same between requests—for example, if session tracking is required, buffering requirements, and the name of a page that should be used to report errors, if any. Directives are also used to build a complete page from multiple segments and to declare custom tag libraries used in the page.
Example 4-3 includes two directives: page and taglib. A JSP directive element is delimited by the character sequences <%@ and %>, and consists of the directive name plus one or more attribute name/value pairs: <%@ directive_name attr1="value1" attr2="value2" %> Note that JSP element and attribute names are case-sensitive and in most cases, the same is true for attribute values. All attribute values must be enclosed in single or double quotes. 4.4.2.2 Action elementsAction elements are executed when a JSP page is requested (i.e., in the request processing phase), as opposed to JSP directives, which are used only during the translation phase (when the JSP page is turned into Java servlet code). An action can add text to the response or do other things such as write to a file on the server, send an email, or retrieve data from a database that is later added to the response by other actions. Actions can be grouped into three categories: standard, custom, and JSP Standard Tag Library actions. Standard actions are the actions defined by the JSP specification itself and are therefore available for use in any JSP application. Most of the JSP 2.0 standard actions are listed in Table 4-2.[2]
Custom actions are developed using the JSP API or as special tag files (a new feature added in JSP 2.0) by in-house staff or third parties to make it easy for nonprogrammers to include custom behavior in a JSP page. They must be installed and declared before they can be used in a JSP page. JSTL actions represent the third category; they are implemented as custom actions but their behavior is defined by an official specification. Until JSTL was defined, programmers had to develop proprietary custom actions even for very generic tasks, such as selecting different parts of a page based on a runtime condition or looping through a collection of data; none of the JSP standard actions support these common tasks. While the name of the standard contains the word "library" (singular), it's in fact a set of libraries that group related actions:
The <c:out> action in Example 4-3 is part of the JSTL core library. It adds the result of the expression (written in the Expression Language, described later in this section) specified as the value attribute to the response. Any action, whether it's a standard, custom, or JSTL action, is represented by an HTML-like element in a JSP page. An action element starts with an opening tag, possibly with attribute/value pairs, followed by a body, and a closing tag: <prefix:action_name attr1="value1" attr2="value2"> action_body </prefix:action_name> This is identical to the HTML element syntax, and as with HTML elements, the body of an action element can contain text or other action elements. The standard action element in Example 4-3 doesn't have a body, so this shorthand syntax is used: <jsp:include page="footer.jsp" /> Note that the single tag for an element without a body (an empty element) ends with />, instead of just >. If you think this looks like XML syntax, you're absolutely right. The shorthand is equivalent to an opening tag, an empty body, and a closing tag: <jsp:include page="footer.jsp"></jsp:include> Action elements, or tags as they are often called, are grouped into libraries (known as tag libraries). The element name, used in the opening and closing tags, is composed of two parts: a prefix and the action's name, separated by a colon, with no space characters between any parts. Again, if you're familiar with XML syntax, you may recognize the prefix as an XML namespace. The jsp prefix is used for all standard actions. With the exception of the standard action prefix (because it's defined by the JSP specification), you must declare the prefix you want to use for a tag library with the taglib directive: <%@ taglib prefix="c" uri="http://java.sun.com/jsp/jstl/core" %>
...
<c:out value="${1 + 2 + 3}" />
The prefix serves two purposes: it makes it possible for actions in different libraries to have the same name, and it makes it possible for the container to figure out which library a specific action belongs to. When the container finds an action element, it locates the taglib directive that declares the library with the corresponding action name prefix. The taglib directive's uri attribute is a unique identifier for the tag library, which the container uses to find the information it needs to process the action. 4.4.2.3 Scripting elementsScripting elements, shown in Table 4-3, allow you to add small pieces of code (typically Java code) in a JSP page, such as an if statement to generate different HTML, depending on a certain condition. Like actions, they are executed when the page is requested. You should use scripting elements with extreme care: if you embed too much code in your JSP pages, you end up with the same kind of maintenance problems as with servlets embedding HTML.
I don't use any scripting elements in this book. If you believe you need to use them in your application, you can read about them in most JSP books, such as my JavaServer Pages book (O'Reilly). 4.4.2.4 Expression Language expressionsThe Expression Language (EL) is a new feature in JSP 2.0; it was originally developed as part of the JSTL 1.0 specification. The JSP EL is a simple language for accessing request data and data made available through application objects. Its syntax is similar to JavaScript but much more forgiving when a variable doesn't contain a value, and data-type conversions are handled automatically for the common cases. These are important features for a web application, because the input is mostly in the form of request parameters, which are always text values but often need to be converted to application datatypes, such as numbers and Boolean values. The JSP EL is deliberately constrained in terms of functionality, because it's not intended to be a full-fledged programming language. It main purpose is rather to be used for tying together action elements and other application components. To give you a feel for how the JSP EL is used, let's look at the expression used for the JSTL <c:out> action in Example 4-3: <c:out value="${1 + 2 + 3}" />
A JSP EL expression always starts with the ${ delimiter (a dollar sign plus a left curly brace) and ends with } (a right curly brace). JSP EL expressions can be used to assign values to JSP action element attributes, as in Example 4-3, as well as directly in the page. This snippet can replace the JSTL <c:out> action in Example 4-3, for instance: 1 + 2 + 3 = ${1 + 2 + 3}
The <c:out> action is needed in a JSP 1.2 container, however, because prior to JSP 2.0, JSP EL expressions could be used only in JSTL action attribute values. The <c:out> action also converts special characters (e.g., < and &) to character entity codes (e.g., > and &) to avoid browser rendering problems, which doesn't happen when the JSP EL expression is used directly in the page. Table 4-4 lists all JSP 2.0 EL operators.
The JSP EL expression operators use literals, variables, or subexpressions as operands. Literals can be integer and floating-point numbers (e.g., 1 and 0.98), Booleans (true and false), strings ("enclosed by double quotes" or `enclosed by single quotes'), and the keyword null to represent the absence of a value. Variables are named references to data (objects) created by the application or made available implicitly by the JSP EL. Application-specific variables can be created in many ways. In a JSF application, the JSF framework can create them automatically based on configuration information, or they can be created explicitly by application code—for instance, by a JSF event listener. A set of JSP EL implicit variables, listed in Table 4-5, provide access to all the information about a request as well as other generic information.
Most implicit variables are of type java.util.Map. You can use the property access operator (a dot) to access individual elements of a Map and properties of an object with JavaBeans-style acessor methods: ${param.userName}
${pageContext.request.requestURI}
The first expression accesses a request parameter named userName. The second accesses the request property of the pageContext implicit variable, and then the requestURI property of the bean held by the request property, corresponding to this Java code: ((HttpServletRequest) pageContext).getRequest( ).getRequestURI( ); Elements of an array or a java.util.List are accessed with the array element operator (square brackets): ${paramValues.subscriptions[0]}
This expression accesses the first element in the array of values for a parameter named subscriptions held by the implicit paramValues variable. If a bean property name or a Map key contains characters that might be confused with operators (e.g., a dot or a dash), you must use the array element operator instead of the property operator. You can do the same if the property name is determined by evaluating a subexpression: ${param['user-name']}
${param[currentUser.name]}
A variable is always of a specific Java datatype, and the same is true for action attributes and bean properties. The EL operators also depend on type information. The EL takes care of type conversions in the "expected way," however, so you rarely have to worry about it. For instance, if you add a number and a string, the EL tries to convert the string to a number and perform the addition. 4.4.2.5 JSP commentsExample 4-3 also shows what a JSP comment looks like: <%-- Calculate the sum of 1 + 2 + 3 dynamically --%> Everything between <%-- and --%> is ignored when the JSP page is processed. You can use this type of comment to describe what's going on in the page or to temporarily comment out pieces of the page to test different alternatives. 4.4.3 Creating, Installing, and Running a JSP PageYou can create a JSP page with a regular text editor. A JSP page should have the file extension .jsp, which tells the server that the page needs to be processed by the JSP container. Without this clue, the server is unable to distinguish a JSP page from any other type of file and sends it unprocessed to the browser. JSP pages are requested directly from a browser (although the container intercepts the request and does its magic before the response is returned); you must place the page in the public part of the WAR structure. For instance, the page in Example 4-3 is contained in the easy.jsp file in the top directory of the WAR for the book examples: /cover.gif
/easy.jsp
/footer.jsp
/index.html
/expense/reports.jsp
...
/WEB-INF/web.xml
/WEB-INF/classes/JSPSourceServlet.class
...
/WEB-INF/lib/commons-logging.jar
/WEB-INF/lib/jsf-api.jar
/WEB-INF/lib/jsf-impl.jar
/WEB-INF/lib/jsfbook.jar
/WEB-INF/lib/jstl.jar
/WEB-INF/lib/standard.jar
...
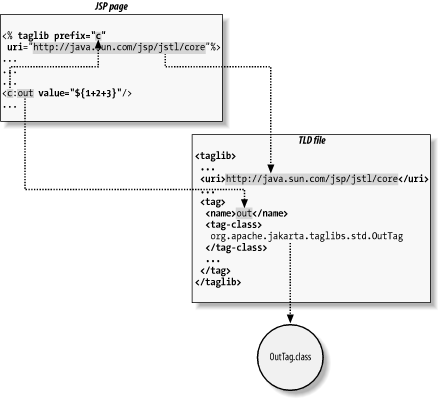
If the page uses actions from a custom tag library, you must also install the tag library. The page in Example 4-3 uses actions from the JSTL core library, so I use this library as an example here. Be aware, though, that because JSTL is defined by a public specification, a web container may bundle a shared implementation of the JSTL tag libraries so you don't have to install them for each application. A true custom library, e.g., one developed in-house, must always be installed, though. Installing a custom tag library is very easy: just place the JAR file for the library in the WEB-INF/lib directory for the web application. If you look in the WEB-INF/lib directory for the book examples application, you see a JAR file named standard.jar; that's the JAR file for the reference implementation of the JSTL libraries, developed at the Apache Jakarta Taglibs project (http://jakarta.apache.taglibs/). It depends on a number of classes delivered in other JAR files, such as the jstl.jar file that contains all public JSTL API classes and interfaces; all dependent JAR file must also be installed in the WEB-INF/lib directory. As I mentioned earlier, the container uses the taglib directive's uri attribute as a unique identifier for the tag library to locate the information it needs to process the action. More precisely, the information it needs is found in what's called a tag library descriptor (TLD). The TLD is an XML file with a .tld extension, containing information, such as mappings between the action names and the classes that implement their behavior. It also contains the unique identifier (the default URI) that should be used as the taglib directive's uri attribute value. When the web application is started, the container scans through the WEB-INF directory structure for files with .tld extensions and all JAR files containing files with .tld extensions in their META-INF directory. In other words, the container locates all TLD files. For each TLD, the container gets the library's default URI and creates a map from the URI to the TLD that contains it. In your JSP page, just to use a taglib directive with a uri attribute value that matches the default URI. This is illustrated in Figure 4-10. Figure 4-10. Relation between the taglib directive, the TLD, and the implementation (tag handler) for the custom actions With the JSP page in the right place and the custom tag libraries installed, all you need to do in order to run the JSP page is type in an appropriate URL in a browser. Assuming you're using Tomcat and have installed the book examples WAR as a subdirectory named jsfbook under Tomcat's webapps directory, as described in Chapter 3, the URL for the easy.jsp page is http://localhost:8080/jsfbook/easy.jsp. Note how the /jsfbook part of the URL matches the Tomcat webapps subdirectory name for the application. This part of the URL is called the application's context path. As described earlier, every web application has a unique context path, assigned one way or another when you install the application. Tomcat uses the subdirectory name as the context path by default, but other containers may prompt you for a path in an installation tool or use other conventions. When you make a request for a web application resource (an HTML or JSP page, or a servlet), the first part of the URL (after the hostname and port number) must be the context path, so the container knows which application should handle the request.[3]
If you try this out, your browser will display a page like the one in Figure 4-9. |
|
|
< Day Day Up > |
|