9.3. Simple Multi-Computer How-ToThis section is a "How-To" that describes the basics for how to plan, install, configure, and run a MySQL Cluster. Whereas the examples in Section 9.4, "MySQL Cluster Configuration," provide more in-depth information on a variety of clustering options and configuration, the result of following the guidelines and procedures outlined here should be a usable MySQL Cluster that meets the minimum requirements for availability and safeguarding of data. This section covers hardware and software requirements; networking issues; installation of MySQL Cluster; configuration issues; starting, stopping, and restarting the cluster; loading of a sample database; and performing queries. Basic Assumptions This How-To makes the following assumptions:
Although we refer to a Linux operating system in this How-To, the instructions and procedures that we provide here should be easily adaptable to either Solaris or Mac OS X. We also assume that you already know how to perform a minimal installation and configuration of the operating system with networking capability, or that you are able to obtain assistance in this elsewhere if needed. We discuss MySQL Cluster hardware, software, and networking requirements in somewhat greater detail in the next section. (See Section 9.3.1, "Hardware, Software, and Networking.") 9.3.1. Hardware, Software, and NetworkingOne of the strengths of MySQL Cluster is that it can be run on commodity hardware and has no unusual requirements in this regard, other than for large amounts of RAM, due to the fact that all live data storage is done in memory. (Note that this is subject to change, and that we intend to implement disk-based storage in a future MySQL Cluster release.) Naturally, multiple and faster CPUs will enhance performance. Memory requirements for Cluster processes are relatively small. The software requirements for Cluster are also modest. Host operating systems do not require any unusual modules, services, applications, or configuration to support MySQL Cluster. For Mac OS X or Solaris, the standard installation is sufficient. For Linux, a standard, "out of the box" installation should be all that is necessary. The MySQL software requirements are simple: All that is needed is a production release of MySQL-max 5.0; you must use the -max version of MySQL to have Cluster support. (See Section 4.3, "The mysqld-max Extended MySQL Server.") It is not necessary to compile MySQL yourself merely to be able to use Cluster. In this How-To, we assume that you are using the -max binary appropriate to your Linux, Solaris, or Mac OS X operating system, available via the MySQL software downloads page at http://dev.mysql.com/downloads/. For inter-node communication, Cluster supports TCP/IP networking in any standard topology, and the minimum expected for each host is a standard 100 Mbps Ethernet card, plus a switch, hub, or router to provide network connectivity for the cluster as a whole. We strongly recommend that a MySQL Cluster be run on its own subnet which is not shared with non-Cluster machines for the following reasons:
It is also possible to use the high-speed Scalable Coherent Interface (SCI) with MySQL Cluster, but this is not a requirement. See Section 9.8, "Using High-Speed Interconnects with MySQL Cluster," for more about this protocol and its use with MySQL Cluster. 9.3.2. Multi-Computer InstallationEach MySQL Cluster host computer running storage or SQL nodes must have installed on it a MySQL-max binary. For management nodes, it is not necessary to install the MySQL server binary, but you do have to install the MGM server daemon and client binaries (ndb_mgmd and ndb_mgm, respectively). This section covers the steps necessary to install the correct binaries for each type of Cluster node. MySQL AB provides precompiled binaries that support Cluster, and there is generally no need to compile these yourself. Therefore, the first step in the installation process for each cluster host is to download the file mysql-max-5.0.19-pc-linux-gnu-i686.tar.gz from the MySQL downloads area (http://dev.mysql.com/downloads/). We assume that you have placed it in each machine's /var/tmp directory. (If you do require a custom binary, see Section 2.8.3, "Installing from the Development Source Tree.") RPMs are also available for both 32-bit and 64-bit Linux platforms; as of MySQL 4.1.10a, the -max binaries installed by the RPMs support the NDBCluster storage engine. If you choose to use these rather than the binary files, be aware that you must install both the -server and -max packages on all machines that are to host cluster nodes. (See Section 2.4, "Installing MySQL on Linux," for more information about installing MySQL using the RPMs.) After installing from RPM, you will still need to configure the cluster as discussed in Section 9.3.3, "Multi-Computer Configuration." Note: After completing the installation, do not yet start any of the binaries. We will show you how to do so following the configuration of all nodes. Storage and SQL Node InstallationOn each of the three machines designated to host storage or SQL nodes, perform the following steps as the system root user:
Remember that the preceding steps must be performed separately for each machine on which a storage or SQL node is to reside. Management Node InstallationInstallation for the management (MGM) node does not require installation of the mysqld binary. Only the binaries for the MGM server and client are required, which can be found in the downloaded -max archive. Again, we assume that you have placed this file in /var/tmp. As system root (that is, after using sudo, su root, or your system's equivalent for temporarily assuming the system administrator account's privileges), perform the following steps to install ndb_mgmd and ndb_mgm on the Cluster management node host:
In Section 9.3.3, "Multi-Computer Configuration," we will create and write configuration files for all of the nodes in our example Cluster. 9.3.3. Multi-Computer ConfigurationFor our four-node, four-host MySQL Cluster, we will need to write four configuration files, one per node/host.
Configuring the Storage and SQL NodesThe my.cnf file needed for the data nodes is fairly simple. The configuration file should be located in the /etc directory and can be edited using any text editor. (Create the file if it does not exist.) For example: shell> vi /etc/my.cnf
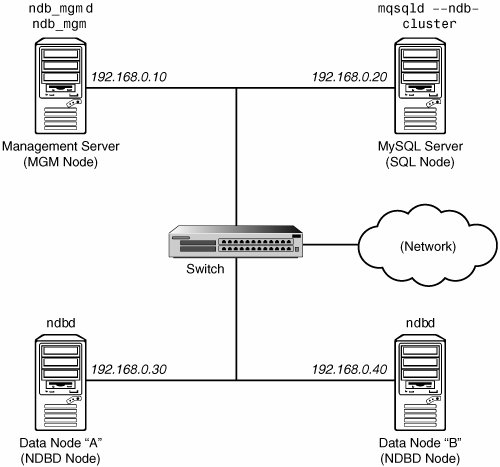
We show vi being used here to create the file, but any text editor should work just as well. For each data node and SQL node in our example setup, my.cnf should look like this: # Options for mysqld process: [MYSQLD] ndbcluster # run NDB engine ndb-connectstring=192.168.0.10 # location of MGM node # Options for ndbd process: [MYSQL_CLUSTER] ndb-connectstring=192.168.0.10 # location of MGM node After entering the preceding information, save this file and exit the text editor. Do this for the machines hosting data node "A", data node "B", and the SQL node. Configuring the Management NodeThe first step in configuring the MGM node is to create the directory in which the configuration file can be found and then to create the file itself. For example (running as root): shell> mkdir /var/lib/mysql-cluster shell> cd /var/lib/mysql-cluster shell> vi config.ini For our representative setup, the config.ini file should read as follows: # Options affecting ndbd processes on all data nodes:
[NDBD DEFAULT]
NoOfReplicas=2 # Number of replicas
DataMemory=80M # How much memory to allocate for data storage
IndexMemory=18M # How much memory to allocate for index storage
# For DataMemory and IndexMemory, we have used the
# default values. Since the "world" database takes up
# only about 500KB, this should be more than enough for
# this example Cluster setup.
# TCP/IP options:
[TCP DEFAULT]
portnumber=2202 # This the default; however, you can use any
# port that is free for all the hosts in cluster
# Note: It is recommended beginning with MySQL 5.0 that
# you do not specify the portnumber at all and simply allow
# the default value to be used instead
# Management process options:
[NDB_MGMD]
hostname=192.168.0.10 # Hostname or IP address of MGM node
datadir=/var/lib/mysql-cluster # Directory for MGM node logfiles
# Options for data node "A":
[NDBD]
# (one [NDBD] section per data node)
hostname=192.168.0.30 # Hostname or IP address
datadir=/usr/local/mysql/data # Directory for this data node's datafiles
# Options for data node "B":
[NDBD]
hostname=192.168.0.40 # Hostname or IP address
datadir=/usr/local/mysql/data # Directory for this data node's datafiles
# SQL node options:
[MYSQLD]
hostname=192.168.0.20 # Hostname or IP address
# (additional mysqld connections can be
# specified for this node for various
# purposes such as running ndb_restore)
( Note: The world database can be downloaded from http://dev.mysql.com/doc/, where it can be found listed under "Examples.") After all the configuration files have been created and these minimal options have been specified, you are ready to proceed with starting the cluster and verifying that all processes are running. We discuss how this is done in Section 9.3.4, "Initial Startup." For more detailed information about the available MySQL Cluster configuration parameters and their uses, see Section 9.4, "MySQL Cluster Configuration," and Section 9.4.4, "Configuration File." For configuration of MySQL Cluster as relates to making backups, see Section 9.6.5.4 "Configuration for Cluster Backup." Note: The default port for Cluster management nodes is 1186; the default port for data nodes is 2202. Beginning with MySQL 5.0.3, this restriction is lifted, and the cluster automatically allocates ports for data nodes from those that are already free. 9.3.4. Initial StartupStarting the cluster is not very difficult after it has been configured. Each cluster node process must be started separately, and on the host where it resides. Although it is possible to start the nodes in any order, it is recommended that the management node be started first, followed by the storage nodes, and then finally by any SQL nodes:
If all has gone well, and the cluster has been set up correctly, the cluster should now be operational. You can test this by invoking the ndb_mgm management node client. The output should look like that shown here, although you might see some slight differences in the output depending on the exact version of MySQL that you are using: shell> ndb_mgm -- NDB Cluster -- Management Client --ndb_mgm>SHOW Connected to Management Server at: localhost:1186 Cluster Configuration --------------------- [ndbd(NDB)] 2 node(s) id=2 @192.168.0.30 (Version: 5.0.19, Nodegroup: 0, Master) id=3 @192.168.0.40 (Version: 5.0.19, Nodegroup: 0) [ndb_mgmd(MGM)] 1 node(s) id=1 @192.168.0.10 (Version: 5.0.19) [mysqld(SQL)] 1 node(s) id=4 (Version: 5.0.19) Note: If you are using an older version of MySQL, you may see the SQL node referenced as [mysqld(API)]. This reflects an older usage that is now deprecated. You should now be ready to work with databases, tables, and data in MySQL Cluster. See Section 9.3.5, "Loading Sample Data and Performing Queries," for a brief discussion. 9.3.5. Loading Sample Data and Performing QueriesWorking with data in MySQL Cluster is not much different from doing so in MySQL without Cluster. There are two points to keep in mind:
If you are importing tables from an existing database using the output of mysqldump, you can open the SQL script in a text editor and add the ENGINE option to any table creation statements, or replace any existing ENGINE (or TYPE) options. Suppose that you have the world sample database on another MySQL server that does not support MySQL Cluster, and you want to export the City table: shell> mysqldump --add-drop-table world City > city_table.sql
The resulting city_table.sql file will contain this table creation statement (and the INSERT statements necessary to import the table data):
DROP TABLE IF EXISTS `City`;
CREATE TABLE `City` (

  `ID` int(11) NOT NULL auto_increment,
  `Name` char(35) NOT NULL default  '',
  `CountryCode` char(3) NOT NULL default '',
  `District` char(20) NOT NULL default '',
  `Population` int(11) NOT NULL default '0',
  PRIMARY KEY  (`ID`)
) ENGINE=MyISAM DEFAULT CHARSET=latin1;

INSERT INTO `City` VALUES (1, 'Kabul', 'AFG', 'Kabol',1780000);
INSERT INTO `City` VALUES (2, 'Qandahar', 'AFG', 'Qandahar',237500);
INSERT INTO `City` VALUES (3, 'Herat', 'AFG', 'Herat',186800);
(remaining INSERT statements omitted)
You will need to make sure that MySQL uses the NDB storage engine for this table. There are two ways that this can be accomplished. One of these is to modify the table definition before importing it into the Cluster database. Using the City table as an example, modify the ENGINE option of the definition as follows: DROP TABLE IF EXISTS `City`;
CREATE TABLE `City` (
`ID` int(11) NOT NULL auto_increment,
`Name` char(35) NOT NULL default '',
`CountryCode` char(3) NOT NULL default '',
`District` char(20) NOT NULL default '',
`Population` int(11) NOT NULL default ' '0',
PRIMARY KEY (`ID`)
) ENGINE=NDBCLUSTER DEFAULT CHARSET=latin1;
INSERT INTO `City` VALUES (1, 'Kabul', 'AFG', 'Kabol',1780000);
INSERT INTO `City` VALUES (2, 'Qandahar', 'AFG', 'Qandahar', 237500);
INSERT INTO `City` VALUES (3, 'Herat', 'AFG', 'Herat',186800);
(remaining INSERT statements omitted)
This must be done for the definition of each table that is to be part of the clustered database. The easiest way to accomplish this is to do a search-and-replace on the file that contains the definitions and replace all instances of TYPE=engine_name or ENGINE=engine_name with ENGINE=NDBCLUSTER. If you do not want to modify the file, you can use the unmodified file to create the tables, and then use ALTER TABLE to change their storage engine. The particulars are given later in this section. Assuming that you have already created a database named world on the SQL node of the cluster, you can then use the mysql command-line client to read city_table.sql, and create and populate the corresponding table in the usual manner: shell> mysql world < city_table.sql
It is very important to keep in mind that the preceding command must be executed on the host where the SQL node is running (in this case, on the machine with the IP address 192.168.0.20). To create a copy of the entire world database on the SQL node, use mysqldump on the non-cluster server to export the database to a file named world.sql; for example, in the /tmp directory. Then modify the table definitions as just described and import the file into the SQL node of the cluster like this: shell> mysql world < /tmp/world.sql
If you save the file to a different location, adjust the preceding instructions accordingly. It is important to note that NDB Cluster in MySQL 5.0 does not support autodiscovery of databases. (See Section 9.9, "Known Limitations of MySQL Cluster.") This means that, once the world database and its tables have been created on one data node, you need to issue the CREATE SCHEMA world statement (beginning with MySQL 5.0.2, you may use CREATE SCHEMA world instead), followed by FLUSH TABLES on each SQL node in the cluster. This will cause the node to recognize the database and read its table definitions. Running SELECT queries on the SQL node is no different from running them on any other instance of a MySQL server. To run queries from the command line, you first need to log in to the MySQL Monitor in the usual way (specify the root password at the Enter password: prompt): shell> mysql -u root -p
Enter password:
Welcome to the MySQL monitor. Commands end with ; or \g.
Your MySQL connection id is 1 to server version: 5.0.19
Type 'help;' or '\h' for help. Type '\c' to clear the buffer.
mysql>
We simply use the MySQL server's root account and assume that you have followed the standard security precautions for installing a MySQL server, including setting a strong root password. For more information, see Section 2.9.3, "Securing the Initial MySQL Accounts." It is worth taking into account that Cluster nodes do not make use of the MySQL privilege system when accessing one another. Setting or changing MySQL user accounts (including the root account) affects only applications that access the SQL node, not interaction between nodes. If you did not modify the ENGINE clauses in the table definitions prior to importing the SQL script, you should run the following statements at this point: mysql> USE world; mysql> ALTER TABLE City ENGINE=NDBCLUSTER; mysql> ALTER TABLE Country ENGINE=NDBCLUSTER; mysql> ALTER TABLE CountryLanguage ENGINE=NDBCLUSTER; Selecting a database and running a SELECT query against a table in that database is also accomplished in the usual manner, as is exiting the MySQL Monitor: mysql> USE world; mysql> SELECT Name, Population FROM City ORDER BY Population DESC LIMIT 5; +-----------+------------+ | Name | Population | +-----------+------------+ | Bombay | 10500000 | | Seoul | 9981619 | | São Paulo | 9968485 | | Shanghai | 9696300 | | Jakarta | 9604900 | +-----------+------------+ 5 rows in set (0.34 sec) mysql> \q Bye shell> Applications that use MySQL can employ standard APIs to access NDB tables. It is important to remember that your application must access the SQL node, and not the MGM or storage nodes. This brief example shows how we might execute the SELECT statement just shown by using PHP 5's mysqli extension running on a Web server elsewhere on the network:
<!DOCTYPE HTML PUBLIC "-//W3C//DTD HTML 4.01 Transitional//EN"
  "http://www.w3.org/TR/html4/loose.dtd">
<html>
<head>
  <meta http-equiv="Content-Type"
           content="text/html; charset=iso-8859-1">
  <title>SIMPLE mysqli SELECT</title>
</head>
<body>
<?php
  # connect to SQL node:
  $link = new mysqli('192.168.0.20', 'root', 'root_password', 'world');
  # parameters for mysqli constructor are:
  #   host, user, password, database

  if( mysqli_connect_errno() )
    die("Connect failed: " . mysqli_connect_error());


  $query = "SELECT Name, Population
            FROM City
            ORDER BY Population DESC
            LIMIT 5";

  # if no errors...
  if( $result = $link->query($query) )
  {
?>
<table border="1" width="40%" cellpadding="4" cellspacing ="1">
  <tbody>
  <tr>
    <th width="10%">City</th>
    <th>Population</th>
  </tr>
<?
    # then display the results...
    while($row = $result->fetch_object())
      printf(<tr>\n  <td align=\"center\">%s</td><td>%d</td>\n</tr>\n",
              $row->Name, $row->Population);
?>
  </tbody
</table>
<?
  # ...and verify the number of rows that were retrieved
    printf("<p>Affected rows: %d</p>\n", $link->affected_rows);
  }
  else
    # otherwise, tell us what went wrong
    echo mysqli_error();

  # free the result set and the mysqli connection object
  $result->close();
  $link->close();
?>
</body>
</html>
We assume that the process running on the Web server can reach the IP address of the SQL node. In a similar fashion, you can use the MySQL C API, Perl-DBI, Python-mysql, or MySQL AB's own Connectors to perform the tasks of data definition and manipulation just as you would normally with MySQL. 9.3.6. Safe Shutdown and RestartTo shut down the cluster, enter the following command in a shell on the machine hosting the MGM node: shell> ndb_mgm -e shutdown
The -e option here is used to pass a command to the ndb_mgm client from the shell. See Section 3.3.1, "Using Options on the Command Line." The command causes the ndb_mgm, ndb_mgmd, and any ndbd processes to terminate gracefully. Any SQL nodes can be terminated using mysqladmin shutdown and other means. To restart the cluster, run these commands:
For information on making Cluster backups, see Section 9.6.5.2, "Using the Management Server to Create a Backup." To restore the cluster from backup requires the use of the ndb_restore command. This is covered in Section 9.6.5.3, "How to Restore a Cluster Backup." More information on configuring MySQL Cluster can be found in Section 9.4, "MySQL Cluster Configuration." |