Disk Slices
Objective:
Perform disk partitioning and relabel a disk in a Solaris operating environment using the appropriate files, commands, options, menus, and/or tables.
Disks are divided into regions called disk slices or disk partitions. A slice is composed of a single range of contiguous blocks. It is a physical subset of the disk (except for slice 2, which represents the entire disk). A Unix file system or the swap area is built within these disk slices. The boundaries of a disk slice are defined when a disk is partitioned using the Solaris format utility or the Solaris Management Console Disks Tool, and the slice information for a particular disk can be viewed by using the prtvtoc command. Each disk slice appears to the operating system (and to the system administrator) as though it were a separate disk drive.
Disk slicing differs between the SPARC and the x86 platforms. On the SPARC platform, the entire disk is devoted to the Solaris OS; the disk can be divided into 8 slices, numbered 07. On the x86 platform, the disk is divided into fdisk partitions using the fdisk command. The Solaris fdisk partition is divided into 10 slices, numbered 09.
Note
Slices Versus Partitions Solaris device names use the term slice (and the letter s in the device name) to refer to the slice number. Slices were called partitions in SunOS 4.x. This book attempts to use the term slice whenever possible; however, certain interfaces, such as the format and prtvtoc commands, refer to slices as partitions.
A physical disk consists of a stack of circular platters, as shown in Figure 1.1. Data is stored on these platters in a cylindrical pattern. Cylinders can be grouped and isolated from one another. A group of cylinders is referred to as a slice. A slice is defined with start and end points, defined from the center of the stack of platters, which is called the spindle.
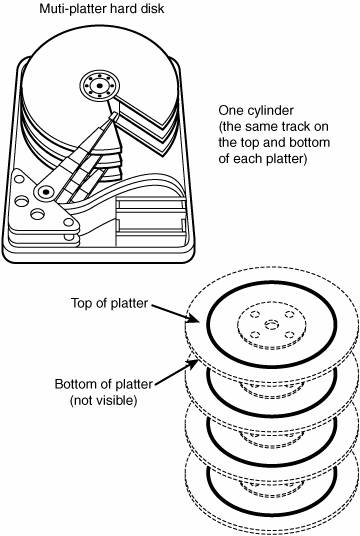
Disk slices are defined by an offset and a size in cylinders. The offset is the distance from cylinder 0. To define a slice, the administrator provides a starting cylinder and an ending cylinder. A disk can have up to eight slices, named 0 to 7, but it is uncommon to use partition 2 as a file system. (See Chapter 2 for a discussion of disk-storage systems and sizing partitions.)
Note
Using Slice 2 As a Partition Sometimes a relational database uses an entire disk and requires one single raw partition. It's convenient in this circumstance to use slice 2, as it represents the entire disk, but is not recommended because you would be using cylinder 0. You should start your database partition on cylinder 1 so that you don't risk overwriting the disk's VTOC. UFS file systems are smart enough not to touch the VTOC, but some databases have proven to be not so friendly.
When setting up slices, remember these rules:
Each disk slice holds only one file system. No file system can span multiple slices. After a file system is created, its size cannot be increased or decreased without repartitioning and destroying the partition directly before or after it. Slices cannot span multiple disks; however, multiple swap slices on separate disks are allowed.
When we discuss logical volumes later in this chapter, you'll learn how to get around some of these limitations in file systems.
Also follow these guidelines when planning the layout of file systems:
Distribute the workload as evenly as possible among different I/O systems and disk drives. Distribute /home and swap directories evenly across disks. A single disk has limitations on how quickly data can be transferred. By spreading this load across more than one disk, you can improve performance exponentially. This concept is described in Chapter 10, "Managing Storage Volumes," where I describe striping using the Solaris Volume Manager. Keep projects or groups within their own file system. This enables you to keep better track of data for backups, recovery, and security reasons. Some disks might have better performance than others. For multiple projects, you could create multiple file systems and distribute the I/O workload by putting high-volume projects on separate physical disks. Use the faster drives for file systems that need quick access and the slower drives for data that might not need to be retrieved as quickly. Some systems have drives that were installed as original hardware along with newer, better performing, drives that were added on some time later. Maybe you have a database dedicated to a high-volume project. This would be a perfect candidate to put on the newer, faster disk while a less accessed project could go on the slower disk drive. It is not important for most sites to be concerned about keeping similar types of user files in the same file system. Occasionally, you might have some users who consistently create small or large files. You might consider creating a separate file system with more inodes for users who consistently create small files. (See the section titled "The inode" later in this chapter for more information on inodes.)
We discuss disk slices again in Chapter 2, where we describe setting up disk storage and planning the layout of your disk slices.
Displaying Disk Configuration Information
As described earlier, disk configuration information is stored in the disk label. If you know the disk and slice number, you can display information for a disk by using the print volume table of contents (prtvtoc) command. You can specify the volume by specifying any slice defined on the disk (for example, /dev/rdsk/c0t3d0s2 or /dev/rdsk/c0t3d0s*). Regardless of which slice you specify, all slices defined on the disk will be displayed. If you know the target number of the disk but do not know how it is divided into slices, you can show information for the entire disk by specifying either slice 2 or s*. Step by Step 1.2 shows how you can examine information stored on a disk's label by using the prtvtoc command.
1. | Become superuser.
| 2. | Type prtvtoc /dev/rdsk/cntndnsn and press Enter.
Information for the disk and slice you specify is displayed. In the following steps, information is displayed for all of disk 3:
|
1. | Become superuser.
| 2. | Type prtvtoc /dev/rdsk/c0t3d0s2 and press Enter.
The system responds with this:
* /dev/rdsk/c0t3d0s2 (volume "") partition map
*
* Dimensions:
*     512 bytes/sector
*      36 sectors/track
*       9 tracks/cylinder
*     324 sectors/cylinder
*    1272 cylinders
*    1254 accessible cylinders
*
* Flags:
*   1: unmountable
*  10: read-only
*
*                      First   Sector  Last
* Partition Tag Flags  Sector  Count   Sector  Mount Directory
  2          5   01    0       406296  406295
  6          4   00    0       242352  242351
7 0 00 242352 163944 406295 /files7 |
|
The prtvtoc command shows the number of cylinders and heads, as well as how the disk's slices are arranged.
The following is an example of running the prtvtoc command on a SCSI disk with an EFI label:
prtvtoc /dev/rdsk/c2t1d0s1
* /dev/rdsk/c2t1d0s1 partition map
*
* Dimensions:
*     512 bytes/sector
*  8385121 sectors
*  8385054 accessible sectors
*
* Flags:
*   1: unmountable
*  10: read-only
*
*                          First     Sector    Last
* Partition  Tag  Flags    Sector     Count    Sector  Mount Directory
       0      2    01         34     41006     41039
       1      2    00      41040   8327663   8368702   /mnt
       8     11    00    8368703     16384   8385086
Using the format Utility to Create Slices
Before you can create a file system on a disk, the disk must be formatted, and you must divide it into slices by using the Solaris format utility. Formatting involves two separate processes:
Writing format information to the disk Completing a surface analysis, which compiles an up-to-date list of disk defects
When a disk is formatted, header and trailer information is superimposed on the disk. When the format utility runs a surface analysis, the controller scans the disk for defects. It should be noted that defects and formatting information reduce the total disk space available for data. This is why a new disk usually holds only 9095% of its capacity after formatting. This percentage varies according to disk geometry and decreases as the disk ages and develops more defects.
The need to perform a surface analysis on a disk drive has dropped as more manufacturers ship their disk drives formatted and partitioned. You should not need to perform a surface analysis within the format utility when adding a disk drive to an existing system unless you think disk defects are causing problems. The primary reason that you would use format is if you want to view or change the partitioning scheme on a disk.
Caution
Always Back Up Your Data Formatting and creating slices is a destructive process, so make sure user data is backed up before you start.
The format utility searches your system for all attached disk drives and reports the following information about the disk drives it finds:
In addition, the format utility is used in disk repair operations to do the following:
The Solaris installation program partitions and labels disk drives as part of installing the Solaris release. However, you might need to use the format utility when doing the following:
Displaying slice information Dividing a disk into slices Formatting a disk drive when you think disk defects are causing problems Repairing a disk drive
The main reason a system administrator uses the format utility is to divide a disk into disk slices.
Exam Alert
format Utility Pay close attention to each menu item in the format utility and understand what task each performs. Expect to see several questions pertaining to the format utility menus on Exam CX-310-200. Along with adding slices, make sure you know how to remove or resize slices. You may see a scenario where a production system is running out of swap and you need to go into the format utility and add another swap slice.
The process of creating slices is outlined in Step by Step 1.3.
Note
If you are using Solaris on an x86 or x64-based PC system, refer to the next Step by Step to create an FDISK partition before creating the slices.
1. | Become superuser.
| 2. | Type format.
The system responds with this:
Searching for disks...done

AVAILABLE DISK SELECTIONS:
       0. c0t0d0 <IBM-DJNA-370910 cyl 17660 alt 2 hd 16 sec 63>
          /pci@1f,0/pci@1,1/ide@3/dad@0,0
       1. c2t1d0 <SUN4.2G cyl 3880 alt 2 hd 16 sec 135>
          /pci@1f,0/pci@1/scsi@1,1/sd@1,0
       2. c2t2d0 <SUN4.2G cyl 3880 alt 2 hd 16 sec 135>
          /pci@1f,0/pci@1/scsi@1,1/sd@2,0
       3. c2t3d0 <SUN4.2G cyl 3880 alt 2 hd 16 sec 135>
          /pci@1f,0/pci@1/scsi@1,1/sd@3,0
       4. c2t4d0 <SUN4.2G cyl 3880 alt 2 hd 16 sec 135>
/pci@1f,0/pci@1/scsi@1,1/sd@4,0 | 3. | Specify the disk (enter its number) .
The system responds with the format main menu:
FORMAT MENU:
    disk - select a disk
    type - select (define) a disk type
    partition - select (define) a partition table
    current - describe the current disk
    format - format and analyze the disk
    repair - repair a defective sector
    label - write label to the disk
    analyze - surface analysis
    defect - defect list management
    backup - search for backup labels
    verify - read and display labels
    save - save new disk/partition definitions
    inquiry - show vendor, product and revision
    volname - set 8-character volume name
    !<cmd> - execute <cmd>, then return
quit describes the format main menu items.
Table 1.5. Format Main Menu Item DescriptionsMenu Item | Description |
|---|
disk | Lists all the system's drives. Also lets you choose the disk you want to use in subsequent operations. This disk is referred to as the current disk. | type | Identifies the manufacturer and model of the current disk. Also displays a list of known drive types. Choose the Auto configure option for all SCSI-2 disk drives. | partition | Creates and modifies slices. | current | Describes the current disk (that is, device name, device type, number of cylinders, alternate cylinders, heads, sectors, and physical device name). | format | Formats the current disk by using one of these sources of information in this order:
Information that is found in the format.dat file
Information from the automatic configuration process
Information that you type at the prompt if no format.dat entry exists
This command does not apply to IDE disks. IDE disks are preformatted by the manufacturer.
| fdisk | x86 platform only: Runs the fdisk program to create a Solaris fdisk partition.
| repair | Used to repair a specific block on the current disk.
| label | Writes a new label to the current disk. This is not the same as labeling the disk with volname. | analyze | Runs read, write, and compare tests.
| defect | Retrieves and displays defect lists. This feature does not apply to IDE disks. IDE disks manage defects automatically. | backup | Searches for backup labels if the VTOC becomes corrupted or gets deleted. | verify | Displays information about the current disk such as device name, device type, number of cylinders, alternate cylinders, heads, sectors, and partition table. | save | Saves new disk and partition information. | inquiry | SCSI disks onlyDisplays the vendor, product name, and revision level of the current drive. | volname | Labels the disk with a new eight-character volume name that you specify. This is not the same as writing the partition table to disk using label. | quit | Exits the format menu. Ctrl+D will also exit the format utility from the main menu or from any submenu. |
| 4. | Type partition at the format prompt. The partition menu is displayed .
Note
Using Shortcuts in the format Utility It is unnecessary to type the entire command. After you type the first two characters of a command, the format utility recognizes the entire command.
format> partition
PARTITION MENU:
    0 - change '0' partition
    1 - change '1' partition
    2 - change '2' partition
    3 - change '3' partition
    4 - change '4' partition
    5 - change '5' partition
    6 - change '6' partition
    7 - change '7' partition
    select - select a predefined table
    modify - modify a predefined partition table
    name - name the current table
    print - display the current table
    label - write partition map and label to the disk
    !<cmd> - execute <cmd>, then return
quit | 5. | Type print to display the current partition map.
The system responds with this:
partition> print
Current partition table (original):
Total disk cylinders available: 3984 + 2 (reserved cylinders)
Part    Tag    Flag    Cylinders       Size            Blocks
0       root    wm      0 -  175      90.49MB    (176/0/0)   185328
1       swap    wu    176 - 1051     450.40MB    (876/0/0)   922428
2     backup    wu      0 - 3983       2.00GB    (3984/0/0) 4195152
3 unassigned    wm      0              0         (0/0/0)          0
4        usr    wm   1052 - 1635     300.27MB    (584/0/0)   614952
5        usr    wm   1636 - 3982       1.18GB    (2347/0/0) 2471391
6 unassigned    wm      0              0         (0/0/0)          0
7 unassigned    wm      0              0         (0/0/0)          0
The columns displayed with the partition table are
- Part The slice number (07).
- Tag This is an optional value that indicates how the slice is being used. The value can be any of the following names that best fits the function of the file system you are creating:
unassigned, boot, root, swap, usr, backup, stand, var, home, alternates, reserved You may also see tags labeled public or private, which represent Sun StorEdge Volume Manager tags: - Flag Values in this column can be
- wm The disk slice is writable and mountable.
- wu The disk slice is writable and unmountable (such as a swap slice).
- rm The disk slice is read-only and mountable.
- ru The disk slice is read-only and unmountable.
- Cylinders The starting and ending cylinder number for the disk slice.
- Size The slice size specified as
mbmegabytes gbgigabytes bblocks ccylinders
- Blocks The total number of cylinders and the total number of sectors per slice.
Note
Wasted Disk Space Wasted disk space occurs during partitioning when one or more cylinders have not been allocated to a disk slice. This may happen intentionally or accidentally. If there are unallocated slices available, then wasted space can possibly be assigned to a slice later on.
You can use the name and save commands in the partition menu to name and save a newly created partition table to a file that can be referenced by name later, when you want to use this same partition scheme on another disk. When issuing the name command, you'll provide a unique name for this partition scheme and then issue the save command to save the information to the ./format.dat file. Normally this file is located in the /etc directory, so provide the full pathname for /etc/format.dat to update the master file.
| 6. | After you partition the disk, you must label it by typing label at the partition prompt:
You are asked for confirmation on labeling the disk as follows:
Ready to label disk, continue?
Enter Y to continue .
Note
Label Your Drive To label a disk means to write slice information onto the disk. If you don't label the drive when exiting the format utility, your partition changes will not be retained. Get into the habit of labeling at the partition submenu, but you can also label at the format utility main menu as wellyou get two chances to remember before exiting the utility.
| 7. | After labeling the disk, type quit to exit the partition menu:
| 8. | Type quit again to exit the format utility:
|
|
It's important to point out a few undesirable things that can happen when defining disk partitions with the format utility if you're not careful. First, be careful not to waste disk space. Wasted disk space can occur when you decrease the size of one slice and do not adjust the starting cylinder number of the adjoining disk slice.
Second, don't overlap disk slices. Overlapping occurs when one or more cylinders are allocated to more than one disk slice. For example, increasing the size of one slice without decreasing the size of the adjoining slice will create overlapping partitions. The format utility will not warn you of wasted disk space or overlapping partitions.
As described earlier in this chapter, Solaris on x86-based PCs treats disk drives slightly differently than on the SPARC-based systems. On an x86 system, once a disk drive has been physically installed and verified as working, you'll use the format command to slice the disk, but first an fdisk partition must be created on the new drive. Use the format command as follows:
1. | As root, type format to get into the format utility.
The following menu appears :
AVAILABLE DISK SELECTIONS:
0. c1t0d0 <FUJITSU-M1606S-512-6234 cyl 3455 alt 2 hd 6 sec
 102>
/pci@0,0/pci9004,8178@3/cmdk@0,0
1. c1t1d0 <IBM-DFHSS1W!e-4141 cyl 4071 alt 2 hd 4 sec 135>
/pci@0,0/pci9004,8178@3/cmdk@1,0
2. c1t2d0 <DEFAULT cyl 2928 alt 2 hd 6 sec 120>
/pci@0,0/pci9004,8178@3/cmdk@2,0
Specify disk (enter its number): 102>
/pci@0,0/pci9004,8178@3/cmdk@0,0
1. c1t1d0 <IBM-DFHSS1W!e-4141 cyl 4071 alt 2 hd 4 sec 135>
/pci@0,0/pci9004,8178@3/cmdk@1,0
2. c1t2d0 <DEFAULT cyl 2928 alt 2 hd 6 sec 120>
/pci@0,0/pci9004,8178@3/cmdk@2,0
Specify disk (enter its number): | 2. | Enter the number corresponding to the new drive and the following menu will be displayed:
FORMAT MENU:
        disk       - select a disk
        type       - select (define) a disk type
        partition  - select (define) a partition table
        current    - describe the current disk
        format     - format and analyze the disk
        fdisk      - run the fdisk program
        repair     - repair a defective sector
        label      - write label to the disk
        analyze    - surface analysis
        defect     - defect list management
        backup     - search for backup labels
        verify     - read and display labels
        save       - save new disk/partition definitions
        inquiry    - show vendor, product and revision
        volname    - set 8-character volume name5
        quit
format> | 3. | Select the fdisk option and the following menu appears:
The recommended default partitioning for your disk is:
  a 100% "SOLARIS System" partition.
To select this, please type "y".  To partition your disk

differently, type "n" and the "fdisk" program will let you
select other partitions. | 4. | If you wish to use the entire drive for Solaris enter y. This will return to the format menu. If n is chosen, the fdisk menu will be displayed.
             Total disk size is 4073 cylinders
             Cylinder size is 540 (512 byte) blocks
                                          Cylinders
      Partition   Status    Type      Start   End   Length    %
      =========   ======    ========  =====   ===   ======   ===

THERE ARE NO PARTITIONS CURRENTLY DEFINED
SELECT ONE OF THE FOLLOWING:
     1.   Create a partition
     2.   Change Active (Boot from) partition
     3.   Delete a partition
     4.   Exit (Update disk configuration and exit)
     5.   Cancel (Exit without updating disk configuration)
Enter Selection: | 5. | Choose 1 to create a Solaris FDISK partition. This is not the same as a Solaris slice.
| 6. | After creating the partition, choose 4 to exit and save. The format menu will return.
| 7. | Choose partition and follow the Step by Step 1.3 procedure described earlier for formatting a disk, beginning at step number 4 .
|
|
One more item of note: On standard UFS file systems, don't change the size of disk slices that are currently in use. When a disk with existing slices is repartitioned and relabeled, any existing data will be lost. Before repartitioning a disk, first copy all the data to tape or to another disk.
The Free Hog Slice
When using the format utility to change the size of disk slices, a temporary slice is automatically designated that expands and shrinks to accommodate the slice resizing operations. This temporary slice is referred to as the free hog, and it represents the unused disk space on a disk drive. If a slice is decreased, the free hog expands. The free hog is then used to allocate space to slices that have been increased. It does not, however, prevent the overlapping of disk slices as described in the previous section.
The free hog slice exists only when you run the format utility. It is not saved as a permanent slice.
Using the format Utility to Modify Partitions
If you need to change the size of slices on a particular disk, you can either re-create the disk slices as outlined in the previous section or use the modify option of the format utility.
Caution
Copy Your Data to Avoid Loss You will lose all data when changing partition sizes. Make sure that you copy your data either to another disk or to tape before continuing.
The modify option allows the root to create slices by specifying the size of each slice without having to keep track of starting cylinder boundaries. It also keeps track of any excess disk space in the temporary free hog slice. To modify a disk slice, follow the process outlined in Step by Step 1.5.
1. | Make a backup of your data. This process destroys the data on this disk slice.
| 2. | As root, enter the partition menu of the format utility, as described in Step by Step 1.3.
| 3. | After printing the existing partition scheme, type modify and press Enter.
Note
Mounted Partitions If you try to modify mounted partitions, you receive an error that states "Cannot modify disk partitions while it has mounted partitions."
When typing modify, you'll see the following output on a disk that does not have mounted partitions :
Select partitioning base:
        0. Current partition table (original)
        1. All Free Hog
Choose base (enter number) [0]? | 4. | Press Enter to select the default selection. The following is displayed:
Part      Tag   Flag   Cylinders    Size        Blocks
0        usr    wm     0 -  194     100.26MB   (195/0/0)   205335
1 unassigned    wu     195 - 1167   500.28MB   (973/0/0)  1024569
2     backup    wm     0 - 3983     2.00GB     (3984/0/0) 4195152
3 unassigned    wm     0             0         (0/0/0)          0
4 unassigned    wm     0             0         (0/0/0)          0
5 unassigned    wm     0             0         (0/0/0)          0
6 unassigned    wm     0             0         (0/0/0)          0
7 unassigned    wm     0             0         (0/0/0)          0

Do you wish to continue creating a new partition
table based on above table[yes]? | 5. | Press Enter to select the default selection. The following message is displayed:
| 6. | Press Enter to select the default selection. If all the disk space is in use, the following message is displayed:
Warning: No space available from Free Hog partition.
Continue[no]? | 7. | Type yes. You'll be prompted to type the new size for each partition:
Enter size of partition '0' [205335b,195c,100.26mb,0.10gb]: 90m
Enter size of partition '1' [1024569b,973c,500.28mb 0.49gb]:450m
Enter size of partition '3' [0b, 0c, 0.00mb, 0.00gb]: <cr>
Enter size of partition '4' [0b, 0c, 0.00mb, 0.00gb]: <cr>
Enter size of partition '5' [0b, 0c, 0.00mb, 0.00gb]: <cr>
Enter size of partition '7' [0b, 0c, 0.00mb, 0.00gb]: <cr>
Note
Temporary Free Hog Slice 6 is not displayed because that is the temporary free hog.
When you are finished resizing the last partition, the following is displayed, showing you the revised partition map :
Part     Tag   Flag    Cylinders      Size       Blocks
0        usr   wm      0 -  175      90.49MB    (176/0/0)  185328
1 unassigned   wu    176 - 1051     450.40MB    (876/0/0)  922428
2     backup   wm      0 - 3983       2.00GB    (3984/0/0) 4195152
3 unassigned   wm      0              0         (0/0/0)          0
4 unassigned   wm      0              0         (0/0/0)          0
5 unassigned   wm      0              0         (0/0/0)          0
6 unassigned   wm   1052 - 3983      1.47GB    (2932/0/0)   3087396
7 unassigned   wm      0              0         (0/0/0)          0
Okay to make this the current partition table[yes]?
Note
The Free Hog Slice 6, the free hog, represents the unused disk space. You might want to allocate this space to another partition so that it does not go unused, or you can save it and allocate it another time to an unused partition.
| 8. | Press Enter to confirm your modified partition map. You'll see the following message displayed:
Enter table name (remember quotes): | 9. | Name the modified partition table and press Enter:
Enter table name (remember quotes): c0t3d0.2gb | 10. | After you enter the name, the following message is displayed:
Ready to label disk, continue? | 11. | Type yes and press Enter to continue.
| 12. | Type quit (or q) and press Enter to exit the partition menu. The main menu is displayed.
| 13. | Type quit and press Enter to exit the format utility .
|
|
Using the Solaris Management Console Disks Tool
You can also partition a disk and view a disk's partition information by using the graphical interface provided by the Solaris Management Console (SMC) Disks Tool. To view partition information, follow the procedure outlined in Step by Step 1.6.
1. | As root, start up the SMC by typing
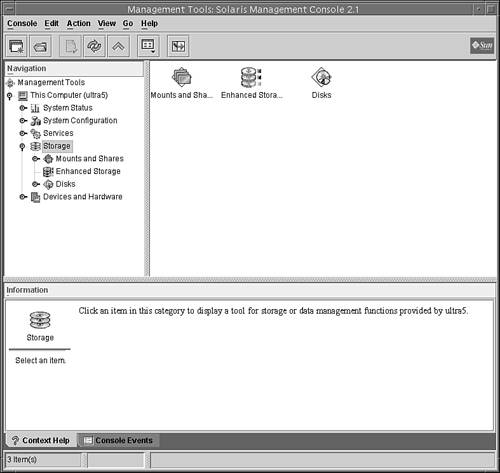
| 2. | In the left navigation window, select the This Computer icon, then click on the Storage icon as shown in Figure 1.2.
| 3. | From the SMC Main window, select the Disks icon as shown in Figure 1.3.
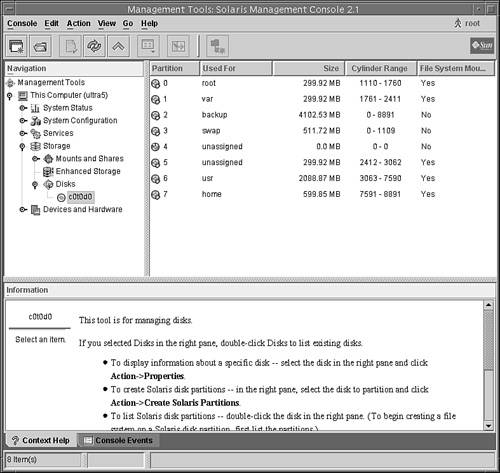
The disk drives connected to your system will be displayed in the main window as shown in Figure 1.4.
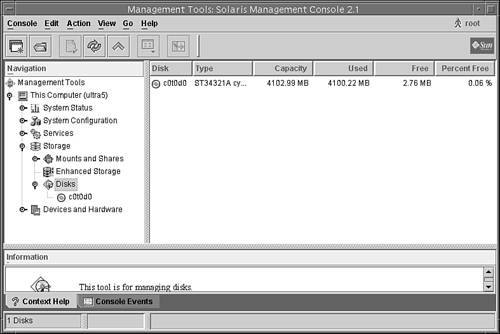
| 4. | Select the disk that you wish to view and the partition information for that disk will be displayed as shown in Figure 1.5.
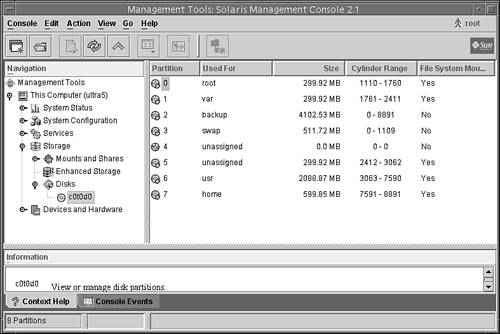
You can use the SMC Disks Tool to perform the following tasks:
Display information about a specific disk. Create Solaris disk partitions. List partitions. Copy the layout of one disk to another disk of the same type. Change the disk's label.
To partition a disk using the SMC Disks Tool, follow the steps outlined in Step by Step 1.6. After selecting the disk that you want to partition, select the Create Solaris Partitions option from the pull-down Action menu as shown in Figure 1.6.
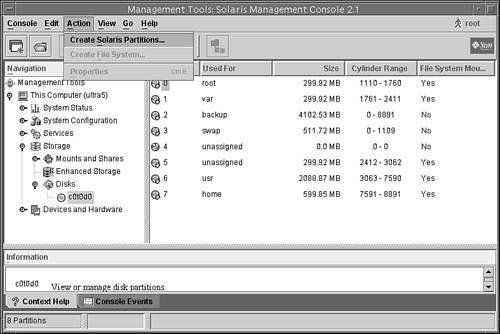
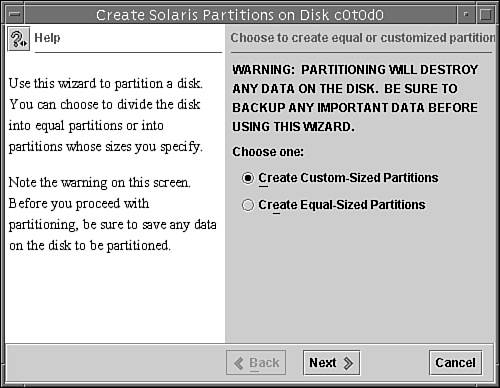
A Warning message will appear as shown in Figure 1.7.
|
Click on the Next button and follow the prompts in each window to partition your disk. To partition a disk using the Disks Tool, follow the procedure outlined in Step by Step 1.7.
|
1. | In the window shown in Figure 1.7, specify whether you want to create custom-sized partitions or equal-sized partitions, then click the Next button. For this example, we are going to create custom-sized partitions. The window shown in Figure 1.8 will be displayed prompting you to specify the number of partitions to create.
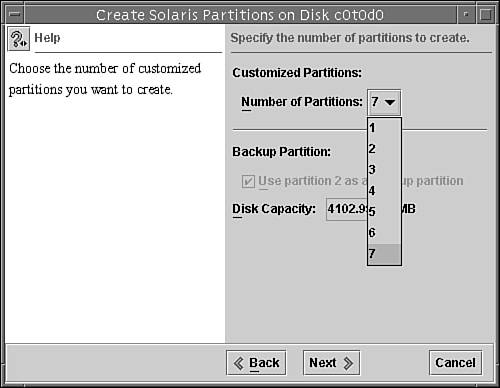
| 2. | For this example, I selected 7 partitions and clicked on the Next button to continue. The next window prompts you to specify the size and use of the partition, as shown in Figure 1.9.
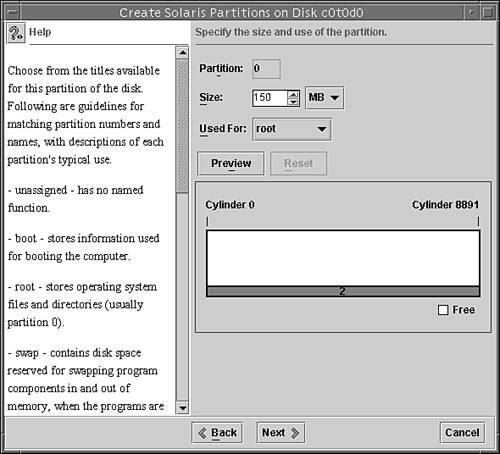
| 3. | Next to the Size field, I selected MB and entered 150 into the Size field. Options for specifying size are MB (megabytes) or % (percentage of total disk).
For the Used For field, I selected root because this is going to be the root partition. Options are unassigned, boot, root, swap, usr, stand, var, or home. Select the option that matches the function of the file system that you are creating. These options are described in the " Using the format Utility to Create Slices" section of this chapter.
When you've made all of your selections, you can click on the Preview button to see a graphical layout of the disk. Click on the Next button when you are finished making all of your selections and you'll be asked to specify the size and use of the next partition. Continue sizing each partition. For this example, I left the remaining slices at 0 MB.
| 4. | When you are finished sizing all of your partitions, you'll see a window summarizing all of your selections. Click Next and you'll see a warning window displayed as shown in Figure 1.10.
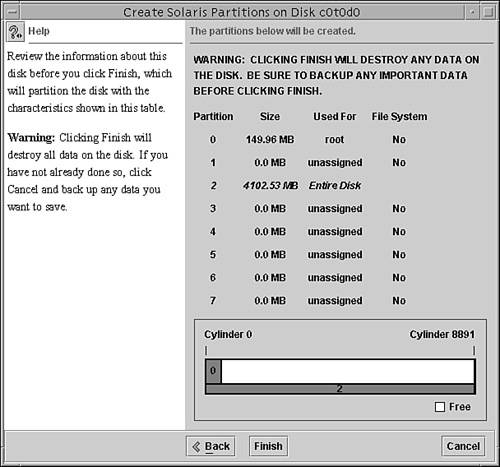
| 5. | If you are satisfied with the partitions, click Finish. The new partitioning information is written and the newfs utility builds the partitions and creates each new file system .
|
|
Recovering Disk Partition Information
It's always a good idea to save a disk's VTOC to a file using the prtvtoc command described earlier. This information can then be used later to restore the disk label if your current VTOC becomes corrupted or accidentally changed, or if you need to replace the disk drive.
Note
The disk label (VTOC) is stored in block 0 of each disk. The UFS file systems are smart enough not to touch the disk label, but be careful of any third party applications that create raw data slices. Ensure that these applications do not start at block 0; otherwise the disk label will be overwritten and the data on the disk will become inaccessible. I've seen some administrators start their raw slice at cylinder 2 or 3 just to ensure the disk label does not accidentally get overwritten.
By saving the output from the prtvtoc command into a file on another disk, you can reference it when running the fmthard command. The fmthard command updates the VTOC on hard disks. To recover a VTOC using fmthard, follow Step by Step 1.8.
1. | Run the format utility on the disk and label it with the default partition table.
| 2. | Use the fmthard command to write the backup VTOC information back to the disk drive. The following example uses the fmthard command to recover a corrupt label on a disk named
/dev/rdsk/c0t3d0s2. The backup VTOC information is in a file named c0t3d0 in the /vtoc directory:
fmthard -s /vtoc/c0t3d0 /dev/rdsk/c0t3d0s2 |
|
Another use for the fmthard command is partitioning several disks with the same partitioning scheme. Get the VTOC information from the disk you want to copy (c0t0d0), and write the information to the new disk (c1t0d0) as follows:
prtvtoc /dev/rdsk/c0t0d0s0 | fmthard -s - /dev/rdsk/c1t0d0s2
Logical Volumes
On a large server with many disk drives, standard methods of disk slicing are inadequate and inefficient. File systems cannot span multiple disks, and the size of the file system is limited to the size of the disk. Another problem with standard file systems is that they cannot be increased in size without destroying data on the file system.
Sun has addressed these issues with two software packages: the Solaris Volume Manager (SVM), called Solstice DiskSuite in previous Solaris releases, and the Veritas Volume Manager (VxVM). Both packages allow file systems to span multiple disks and provide for improved I/O and reliability compared to the standard Solaris file system. We refer to these types of file systems as logical volumes (LVMs).
SVM is now part of Solaris 10. The Veritas Volume Manager is purchased separately and is not part of the standard Solaris operating system distribution. SVM is a lower cost solution and typically, SVM is used on Sun's multipacks and for mirroring the OS drives, whereas the Veritas Volume Manager package is used on the larger SPARC storage arrays. LVMs, the SVM, and the Veritas Volume Manager are described in Chapter 10.
 |