| [ Team LiB ] |
|
EJB DeploymentThe EJB deployment phase follows the EJB development life cycle and generates the deployment descriptors. Deploying a bean into a container is the mechanism by which the container makes the bean ready to process client requests. EJB deployment can be done using one of many ways described here. But before we go into that, let's look at a simple development tool and the directory structure for packaging the EJBs, followed by the different tools used for EJB deployment. EJBGenEJBGen is part of the rich set of WebLogic Server utilities that enable faster EJB development. This is an EJB 2.0 code generator. This tool uses the special JavaDoc tags that are defined in the bean class to generate the home and remote interfaces along with the deployment descriptors. This greatly helps EJB source maintenance because only the bean class needs to be maintained. EJBGen is implemented as a doclet and the simplest invocation is as follows javadoc docletpath <weblogic_library_path>\weblogic.jar doclet weblogic.tools. where XXXBean.java is the bean class. If EJBGen is used on a bean class that has dependencies with other bean classes, specify the dependent classes in the same command. If XXXBean.java is linked to YYYBean.java then the above command will be as follows javadoc docletpath <weblogic_library_path>\weblogic.jar doclet weblogic.tools. Let's look at a simple Stateless Session bean example and how we can leverage EJBGen for better code maintenance and development. Let's use the simple Stateless Session bean TraderBean.java example provided with the WebLogic Server installation. The related files for this example is present under the samples/server/examples/src/ejb20/basic/beanManaged directory contained under the WebLogic Server directory. This bean provides two business methods for buying and selling stocks along with other life-cycle methods defined for the Session bean. In order for the EJBGen to automatically generate the deployment descriptors with the appropriate values, the following snippet with the EJBGen Javadoc tags has to be added to the class-level comment.
@ejbgen:session
   ejb-name = statelessSession
    default-transaction = Required
@ejbgen:jndi-name
  remote = ejb20-statelessSession-TraderHome
@ejbgen:ejb-client-jar
   file-name = ejb20_basic_statelessSession_client.jar
@ejbgen:env-entry
  name=WEBL
  type=java.lang.Double
  value=10.0
@ejbgen:env-entry
  name=INTL
  type=java.lang.Double
  value=15.0
@ejbgen:env-entry
  name=tradeLimit
  type=java.lang.Integer
  value=500
For the EJBGen to generate the Home and Remote interfaces, the business methods buy() and sell() add the javadoc tag @ejbgen:remote-method to the respective method comment to indicate that these methods have to be exposed as remote methods. After making the changes, on invocation of the following command javadoc docletpath c:\bea\weblogic81\server\lib\weblogic.jar doclet weblogic.tools the deployment descriptors and the Home and Remote interfaces for the TraderBean will be generated. EJBGen also provides a list of options that provides greater control to the user with respect to the generated code. For a complete list of options and supported tags, refer to http://e-docs.bea.com/wls/docs81/ejb/EJBGen_reference.html. Packaging EJBsThe bean has to be packaged in a particular directory structure so that it can be deployed correctly. The base directory of the bean should contain the classes within the directory tree represented by its package structure. Apart from the classes, the base directory should also contain a META-INF directory, which should hold the two deployment descriptor files (ejb-jar.xml, weblogic-ejb-jar.xml or weblogic-cmp-rdbms-jar.xml, if applicable). The base directory becomes the root of the JAR file that's created for deployment.
{ejb_base_directory}
---- com/.../*.class
---- META-INF/ejb-jar.xml
---- META-INF/weblogic-ejb-jar.xml
---- META-INF/weblogic-cmp-rdbms-jar.xml
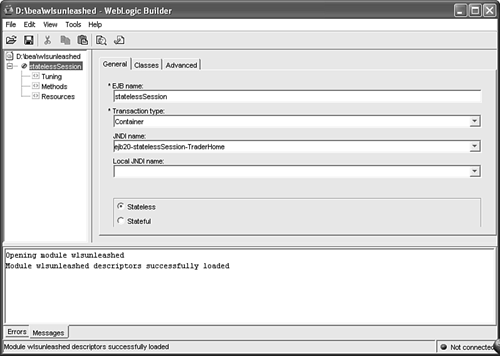
In earlier versions of WebLogic Server, there was no tool to compile all related modules within an archive file and make it a deployable unit. The appc compiler performs all the predeployment validation and executes the ejbc compiler on the validated module. The validation performed takes care of specifications compliance of the deployment descriptors. For the convenience of the developer, WebLogic Server also provides an Ant task to use the appc compiler. For a complete list of options available for the appc compiler and how to use this tool, refer to http://edocs.bea.com/wls/docs81/ejb/EJB_tools.html. WebLogic Builder ToolWebLogic provides a very handy tool called WebLogic Builder, which can be used to assemble your bean module and generate and edit the deployment descriptors. You'll also be able to deploy the bean using this tool. If you're using Windows, this program is available from the Start menu, under Programs You can also start this from the Command Prompt. First, set your environment by invoking the setEnv scripts that you can find in your domain directory. This sets your CLASSPATH to include the relevant JAR files of WebLogic. After you've set the environment, invoke the builder tool by executing the following command: java weblogic.marathon.Main This displays a Swing-based GUI. Alternatively, you can use the prepackaged script startWLBuilder.sh (Unix) or startWLBuilder.cmd (Windows) that comes with the standard WebLogic Server installation. These files are presented in the server/bin directory under the WebLogic root directory. Open the base directory where your bean classes are stored by clicking on the File Figure 20.8. WebLogic Builder tool.
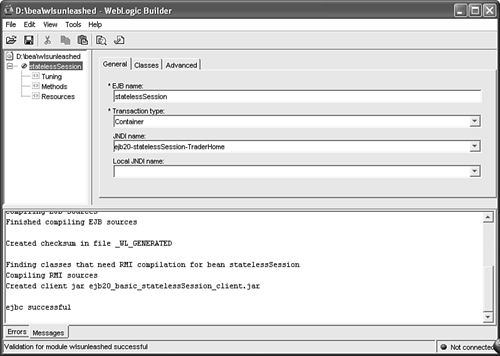
The top-left part of the view (left window) lists all the available beans in the module. Under each bean, it lists three parameters: Tuning, Methods, and Resources. The top-right portion of the view (right window) has a tabbed view, which changes based on which subtitle you've clicked on in the left window. The bottom portion of the view is reserved for displaying status messages and errors. When you have clicked on the topmost entry in the left window that indicates the path of the bean module, the right window enables you to select general options such as roles. We'll discuss roles when dealing with security for session beans. Clicking on the bean name on the left windowstatelessSession, for examplechanges the tabs in the right window. The statelessSession is from one of the basic EJB examples packaged within the standard WebLogic Server installation. Now you find three tabs: General, Classes, and Advanced. In the General tab, you can specify the EJB name, the transaction type (Container or Bean), the JNDI name for remote and local lookups, and whether the bean is a Stateful or Stateless Session bean. In the Classes tab, you can specify the classes that represent the remote home, remote, local home, and local interfaces and the bean class. With the information given so far, Builder can generate deployment descriptors. When you're done with deployment descriptor generation, you can generate the JAR file that contains your bean modules by clicking the File After you generate the JAR file, you must validate the deployment descriptors. This can be done by clicking on the Tools Figure 20.9. EJB Build using the WebLogic Builder tool.
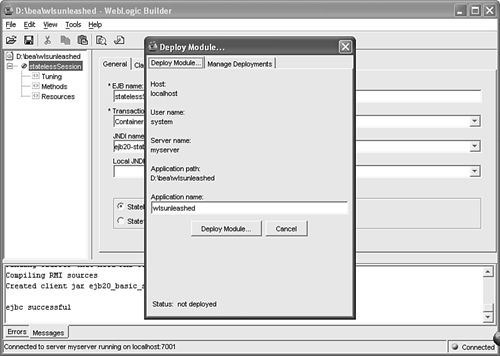
You can now deploy the bean by using the Builder tool. For this, you must have WebLogic server running. Click on the menu item Tools Figure 20.10. Deploying a bean using the WebLogic Builder tool.
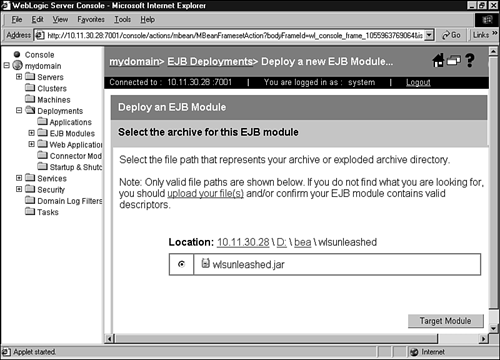
Deploying Using the ConsoleAlternatively, an EJB can be deployed using the WebLogic Console. This supposes that you've properly packaged your bean beforehand. There is some flexibility between a remote deployment and a local deployment. Let's look at the local deployment first. Start your WebLogic Server and the WebLogic Console. Navigate to the link Deployments Figure 20.11. Deploying a bean using the WebLogic Consolepick the JAR.
When you click on Select next to the JAR/EAR file, the view changes to enable you to specify the targets for the deployment. It also enables you to change the name of the component, if necessary. Choose the server from the Available Servers list and move it to the Target Servers list. This can be seen in Figure 20.12. Because our sample WebLogic Server environment is a single server environment using autodeployment, there's no need to choose a specific target (the administration server is automatically targeted). Figure 20.12. Deploying a bean using the WebLogic Consolefinishing up.
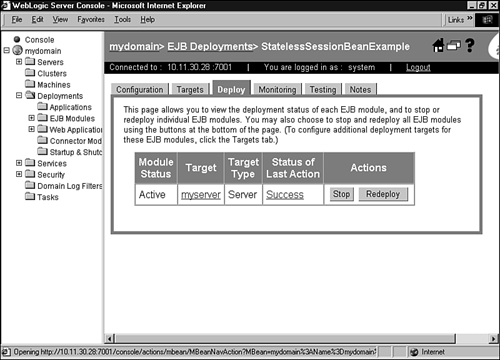
After this, click on the Deploy button, which displays the deployment status on the screen. The screen is refreshed automatically every 10 seconds. Finally, when the deployment succeeds, the screen will display a view as shown in Figure 20.13. Figure 20.13. Deploying a bean using the WebLogic ConsoleDone!
Alternatively, in a remote deployment using the Console, the deployed application can reside anywhere the user wants. It is uploaded from that directory using the hyperlink and the application is then targeted to the servers, if necessary. TIP WebLogic Server collects a lot of information about the deployed EJB and presents it inside the Console in the Tuning tab under the Deployments Using the weblogic.Deployer UtilityA third way to deploy the bean to the server is by the use of the weblogic.Deployer command-line utility. To use this utility to deploy your bean, use the following command line: $ java weblogic.Deployer -adminurl http://localhost:7001 -name STATELESSSESSION -user Here, the -adminurl parameter identifies the URL of the administration server of your application. -name is the name of the application, and -user identifies the user ID. The -source parameter identifies the source archive file or directory from which the files should be deployed into the server. When invoked, the server requests the password for the specified user ID. After you enter the password, the server displays the status of the deployment as shown in the preceding listing. The Deployer utility takes a lot of parameters. Full documentation of this utility is available on BEA's Web site at http://edocs.bea.com/wls/docs81/deployment/tools.html. TIP WebLogic Server allows individual EJB classes to be reloaded without the need to redeploy the entire EJB module. This comes in handy during the development phase when changes to the code are frequent. This feature is facilitated with the help of the individual EJB classloader for implementation classes. |
| [ Team LiB ] |
|
 BEA WebLogic Platform 8.1