16.2. Externalizing Plug-in StringsWhen the plug-in manifest has been externalized, the other major source of human-readable strings is the Java source for the plug-in. Within the Favorites example, there are dozens of strings that are presented to the user in the form of UI elements and messages. To show the process for externalizing the strings in your Java source files, the following will take you through the process of extracting the strings from the FavoritesView class. The Favorites view contains several hard-coded strings that are used for UI elements such as menu labels and table column headers (see Figure 16-1). Figure 16-1. The Favorites view showing various strings.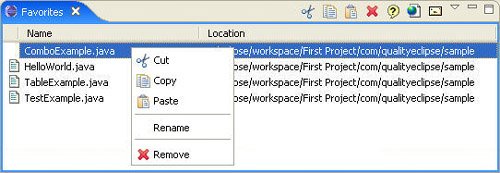
Within the FavoritesView class, you should focus on the following hard-coded string definitions (extracted to constants using the Refactor > Extract Constant... command): private static final String CUT = "Cut"; private static final String COPY = "Copy"; private static final String PASTE = "Paste"; private static final String RENAME = "Rename"; private static final String REMOVE = "Remove"; private static final String NAME = "Name"; private static final String LOCATION = "Location"; Eclipse includes a powerful string externalization tool that will do most of the work. Start by selecting the FavoritesView class. Next, select the Source > Externalize Strings... command to open the Externalize Strings wizard (see Figure 16-2). Figure 16-2. The Externalize Strings wizard.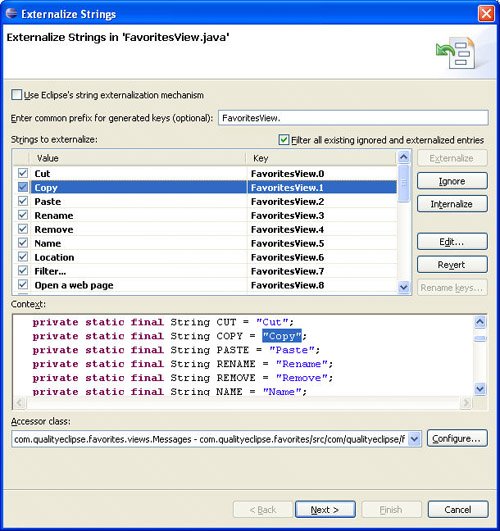
Eclipse 3.2 includes a new wizard for extracting strings from plug-in manifest files (MANIFEST.MF and plugin.xml).Access it using the PDE Tools > Externalize Strings... command in the context menu of your plug-in project or manifest files. The wizard scans the class for any string literals and presents them in the Strings to externalize list. The first column of the table is used to determine whether the string is translated, never translated, or skipped (until the next time the wizard is run on this class). The key column contains the wizard's first attempt at generating a unique key for the string (initially numbered 1 through n). The value column contains the strings that were found. Selecting an entry in the table will highlight it in context in the text pane below the table. Prior to Eclipse 3.1, the default string-extraction mechanism used by Eclipse relied on dynamically looking up each string at runtime using a message lookup class and a call to a getString() method. Eclipse 3.1 introduced a much more efficient mechanism that is used here. At the top of the wizard, click the Use Eclipse's string externalization mechanism option to use the new string-extraction mechanism. The common prefix field has been prepopulated with the name of the class in which the strings were found. Change this value to "FavoritesView_" (note the use of the underscore rather than the period to make each key a valid Java identifier). This value will be prefixed to the keys in the table to create the final keys that will be associated with each string. Because the generated keys are not very meaningful, the first thing to do is edit them to represent the strings they will replace. Since the strings you want to replace are simple, have the keys duplicate the values (see Figure 16-3). Figure 16-3. Externalize Strings wizard with better key names.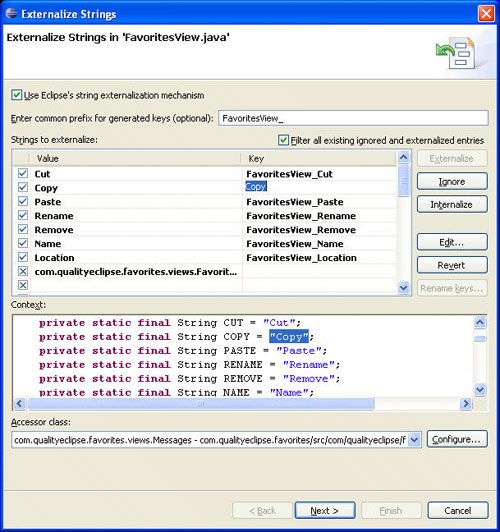
After providing better keys for the strings you want to extract, you need to go through the list and identify which strings to extract and which ones should never be translated (see Figure 16-4). Figure 16-4. Externalize Strings wizard with strings marked as "Ignore."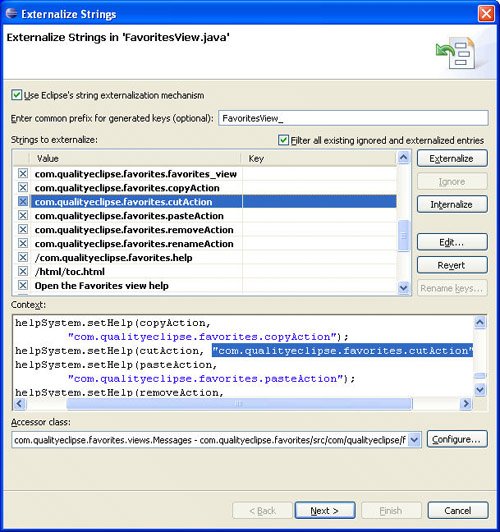
By default, all the strings will be extracted. This means that each string with its key will be added to the properties file. Within the Java source file, the string will be replaced by references to a field which has been populated with the corresponding string from the properties file. If you know that a string should not be extracted, manually mark it with a special end-of-line comment (e.g., //$NON-NLS-1$) during development to make the string extraction process easier later on. The number that is at the end of the comment indicates which string should be ignored when there is more than one string on the same line. If more than one string should be ignored on the line, each string will have its own end-of-line comment in that exact same format (including the leading double slashes). Selecting a string and clicking the Internalize button will tell the wizard to mark the string as nontranslatable using the same end-of-line comment used earlier. Clicking the Ignore button will cause the wizard to take no action. Alternatively, you can click on the checkbox image in the first column of the table. The image will cycle through the three options: Tip Think carefully about how you write your code, since it can cause more strings that need externalization than is strictly necessary. Replace single-character strings with single characters, look for opportunities to reuse keys rather than creating new ones, and use message binding to reduce the number of strings that need to be externalized. For example, assuming that "Count" has already been externalized, you might encounter the following three scenarios: // Bad, we don't want to externalize "Count ("
label.setText("Count (" + count + ")");
// Good, we already have "Count" externalized.
label.setText("Count" + " (" + count + ')');//$NON-NLS-2$
// Better, use binding patterns whenever possible.
label.setText(
MessageFormat.format("Count (%1)",
new String[] {count})
In the second scenario, you can reuse the key assigned to "Count" and reduce the number of keys needed. In the third scenario, you can create a single new key that encodes a dynamic argument in a translation-relative position (in other languages, the %1 argument might appear elsewhere in the string). Clicking the Configure... button will take you to a dialog where you can specify where the strings will be externalized and how they will be accessed (see Figure 16-5). The Package field specifies the location where the property file will be created, and the Property file name field specifies the name of the property file that will be created. It will default to messages.properties. Unless you have a reason to do otherwise, you should simply accept the defaults. Figure 16-5. Define resource bundle and access settings.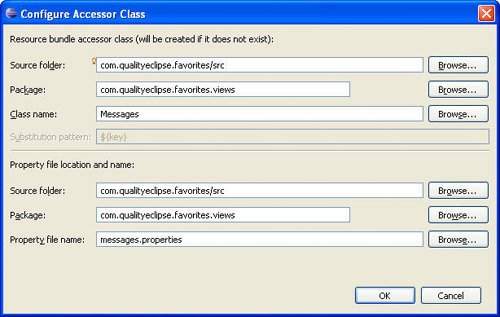
By default, a resource bundle accessor class will be created with the name Messages. This class will define fields corresponding to each extracted string as well as the code needed to populate those fields. If you are using the older Eclipse string-extraction mechanism and don't want to have this class created, blank the Class name field. If you do thatpossibly because you want to use an alternative mechanismyou might also want to specify an alternative string substitution pattern (the default pattern is designed to match the accessor class that the wizard would create). Since the Externalize Strings wizard is actually built using the Eclipse refactoring framework, the next two pages are common to all refactoring wizards. The first of these pages (see Figure 16-6) will show any errors or informational messages. The only message you should see at this point is a notification that the properties file does not exist and needs to be created. Click the Next button to continue. Figure 16-6. The messages.properties file needs to be created.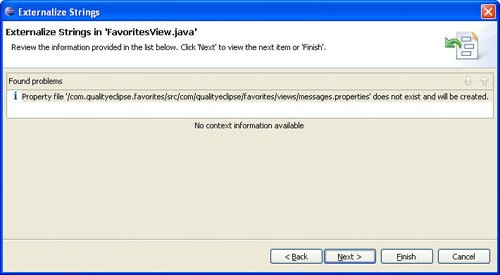
The final page of the wizard will present a list of all the proposed changes that the wizard wants to make (see Figure 16-7). First, you will see all the string substitutions that will be made to the FavoritesView class. After that, you will see the contents of the properties file and the resource bundle accessor class. Figure 16-7. Review the proposed changes.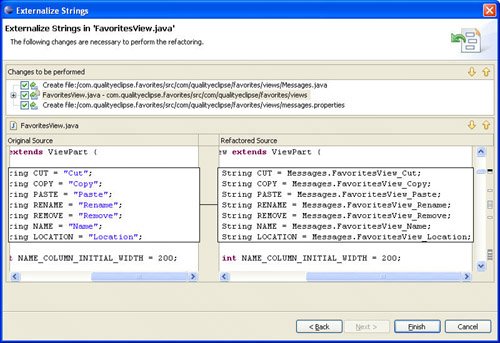
Clicking the Finish button will implement all the proposed changes. The original lines from the FavoritesView that you concentrated on earlier will be replaced by the following: private static final String CUT = Messages.FavoritesView_Cut;
private static final String COPY = Messages.FavoritesView_Copy;
private static final String PASTE = Messages.FavoritesView_Paste;
private static final String RENAME = Messages.FavoritesView_Rename;
private static final String REMOVE = Messages.FavoritesView_Remove;
private static final String NAME = Messages.FavoritesView_Name;
private static final String LOCATION =
Messages.FavoritesView_Locatiion;
Every string literal is replaced by a reference to its matching field defined in the Messages class. Every field is populated with the value of its corresponding string. Any string literals that were initially ignored will be marked with the //$NON-NLS-1$ tag, which will prevent them from being extracted in the future. The code for the resource bundle accessor class will look something like this: package com.qualityeclipse.favorites.views;
import org.eclipse.osgi.util.NLS;
public class Messages extends NLS {
private static final String BUNDLE_NAME =
"com.qualityeclipse.favorites.views.messages"; //$NON-NLS-1$
private Messages() {
}
static {
// initialize resource bundle
NLS.initializeMessages(BUNDLE_NAME, Messages.class);
}
public static String FavoritesView_Cut;
public static String FavoritesView_Copy;
public static String FavoritesView_Paste;
public static String FavoritesView_Rename;
public static String FavoritesView_Remove;
public static String FavoritesView_Name;
public static String FavoritesView_Location;
public static String FavoritesView_Filter;
}
Finally, the messages.properties file will look like this: FavoritesView_Cut=Cut FavoritesView_Copy=Copy FavoritesView_Paste=Paste FavoritesView_Rename=Rename FavoritesView_Remove=Remove FavoritesView_Name=Name FavoritesView_Location=Location As with the plugin.properties file, the translated properties files for every targeted language should be named <basename>_<language>_ <country>.properties, where <language> and <country> represent the two-letter codes used to signify the language and country and <basename> is the name of the original properties file. Tip To make sure that you have externalized all your plug-in's strings (or marked them as nontranslatable), consider changing the Usage of non-externalized strings option from "Ignore" to "Warning". This option can be found on the Java > Compiler > Errors/Warnings preference page. Alternatively, CodePro includes a String Literals code audit rule that will flag hard-coded string literals (with options to ignore single-character strings, strings containing only whitespace or digits, static final field initializers, strings matching certain patterns, etc.). While externalizing strings, the following suggestions have been found to be helpful:
|