Previous Page
Next Page

Selling Items on Google Base

Okay, now you know how you can search for and purchase items on Google Base. But what if you have something to sell? Read on to learn how to post your items for sale on the Google Base system.

Submitting Google Base Listings

Creating a listing with Google Base is a relatively easy process. All you have to do is follow these steps:

1.
From the main Google Base page, click the Post Your Own Item link.

2.
The next page, shown in Figure 17.11, prompts you to select an item type. This should be the main product category for your listing. You can probably find a category that fits by pulling down the Choose an Existing Item Type list; if not, enter a new category into the Create Your Own Item Type box. Click the Next button to continue.


Figure 17.11. Selecting an item type.


3.
The next page, shown in Figure 17.12, is where you enter all the details about what you're selling. While the specific details will vary by item type, here's what you're likely to encounter:

  • Title (the heading of your item listing)

  • Price

  • Price type (fixed price, minimum price, or negotiable)

  • Quantity

  • Product type

  • Condition

  • Brand

  • Other attributes (below the Brand box)

  •  Labels (up to 10 keywords that describe your item, separated by commas)

  • Description (detailed text description)

Figure 17.12. Entering product details.


Tip

You'll need to click the Edit link in the Location and Delivery section to specify your shipping costs for this item.

4.
Still on the same page, move to the Pictures section (top right) and add up to 10 photos of your item. You can add a picture hosted on another website by entering the photo's complete URL, or you can click the Browse button to upload pictures stored on your PC. Click OK after you've entered the information for each photo.

5.
Still on the same page, scroll down to the bottom of the page and check your Contact, Payment, and Location and Delivery information. Click the appropriate Edit link to change any of this info.

6.
Still on the same page, enter the length of time you want this listing to last into the This Item Will Expire in XX Days field. Your listings can run a maximum of 31 days.

7.
When you're done entering information, click the Preview button to preview your listing, or the Publish button to finalize and post your listing.

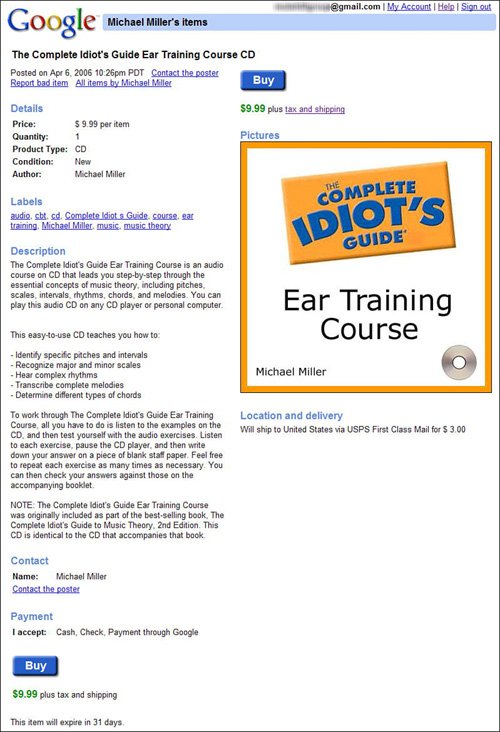
The resulting listing, like the one in Figure 17.13, is now live. Good luck with the selling!

Figure 17.13. A live Google Base listing.

Accepting Google Payments

If you want to accept payment via Google Payments (which lets you accept credit card payments), you'll need to specify this separately when you're creating the product listing. When you click the Edit button in the Payment section, you'll see the section expand to display the options shown in Figure 17.14. Check the Accept Payment Through Google option and then complete the rest of your item listing.

Figure 17.14. Selecting the Google Payments option.


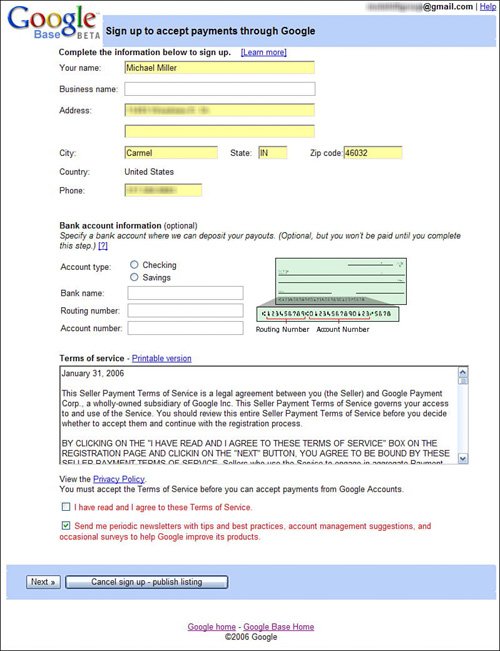
The first time you specify Google Payments for an item listing, you'll be prompted to sign up to accept payments through Google. When you see the page shown in Figure 17.15, enter your name, address, phone number, checking/savings account information (for direct deposit of payment funds), and so on. When you click the Next button, your account is activated.

Figure 17.15. Entering information to establish your Google Payments account.

Why should you sign up for Google Payments? Well, it's an easy way for individuals to accept payment via credit cardwhich is the preferred form of payment by most buyers. Google handles all the details of the transaction; in effect, the buyer pays Google, and then Google deposits the funds in your bank account.

Of course, this service isn't free. (What is?) Google charges you 2.5% of the transaction value, plus 25 cents per transaction. This is less than PayPal charges for similar services on eBay; it's a fair deal, and should be factored into your cost of doing business.


Previous Page
Next Page