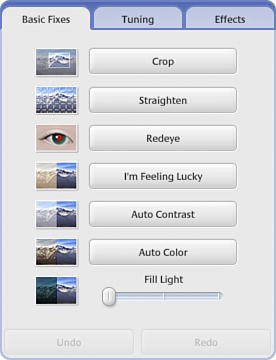
Fixing Common Photo ProblemsIf you're like me, not every photo you take is a "keeper." Some of my photos are too dark, some are too light, some have a bad color balance, some aren't composed properly, some are shots of people with really bad red eye...you get the picture. (No pun intended.) The nice thing about taking photos digitally (as opposed to shooting on film) is that fixing bad pictures is a simple matter of moving the appropriate digital bits and bytes aroundwhich is something that Picasa does with aplomb. Tip You return to Picasa's photo library by clicking the Back to Library button. When you want to fix a picture, you start by double-clicking it in the photo library. This displays a large version of the photo in the main window, along with a new control pane on the left side of the window, as shown in Figure 34.6. The control pane has three different tabs; each tab contains a variety of controls you can use to edit and manipulate the selected picture. Figure 34.6. Editing a picture.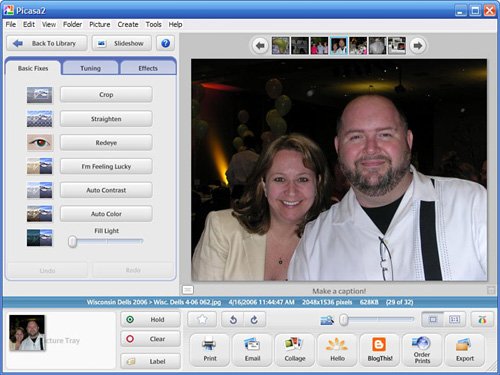
Read on to learn how to perform some of the more common fixes. Fixing a Dark (or Light) PictureIf you shoot a lot of photos indoors, chances are you'll run across a few shots that are underlitthat is, the photos appear too dark. Conversely, shooting outdoors in bright sunlight can result in some photos being too light, or washed out. Fortunately, Picasa can fix both these problems. Whether your picture is too dark or too light, there are several different methods you can use to fix the problem. The easiest method, and the first to try, is to select the Basic Fixes tab (shown in Figure 34.7) and click the Auto Contrast button. Nine times out of ten, this will do the trick. Figure 34.7. Picasa's Basic Fixes tab.
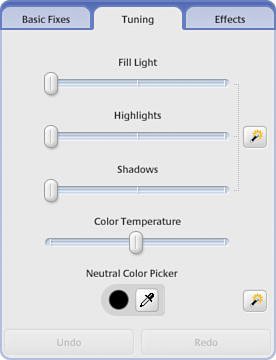
If using Auto Contrast doesn't fix the problem, try adjusting the Fill Light slider (also on the Basic Fixes tab). Moving the slider to the right lightens the picture as if you shot it with additional fill light; moving the slider to the left removes the fill light and darkens the picture. Additional adjustments can be made from the Tuning tab, shown in Figure 34.8. From here you can (once again) adjust the Fill Light, as well as Highlights (lightens or darkens only the brightest areas of the picture) and Shadows (lightens or darkens only the darkest areas of the picture). Figure 34.8. Picasa's Tuning tab.
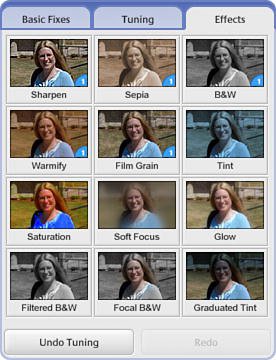
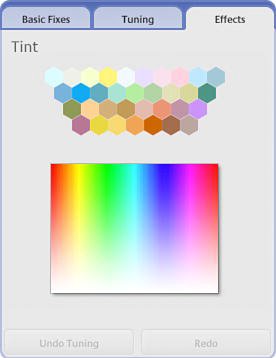
Fixing an Off-Color PictureAnother problem with shooting indoors is that you don't always get the right colors. Shooting under fluorescent lights can turn everything a little green, while shooting under too low a light can give everything a warmish orange cast. Tip You can undo any change you make by clicking the Undo button in the Control Panel. Reapply the change by clicking the Redo button. To fix tint problems (the entire picture looking the wrong color), go to the Basic Fixes tab and click the Auto Color button. If this doesn't do the trick, go to the Tuning tab and adjust the Color Temperature control. Moving this slider to the left creates a "cooler" picture (more blue), while moving it to the right creates a "warmer" picture (more red). You might also consider using the Neutral Color Picker on the Basic Fixes tab. Click the eyedropper button and then click the cursor on an area in your picture that should be neutral white or black. This will adjust all the other colors to match. If you need more control over the picture's tint, go to the Effects tab (shown in Figure 34.9) and click Tint; this displays the Tint control. Click your cursor within the Pick Color box to display the screen shown in Figure 34.10. Move the cursor around the color box until you find the proper tint, and then click the cursor to confirm. Figure 34.9. Picasa's Effects tab.
Figure 34.10. Adjusting the tint of a picture.
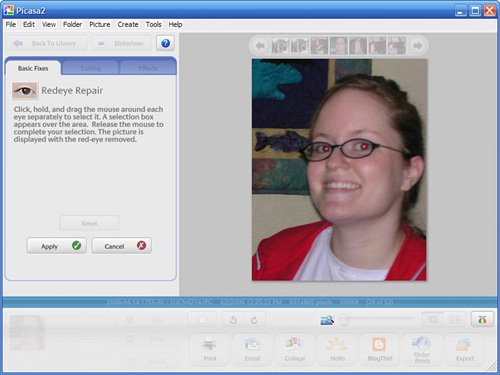
Finally, if a picture has too much (or too little color), you need to adjust the photo's color saturation. You do this from the Effects tab. Click the Saturation control, and then adjust the Amount slider to the left (to remove color from the picture) or the right (to increase the amount of color). Fixing Red EyeWhen you shoot indoors with a flash, you sometimes get what is called the "red eye" effect. (You know this one; it's when your subject looks like the red-eyed spawn of a devil.) Fortunately, Picasa makes removing red eye a snap. Here's what you do:
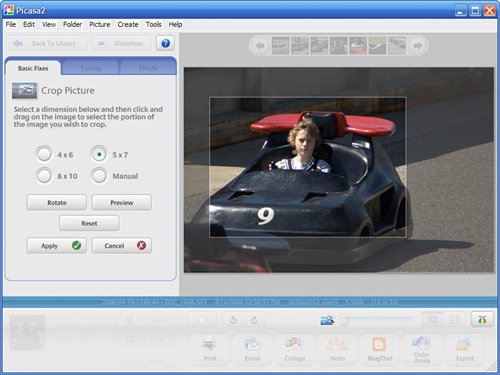
Cropping a PictureSometimes, for whatever reason, you don't properly compose a picture. Maybe your subject isn't centered; maybe your subject is too far away. Whatever the case, you can crop the photo to put the subject front and center in the picture, using Picasa's Crop control. To crop a picture, follow these steps:
Applying Special EffectsPicasa's Effects tab not only lets you adjust tint and color saturation, it also lets you apply a bevy of special effects to your photos. Table 34.2 details the available special effects.
Figure 34.13. A portrait with a soft focus effect.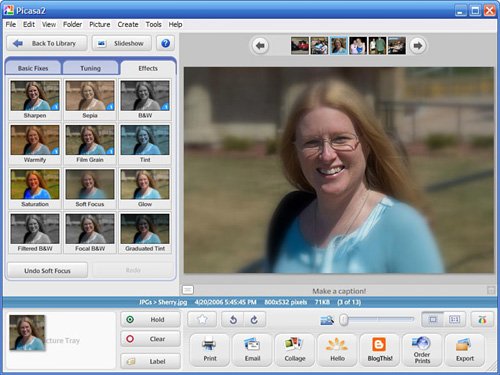
|