|
|
< Day Day Up > |
|
Hack 26 Secure Your IRC Connection with SSL
Hide your conversations on IRC from prying eyes on the Internet. Let's face it—IRC was not designed for the paranoid. Messages, commands, passwords, everything gets sent to the server unencrypted, which frankly just makes life easy for eavesdroppers. The Internet has demanded a solution to this problem, and the Internet has provided one: SSL, the Swiss Army knife of network encryption solutions. If your IRC server of choice supports SSL, you can open an encrypted connection between your computer and the IRC server and tunnel your IRC connection through it, hiding your precious conversations from all eavesdroppers with fewer resources than a national government.
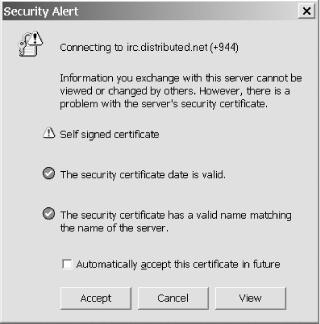
Securing IRC with SSL has a number of advantages over SSH tunneling. Most importantly, no user account is required on the machine at the remote end of the tunnel. Secondly, the information usually remains encrypted at every point between the client and the server, rather than just between the start and end of the tunnel. Finally, the tunnel can be automatically established and destroyed when the IRC client connects and disconnects, relieving the user of the job of starting and stopping a separate SSH session. However, SSL tunneling cannot be used to bypass firewalls in the same manner as SSH. Many modern IRC clients and servers have SSL support built in. This hack will explain how to establish secure connections with mIRC, XChat, and irssi. The use of an external SSL package such as stunnel to create the encrypted link will also be explained. To make a secure connection to your IRC server or network, it must support SSL connections at the server end—contact your server administrator or read your network's FAQ to find out if this is the case. 4.11.1 Securing Your IRC Connection with mIRCmIRC Versions 6.14 and later support SSL-encrypted IRC connections, but at the time of writing, mIRC does not include the required SSL libraries for legal reasons. Fortunately, all you have to do to install the libraries is download and run the latest self-installing OpenSSL package from http://www.shininglightpro.com/products/Win32OpenSSL.html. mIRC's SSL support will then be enabled automatically. To configure mIRC to connect to a server using SSL, open the FileSelect Server dialog, select your IRC server from the IRC Server list, and click the Edit button. In the Edit Server dialog that appears, change the port number to the port on which the server listens for SSL connections and prefix it with a + to tell mIRC to use SSL when connecting, as shown in Figure 4-26. Finally, click OK and then Connect to Server to connect securely to the server. If your server presents a self-signed certificate, mIRC will display the dialog shown in Figure 4-26. To accept the certificate and complete the IRC connection, click Accept. Figure 4-26. mIRC warning that a certificate has been self-signed 4.11.2 Securing Your IRC Connection with XChatTo open a secure IRC connection with
XChat, first bring up the
Server List window by selecting X-Chat
Figure 4-27. Setting up an SSL-secured connection in XChat 4.11.3 Securing Your IRC Connection with irssiSpecifying in irssi that a connection should be encrypted using SSL is as easy as adding an -ssl parameter to the /connect command. If your server were irc.example.com and it listened for SSL connections on port 6668, you would simply launch irssi and type: /connect -ssl irc.example.com 6668irssi supports a number of other SSL-related commands, including ones that attempt to verify the authenticity of server certificates before connecting. By default, irssi will accept all valid certificates, even self-signed ones. See the irssi documentation for further details. 4.11.4 Securing Your IRC Connection with stunnelIf your IRC client doesn't support SSL natively, you can create a secure connection to the IRC server with a separate package, and then tunnel your IRC connection through it. One such free package is stunnel, available for both Windows and Linux/Unix operating systems from http://www.stunnel.org. For installation instructions, see the stunnel installation FAQ at http://www.stunnel.org/faq/install.html. This hack is based on stunnel Version 4.0 or later. To set up stunnel to secure your IRC connections, you need to create a configuration file, stunnel.conf. On Linux/Unix, this file should go in your home directory. On Windows, it should go in the same directory as the stunnel executable. If your server were irc.example.com and it listened for SSL connections on port 6668, then for simple IRC session encryption, the contents of the file should be as follows: client = yes verify = 0 delay = yes # [irc] accept = 6667 connect = irc.example.com:6668 Now run stunnel. On Linux/Unix, run stunnel ~/stunnel.conf. On Windows, just launch stunnel.exe from wherever you installed it. Finally, to set up the secure link and tunnel your IRC connection through it, simply tell your IRC client to connect to port 6667 on localhost. The preceding sample configuration file does not prevent stunnel from connecting to servers with self-signed certificates: details of how to do so are in the stunnel documentation. The SSL connection will not be made until your IRC client tries to connect, so it is safe and convenient to start stunnel automatically by adding it to your Start menu's Startup folder, or by adding the previous command to your .profile. —Steve Jolly |
|
|
< Day Day Up > |
|