18.1. Feature ProjectsThe Favorites example includes three projects"Favorites Plug-in," "Favorites Help," and "Favorites NLS Fragment"that you would like to combine together into a single feature. 18.1.1. Creating a new feature projectTo create the new feature, you will begin by using the New Project wizard to create a new Feature Project (see Figure 18-2). Figure 18-2. The New Project wizard.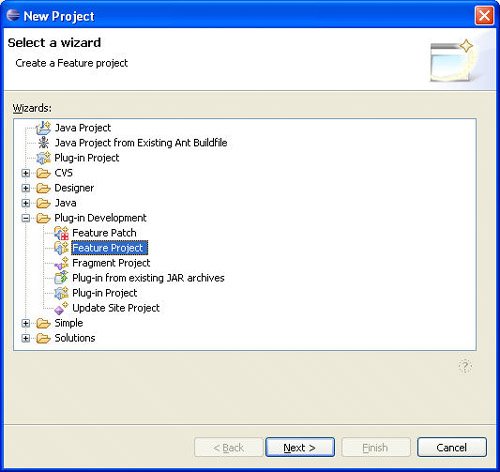
On the first page of the New Feature wizard (see Figure 18-3), enter "com.qualityeclipse.favorites.feature" as the project name. Click the Next button. Figure 18-3. The New Feature wizard.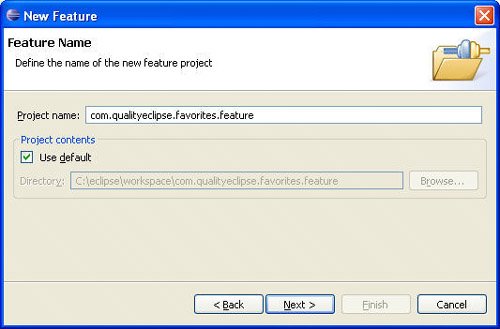
On the second page of the wizard (see Figure 18-4), change the feature ID to "com.qualityeclipse.favorites" so that it matches the ID of the main plug-in. This is important because the generally accepted practice in the Eclipse world is to locate feature branding files (such as about.ini and about. properties) in the plug-in with the same ID as the feature (as you will see a bit later, this is not strictly requiredsee Section 18.1.3, Feature manifest editor, on page 624). Figure 18-4. Feature Properties page of the New Feature wizard.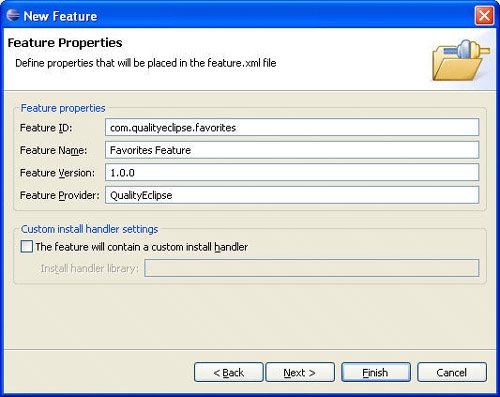
A couple of other fields should be filled in on this page as well: Change the Feature Name to "Favorites Feature"; leave the Feature Version set to "1.0.0"; and set the Feature Provider to "QualityEclipse". The section at the bottom of this page deals with setting up a custom install handler. This is an advanced feature, which won't be covered in this book. Leave those settings unchanged and click the Next button. On the last page of the wizard (see Figure 18-5), you will see a list of all the loaded plug-ins and fragments defined in your workspace along with their version numbers. Find the two plug-ins and one fragment created earlier and select them. Click Finish to create the project and generate the feature manifest file. Figure 18-5. Referenced Plug-ins and Fragments page of the New Feature wizard.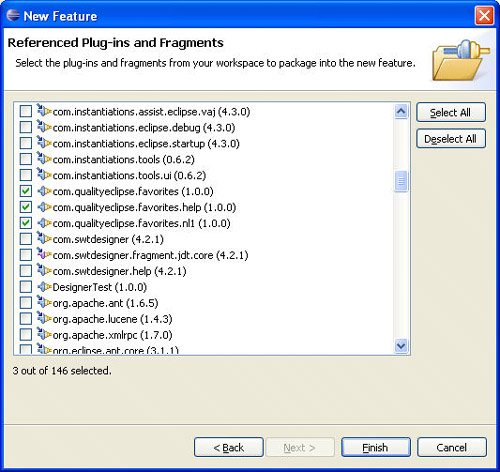
18.1.2. Feature manifest filesThe wizard created a single file of interest: the feature manifest file. Based on the options selected in the wizard, the feature manifest file (feature.xml) will look like this: <?xml version="1.0" encoding="UTF-8"?>
<feature
id="com.qualityeclipse.favorites"
label="Favorites Feature"
version="1.0.0"
provider-name="QualityEclipse">
<description url="http://www.example.com/description">
[Enter Feature Description here.]
</description>
<copyright url="http://www.example.com/copyright">
[Enter Copyright Description here.]
</copyright>
<license url="http://www.example.com/license">
[Enter License Description here.]
</license>
<plugin
id="com.qualityeclipse.favorites"
download-size="0"
install-size="0"
version="0.0.0"/>
<plugin
id="com.qualityeclipse.favorites.help"
download-size="0"
install-size="0"
version="0.0.0"/>
<plugin
id="com.qualityeclipse.favorites.nl1"
download-size="0"
install-size="0"
version="0.0.0"
fragment="true"/>
</feature>
The structure is fairly simple. At the beginning of the file, you will find the id, label, version, and provider-name attributes. The description, copyright, and license sections contain information meant to be presented to the user of the feature. The remainder of the file lists the individual plug-ins and fragments that compose this feature. Each plug-in is identified by its plug-in ID, and the version attribute specifies the specific version of the plug-in that is part of this feature. In general, the version numbers of the included plug-ins should match the version number of the feature. Having the fragment attribute set to true identifies any included fragments. 18.1.3. Feature manifest editorThe feature manifest generated by the wizard contains the barest essential elements needed to define a feature. Numerous other attributes can be defined to enhance a feature. The feature manifest editor provides a convenient interface for editing the existing attributes of a feature or adding new attributes. Double-clicking on the feature manifest file, feature.xml, will open the feature manifest editor (see Figure 18-6). The editor looks very similar to the plug-in manifest editor with Overview, Information, Plug-ins, Included Features, Dependencies, Installation, Build, feature.xml, and build.properties pages. Figure 18-6. Feature manifest editor.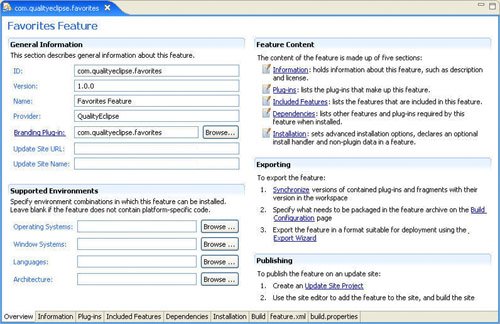
There are a lot of things happening on this page. Initially, the ID, Version, Name, and Provider fields will be filled in based on inputs to the wizard pages. There are other fields to make note of here. Branding Plug-in contains the name of the plug-in that will contain the feature branding files. Use the Browse... button to select the main plug-in or manually change the value to "com.qualityeclipse.favorites" so that it matches the ID of the main plug-in. The Update Site URL and Update Site Name fields are used to specify the Web address and name of the update site that will be used to load the feature using the Eclipse Update Manager. When the Update Manager is looking for updates to your plug-in, it will look at the sites defined by your update URLs. This is discussed in more detail in Section 18.3, Update Sites, on page 637. For most plug-ins written against the public Eclipse API, portability to different Eclipse platforms won't be a problem. Eclipse does not prevent you, however, from making use of platform-specific functionality (such as ActiveX support under Windows). In situations like that, you need to be able to specify which environments are appropriate for your plug-in. In the Supported Environments section, you can supply a comma-separated list of valid values for Operating Systems, Window Systems, Languages, and Architecture. Clicking on the Browse... button to the right of each field will open a selection dialog appropriate to the chosen environment type. For example, the choices available for Operating Systems include aix, hpux, linux, macosx, qnx, solaris, and win32 (see Figure 18-7). Figure 18-7. Portability Choices for operating systems.
On the right side of the page, the Exporting section includes a couple of interesting options. The Synchronize button is used to synchronize the version numbers of the included plug-ins and fragments with the version number of the feature. If these version numbers don't match, the Update Manager won't be able to install the feature properly. Clicking the button will open the Version Synchronization dialog (see Figure 18-8). Figure 18-8. Version Synchronization dialog.
That dialog contains three options: The first, and most useful option, is Synchronize versions on build (recommended). This will update the manifest files of all included plug-ins and fragments so that their version numbers match the version number of the feature. The second option, Copy versions from plug-in and fragment manifests, will copy the individual version numbers from each plug-in and fragment and update the corresponding plug-in entry in the feature manifest file. The final option, Force feature version into plug-in and fragment manifests, does the reverse and takes the individual version numbers defined for each plug-in in the feature manifest file and updates the manifest files of the corresponding plug-ins and fragments. Select the first option and click Finish to return to the manifest editor. The Export Wizard button is used to build and deploy the feature. Ignore this option and focus on a much more comprehensive build operation in Chapter 19, Building a Product. The Information page of the editor provides tabs for specifying Feature Description, Copyright Notice, License Agreement, and Sites to Visit information about the feature (see Figure 18-9). The feature description will be displayed by the Update Manager when the feature is selected. This information, as well as the license and copyright text, is displayed in the Properties dialog that appears when the Show Properties link is clicked within the Update Manager. Figure 18-9. Description, license, and copyright information page.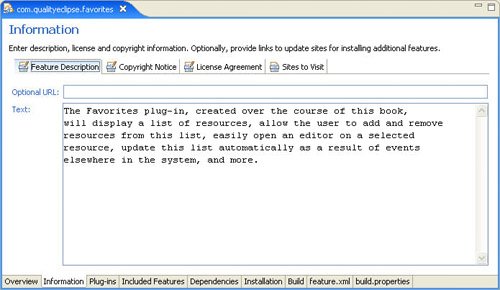
For each of these items, you can either enter text into the Text field or you can specify a URL in the Optional URL field. Unless the URL is an absolute reference to a site, the URL is assumed to point to an HTML file that is located relative to the root of the feature. The Plug-ins page of the editor lists the plug-ins and fragments contained in your feature (see Figure 18-10). In this case, you will see the same three items that were selected when the feature was originally created. Double-clicking on any of these items will open the appropriate manifest editor. Figure 18-10. Plug-ins and Fragments page.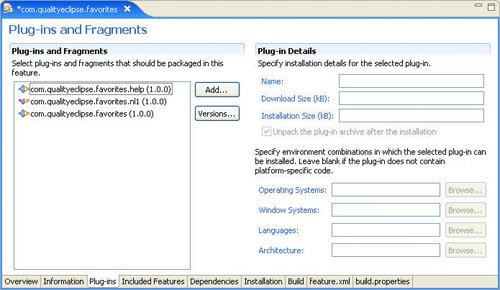
As your project gets more complex, you may need to add plug-ins or fragments and update the list of required features and plug-ins. Clicking the Add... button will open a dialog showing a list of all the plug-in and fragment projects available in your workspace. Select one or more and then click Finish to add them to the list. The Included Features page of the editor contains a list of subfeatures that are included as part of this feature (see Figure 18-11). Clicking the Add... button will allow you to select the features that should become children of the current feature. Figure 18-11. Included Features page.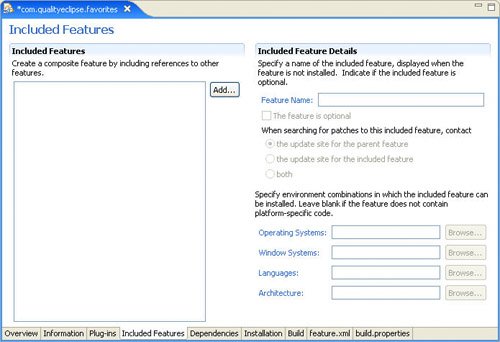
If a feature has its The feature is optional field enabled, it is not required to be present for the parent feature to be successfully loaded (it may be loaded and installed later as necessary). Optional subfeatures can also be enabled or disabled via the Update Manager independent of their parent features. The Feature Name field is used to supply a name for this feature (for display purposes) in the event that it is missing. The Dependencies page contains a list of all the features and plug-ins that must be available to install your feature (see Figure 18-12). If any of them are missing, your feature won't be able to load. As stated earlier, the list of required plug-ins was initially computed based on merging the required plug-ins specified by the plug-ins in your feature. Figure 18-12. Dependencies page.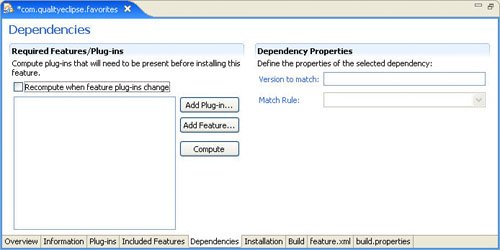
You can manually add plug-ins or features to the list by clicking the Add Plug-in... or Add Feature... buttons. Clicking the Compute button will recompute the list based on the requirements specified by the plug-ins included in the feature. For each required plug-in, you, optionally, can specify a Version to match and a Match Rule. The following choices that are available in the Match Rule field control what versions of the plug-in are acceptable prerequisites.
If the version number does not match the chosen criteria, that prerequisite will be missing and your feature will not load. In general, you will probably leave these fields blank unless your feature has very specific requirements that will cause it to fail when faced with the wrong version of some expected plug-in (as might be the case if you were using an Eclipse 3.1-specific API that was not available in earlier releases). The Installation Details page specifies whether the feature cannot be installed simultaneously with other features or must be installed in the same directory as another feature (see Figure 18-13). The This feature requires exclusive installation option is used to prevent your feature from being installed simultaneously with a number of other features. Unless there is something unique about your feature that would prevent it from being installed properly in conjunction with other features, you should leave this option unchecked. Figure 18-13. Installation Details page.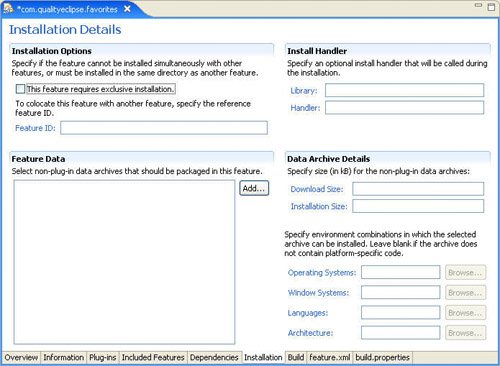
The remaining fields on the Installation Details page are used for specifying optional non-plug-in items that should be included with this feature as well as advanced installation handlers. These are beyond the scope of this book and won't be discussed further here. |