|
|
< Day Day Up > |
|
Hack 74. Import Mail into Gmail
Moving to Gmail doesn't have to mean starting from scratch. Forward mail in bulk from your computer or other web mail service to your Gmail account. The most enticing feature of Gmail is probably its ability to perform Google-style searches on your own inbox. The one gigabyte of free space is intriguing, but it's not much when you consider that you have far more than that available to you on even your most outdated PC. And I'd warrant that not even its snazzy JavaScripted user interface is enough to tear you away from your existing web mail service, uprooting yourself and starting over. Gmail doesn't currently provide any way to import your existing email archive (web mail service or desktop mailbox). While you already might have considered forwarding all that mail to your Gmail account, just how to do so—even just the few hundred "important" messages—is quite a trick. Not so, thanks to hacks like the Google Mail Loader for forwarding desktop mail and web mail intermediaries YPOPs! for Yahoo! Mail and MSN email and GetMail for Hotmail. 6.7.1. Forward Desktop MailThe Google Mail Loader (http://www.marklyon.org/gmail; GNU Public License) is a point-and-click application that reads your existing mail files on your computer and forwards the messages on to Gmail—one every two seconds, so as not to overload or otherwise annoy the Gmail servers. It does so without deleting mail from your local computer; what's sent to Gmail is a copy of each and every message. You can even set it to drop uploaded messages into your Gmail Inbox or Sent Mail folder. GML is cross-platform and understands multiple mailbox formats:
6.7.1.1 Installing the hackDownload the Windows or Linux/Mac OS X, source-only version (http://www.marklyon.org/gmail/download.htm). The Windows version is definitely the simplest version to set up and use, requiring no prerequisites and other bits and pieces. The source version assumes you have the Python scripting language and the Python Mega Widgets (http://pmw.sourceforge.net) toolkit installed.
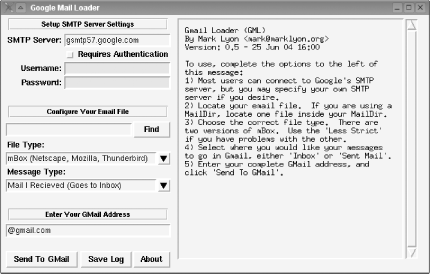
6.7.1.2 Running the hackSince Google Mail Loader works directly with your email application's mailboxes, you'll need to figure out where they live before you can go much further. Consult your email app's preferences or documentation or just dig around—both on your hard drive and by googling for "outlook express" mailbox files location, replacing "outlook express" with the name of your email program. You'll also need to make sure that your mailbox files are in a format that Google Mail Loader can read, as listed in the beginning of this hack. If there's any conversion to do, do so now. For instance, use PST Reader (http://www.mailnavigator.com/reading_ms_outlook_pst_files.html) to turn Outlook and Outlook Express PST files into DBX format. With mailbox files in hand, launch Google Mail Loader by double-clicking gmlw.exe on Windows or typing python gmlw.py on the Unix or Mac OS X command line. Figure 6-14 shows Google Mail Loader running under Linux. Figure 6-14. Google Mail Loader Work your way down the settings on the left half of the GML window:
|
If you don't know what format your mail application uses, try googling for mail format pine, replacing pine with your mail app's name. (Pine uses Mbox, by the by.)
GML is able to upload both your incoming and outgoing mail. Choose Mail I Received from the Message Type pull-down menu, and messages will be dropped into your Gmail Inbox and appear to be from the original sender, just as they did in your email application's mailbox. If you choose Mail I Sent, the messages will be relabeled as coming from your Gmail address and appear in your Gmail Sent Mail folder.
|
Finally, type in your full Gmail address (e.g., hank@gmail.com).
Click the Send to Gmail button and the application will start sending messages, one every two seconds. The delay is necessary to prevent flooding of Google's servers.
If you're interested in the details, click the Save Log button to save the contents of the output window to a file for later review.
There are, as with any hack of this sort, some issues worth noting:
The timestamp of imported messages in your Gmail Inbox will be that of when the message was received by Google. Inside the message itself, however, the original date is still preserved. You can search for parts of dates to retrieve matching messages: Aug 94, for instance, will find all messages from August of 1994.
The count of messages in your Inbox will not match the number GML reports as sent. This is due to the fact that the number GML reports is the number of new threads, not individual messages. Gmail automatically groups related messages as they arrive.
Some people, especially users of Mozilla or Firefox, report problems with their Mbox files being corrupt. I have tracked down a Python script (http://www.marklyon.org/gmail/cleanmbox.py) that'll clean up most of these problems.
Importing mail from Outlook is a bit spotty. I recommend one of two things: import your Outlook mail into Outlook Express and then into the open source Thunderbird mail application (http://www.mozilla.org/products/thunderbird/), or use PST Reader or the like to convert your Outlook mail to Mbox.
If you're a command-line jockey or don't particularly relish installing the various prerequisites (Tk, Python Mega Widgets) necessary to get the graphical version of Google Mail Loader running, there's also a text-only version available at http://www.marklyon.org/gmail/old/default.htm.
|
Here's a sample session with the older GML on the Mac OS X command line:
$ python gml.py

Mbox & Maildir to Google Mail Loader (GML) by Mark Lyon <mark@marklyon.org>


Usage: gml.exe [mbox or maildir] [mbox file or maildir path] [gmail address] [Optional

SMTP Server]

Exmpl: gml.exe mbox "c:\mail\Inbox" marklyon@gmail.com

Exmpl: gml.exe maildir "c:\mail\Inbox" marklyon@gmail.com gsmtp171.google.com


$ python gml.py mbox ~/Library/Mail/Mailboxes/1999.mbox/mbox 'hank+gml@gmail.com'


Mbox & Maildir to Google Mail Loader (GML) by Mark Lyon <mark@marklyon.org>


    1 Forwarded a message from  : someone@example.com


Done. Stats: 1 success 0 error 0 skipped.Despite attempts by your existing web mail service to entice you to stay, Gmail beckons with its one gigabyte of storage, powerful search, rich web interface, and chance of grabbing a better email address than raelity973@. That said, you're loathe to leave behind the last year or three's email.
Well, you can indeed take it with you, thanks to some nice donateware Web-to-POP mail utilities. These intermediaries operate in one of two ways:
The utility sits between your desktop email application and web mail service, allowing you to download all of your mail to your computer, after which you can use the Google Mail Loader to feed it all to Gmail.
The utility combines these two steps into one, grabbing all of your web mail and forwarding it on in bulk to your Gmail account.
While there are no doubt any number of these utilities, two we stumbled across were GetMail and YPOPs!
|
GetMail (http://www.e-eeasy.com/GetMail.aspx; donate-ware) is a two-in-one for Hotmail and MSN that runs under Windows.
Move any messages that you want to send across to your Gmail account to your Hotmail Inbox (if you've previously filed them elsewhere) and mark them as unread.
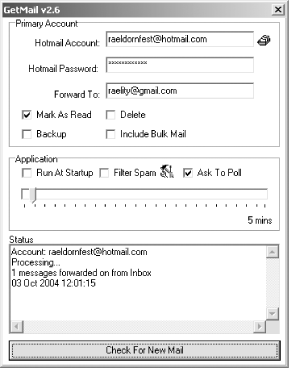
Launch GetMail (shown in Figure 6-16), provide it with your Hotmail/MSN account name and password, and type your full Gmail address into the Forward To box. Check whatever options you prefer; I'd uncheck the Delete checkbox. Now click Check for New Mail to set GetMail in motion and go get a cup of coffee while it moves all those messages across for you. You can even leave it running, transferring your Hotmail messages to Gmail on an ongoing basis.

YPOPs! (http://yahoopops.sourceforge.net/; donateware) is a POP mail proxy, sitting between your preferred email application and Yahoo! Mail. It is available for Windows, Mac OS X, Linux, and Solaris. The Windows version self-installs while the others require that you compile from source code and so are a little more difficult for the uninitiated to get up and running.
Move any messages you want to download and carry across to Gmail into your Yahoo! Mail Inbox and mark them as unread.
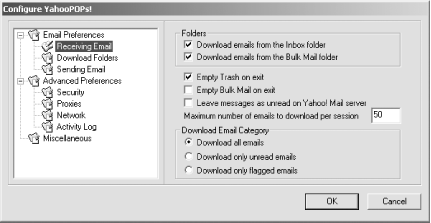
On Windows, run YPOPs! after installation. A little icon appears in your Windows taskbar; double-click it to get to the settings, shown in Figure 6-17.

While you can go ahead and make a few changes in the settings, YPOPs! runs right out of the box without any further configuration.
Now, simply set up a POP mail account like any other, only pointing to YPOPs! running locally as your mail server—both incoming and outgoing. The YPOPs! site has details on configuring most email clients at http://yahoopops.sourceforge.net/modules.php?op=modload&name=Sections&file=index&req=listarticles&secid=1.
Once you have downloaded all of your web mail to your computer, use the Google Email Loader to send all the contents of your local inbox to Gmail.
GmailerXP (http://gmailerxp.sourceforge.net; donateware) is the be-all and end-all of Gmail/Windows integration, providing a full-featured frontend to your Gmail email, importing and uploading legacy messages to Gmail, new mail notification, and so on.
Mark Lyon, Justin Blanton, and Rael Dornfest
|
|
< Day Day Up > |
|