Previous Page
Next Page

Working with Multiple Rollovers

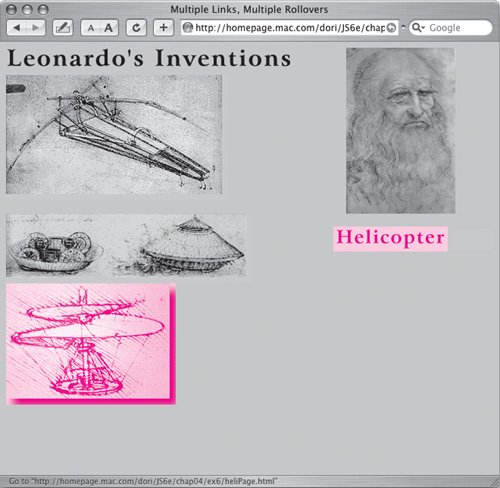
What if you want the image that triggers the rollover to also be a rollover itself? Figure 4.9 builds on the last example and shows how we've added this feature. When you roll over one of the invention images, it makes the description image appear, as before, but this time also swaps out the invention image for another image with a drop shadow. This gives the user visual feedback about what they're pointing at (as if the mouse pointer isn't enough!). Script 4.10 is the HTML page (no changes except for the title and the name of the external JavaScript file being called), and Script 4.11 shows the additions to the JavaScript from the previous example.

Figure 4.9. When you roll over one of the images, a description appears and a drop shadow appears around the image itself.


Script 4.10. This HTML is identical to Script 4.8, except for the title and reference to the external script.

<!DOCTYPE html PUBLIC "-//W3C//DTD XHTML 1.0 Transitional//EN">
<html xmlns="http://www.w3.org/1999/xhtml">
<head>
     <title>Multiple Links, Multiple Rollovers</title>
     <script src="script06.js" language= "javascript" type="text/javascript"> </script>
</head>
<body bgcolor="#EECC99">
     <img src="images/DaVinci.jpg" width="144" height="219" alt="DaVinci" align="right"
 hspace="50" />
     <img src="images/leoText.gif" width="375" height="26" alt="Leonardo's Inventions" />
     <a href="flyPage.html" class="textField" id="flyer"><img src="images/flyer.gif" 
width="293" height="165" border="0" alt="Flying Machine" vspace="10" id="flyerImg" /></
a><br clear="right" />
     <img src="images/bg.gif" width="208" height="27" id="textField" alt="Text Field"
 align="right" vspace="20" />
     <a href="tankPage.html" class="textField" id="tank"><img src="images/tank.gif" 
width="325" height="92" border="0" alt="Tank" id="tankImg" /></a><br />
     <a href="heliPage.html" class="textField" id="helicopter"><img src="images/
 helicopter.gif" width="224" height="160" border="0" alt="Helicopter" id="helicopterImg" /></a>
</body>
</html>

Script 4.11. This script handles the multiple rollovers.

window.onload = rolloverInit;

function rolloverInit() {
     for (var i=0; i<document.links.length; i++) {
        var linkObj = document.links[i];
        if (linkObj.className) {
           var imgObj = document.getElementById(linkObj.className);
           if (imgObj) {
              setupRollover(linkObj,imgObj);
           }
        }
     }
}

function setupRollover(thisLink,textImage) {
     thisLink.imgToChange = new Array;
     thisLink.outImage = new Array;
     thisLink.overImage = new Array;

     thisLink.imgToChange[0] = textImage;
     thisLink.onmouseout = rollOut;
     thisLink.onmouseover = rollOver;

     thisLink.outImage[0] = new Image();
     thisLink.outImage[0].src = textImage.src;

     thisLink.overImage[0] = new Image();
     thisLink.overImage[0].src = "images/" + thisLink.id + "Text.gif";

     var rolloverObj = document.getElementById(thisLink.id + "Img");
     if (rolloverObj) {
        thisLink.imgToChange[1] = rolloverObj;

        thisLink.outImage[1] = new Image();
        thisLink.outImage[1].src = rolloverObj.src;
        thisLink.overImage[1] = new Image();
        thisLink.overImage[1].src = "images/" + thisLink.id + "_on.gif";
     }
}

function rollOver() {
     for (var i=0;i<this.imgToChange.length; i++) {
        this.imgToChange[i].src = this.overImage[i].src;
     }
}

function rollOut() {
     for (var i=0;i<this.imgToChange.length; i++) {
        this.imgToChange[i].src = this.outImage[i].src;
     }
}

To work with multiple rollovers:

1.
thisLink.imgToChange = new Array;
thisLink.outImage = new Array;
thisLink.overImage = new Array;


These lines were added because the script has more images to work with (two for each rollover). In each line, we're creating a new property of thisLink, each of which is a new kind of object, called an array. An array is an object that contains a set of related information. One way to access the contents of an array is numerically inside square brackets. For example, thisLink.imgToChange[0] is the first member of the array. Most numbering of objects in JavaScript begins with 0, rather than 1. See the "JavaScript Strings" sidebar in Chapter 3.

2.
thisLink.imgToChange[0] = textImage;


In the previous task, imgToChange was an image, but in this task, it's an array that will contain images. Here, textImage is stored in the first element of imgToChange.

3.
thisLink.outImage[0] = new Image();
thisLink.outImage[0].src = textImage.src;


As previously, we need to store the out (off) version of the image, but this time it's stored in the first element of the outImage array.

4.
thisLink.overImage[0] = new Image();
thisLink.overImage[0].src = "images/" + thisLink.id + "Text.gif";


Similarly, the over (on) version of the image is calculated and stored in the first element of overImage.

5.
var rolloverObj = document.getElementById(thisLink.id + "Img");
if (rolloverObj) {


Now we need to figure out if this rollover will trigger multiple images, not just an individual image. If that's the case, there will be an element on the HTML page whose id is the same as this one, but with Img appended. That is, if we're working on flyer, we'll be checking to see if there's a flyerImg element on the page. If there is, it's saved in rolloverObj, and we should do the next three steps.

6.
thisLink.imgToChange[1] = rolloverObj;


In the same way that we set imgToChange[0] above, we now set imgToChange[1] (the second element in the array) to the new rolloverObj. When the onmouseout and onmouseover event handlers are triggered, both images swap to their alternate versions, as we'll see later.

7.
thisLink.outImage[1] = new Image();
thisLink.outImage[1].src = rolloverObj.src;


This sets the second array element of outImage to the out (off) version of the image.

8.
thisLink.overImage[1] = new Image();
thisLink.overImage[1].src = "images/" + thisLink.id + "_on.gif";


And here, the over (on) version of the image is calculated and stored in the second element of overImage.

If, for some reason, we wanted a third image to also change during this same rollover, we'd repeat steps 68 with the third image object.

9.
for (var i=0; i<this.imgToChange. length; i++) {
   this.imgToChange[i].src = this.overImage[i].src;
}

Here inside the rollOver() function is where the images get swapped. Because one or more images can be changed, we need to start by asking how many images we have storedthat's the value of this.imgToChange.length. Here, the value is 2, because we want two images to change. We then loop through two times, setting the source of imgToChange[0] and then imgToChange[1] to their respective over values.

10.
function rollOut() {
  for (var i=0; i<this. imgToChange.length; i++) {
     this.imgToChange[i].src = this.outImage[i].src;
  }


This code in the rollOut() function is virtually the same as that in the previous step; the only difference is that we're now resetting those images to their out source values.

Tips

  • It's important to remember that every image that ever gets rolled over must have a unique id.

  • What if you want some of the links on your page to trigger multiple rollovers, but others to be individual rollovers? No problem you don't even need to change a line of JavaScript. So long as the check in step 5 doesn't find the alternate id on the page, no second element is stored, and the rollOver() and rollOut() loops only animate the initial image.


Previous Page
Next Page